Перейти к основному содержанию

iMac Intel 24" EMC 2134 and 2211 Front Bezel Replacement

Выберете то, что вам нужно

  1. iMac Intel 24" EMC 2134 and 2211 Front Bezel Replacement, Access Door: шаг 1, изображение 1 из 1
    • Loosen the single Phillips screw in the center of the access door.

    • This screw is captive in the access door.

    • Remove the access door from your iMac.
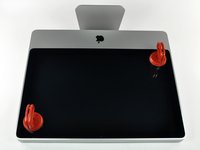
  2. iMac Intel 24" EMC 2134 and 2211 Front Bezel Replacement, Glass Panel: шаг 2, изображение 1 из 2 iMac Intel 24" EMC 2134 and 2211 Front Bezel Replacement, Glass Panel: шаг 2, изображение 2 из 2
    Инструмент, используемый на этом этапе:
    Heavy-Duty Suction Cups (Pair)
    $14.95
    Купить
    • The glass panel is fixed onto the front bezel with fourteen magnets around its perimeter.

    • Stick two suction cups to opposing corners of the glass panel.

    • To attach the suction cups we sell, first position the suction cup with the movable handle parallel to the face of the glass panel. While lightly holding the suction cup against the glass, raise the movable handle until it is parallel with the other handle.

    • If your suction cups refuse to stick, try cleaning both the glass panel and the suction cup with a mild solvent such as Windex.

  3. iMac Intel 24" EMC 2134 and 2211 Front Bezel Replacement: шаг 3, изображение 1 из 1
    • Gently pull the glass panel straight up off the iMac.

    • The glass panel has several positioning pins around its perimeter. To avoid shearing these pins off the glass panel, be sure to only pull straight up during removal.

    • Be meticulous about cleaning the LCD and the inside face of the glass panel before reinstallation, as any fingerprints or dust trapped inside will be annoyingly visible when the display is on.

  4. iMac Intel 24" EMC 2134 and 2211 Front Bezel Replacement, Front Bezel: шаг 4, изображение 1 из 2 iMac Intel 24" EMC 2134 and 2211 Front Bezel Replacement, Front Bezel: шаг 4, изображение 2 из 2
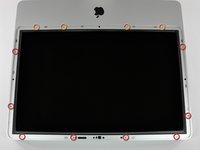
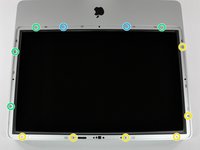
    • Remove the following 12 screws securing the front bezel to the rear case:

    • Eight 13 mm T8 Torx screws

    • Four 25 mm T8 Torx screws

    • You may have different-length screws depending on your model:

    • Six 13 mm T8 Torx screws

    • Four 25 mm T8 Torx screws

    • Two 35 mm T8 Torx screws

  5. iMac Intel 24" EMC 2134 and 2211 Front Bezel Replacement: шаг 5, изображение 1 из 2 iMac Intel 24" EMC 2134 and 2211 Front Bezel Replacement: шаг 5, изображение 2 из 2
    • The front bezel is still attached to the iMac by the microphone cable.

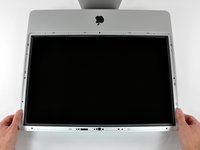
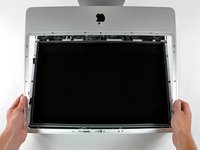
    • Gently lift the front bezel from its top edge off the rear case. It helps to use your thumbs to push down very gently on the corners of the display.

    • Once the top edge of the front bezel has cleared the rear case, rotate the front bezel toward the stand and lift it off the rear case.

    • When reinstalling the front bezel, start at the lower edge and make sure it is flush with the rear case before lowering the top edge onto the iMac.

  6. iMac Intel 24" EMC 2134 and 2211 Front Bezel Replacement: шаг 6, изображение 1 из 1
    • Disconnect the microphone cable connector, removing tape as necessary.

    • For the front bezel to sit properly, be sure to tuck the microphone cable and connector into the void next to the camera board.

Заключение

To reassemble your device, follow these instructions in reverse order.

37 участников успешно повторили данное руководство.

Brittany McCrigler

Участник с: 03/05/12

88 898 Репутация

Автор 131 руководств

Команда

iFixit Участник iFixit

Staff

136 членов

Автор 16 562 руководств

Один комментарий

Te damos las gracias por tomarte el tiempo de mostrarnos tan útiles consejos, saludos!

Raul Jeronimo - Ответить

Добавить комментарий

Просмотр статистики:

За последние 24часов: 1

За последние 7 дней: 7

За последние 30 дней: 61

За всё время: 24,538