Перейти к основному содержанию

Эта версия возможно содержит некорректные исправления. Переключить на последнюю проверенную версию.

Выберете то, что вам нужно

  1. Этот шаг не переведен. Помогите перевести

    : шаг 1, изображение 1 из 1
    Инструмент, используемый на этом этапе:
    iMac Intel 27" Cardboard Service Wedge
    $4.99
    Купить
    • With the hinge free to move, the iMac will be unbalanced and hard to work on. Repairs can be completed with the iMac laying down, but are faster and easier with an iMac service wedge.

    • If you are using the iFixit cardboard service wedge, follow these assembly directions to put it together.

  2. Этот шаг не переведен. Помогите перевести

    : шаг 2, изображение 1 из 3 : шаг 2, изображение 2 из 3 : шаг 2, изображение 3 из 3
    • Starting on the left of the display, near the power button, insert the iMac Opening Tool into the gap between the glass panel and the rear case.

    • The hub on the iMac Opening Tool will keep you from pushing the wheel in too far. If using a different tool, insert no more than 3/8" (9.5 mm) into the display. You risk severing antenna cables and causing serious damage.

  3. Этот шаг не переведен. Помогите перевести

    : шаг 3, изображение 1 из 3 : шаг 3, изображение 2 из 3 : шаг 3, изображение 3 из 3
    • Use the tool like a pizza cutter—roll it along through the gap, and it will cut the foam adhesive through the center.

    • Be sure to always push with the handle behind the cutting wheel. If you pull, the wheel might get pulled out of the handle.

    • Run the tool up along the left side of the display.

  4. Этот шаг не переведен. Помогите перевести

    : шаг 4, изображение 1 из 3 : шаг 4, изображение 2 из 3 : шаг 4, изображение 3 из 3
    • Continue wheeling the tool up around the top left corner.

  5. Этот шаг не переведен. Помогите перевести

    : шаг 5, изображение 1 из 2 : шаг 5, изображение 2 из 2
    • Cut the adhesive along the top left of the display.

  6. Этот шаг не переведен. Помогите перевести

    : шаг 6, изображение 1 из 2 : шаг 6, изображение 2 из 2
    • Continue along the top of the display.

    • You may want to run the tool back and forth through what you've already cut a few times, to ensure you get as much of the adhesive separated as possible.

  7. Этот шаг не переведен. Помогите перевести

    : шаг 7, изображение 1 из 3 : шаг 7, изображение 2 из 3 : шаг 7, изображение 3 из 3
    • Push the tool around the top right corner of the display.

  8. Этот шаг не переведен. Помогите перевести

    : шаг 8, изображение 1 из 2 : шаг 8, изображение 2 из 2
    • Wheel the tool down along the right side of the display.

  9. Этот шаг не переведен. Помогите перевести

    : шаг 9, изображение 1 из 2 : шаг 9, изображение 2 из 2
    • Finish pushing the opening tool to the bottom of the right side of the display.

    • At this point, you'll want to run the tool back around the entire display, to ensure you cut as much adhesive as possible.

  10. Этот шаг не переведен. Помогите перевести

    : шаг 10, изображение 1 из 3 : шаг 10, изображение 2 из 3 : шаг 10, изображение 3 из 3
    Инструмент, используемый на этом этапе:
    Plastic Cards
    $2.99
    Купить
    • While the opening tool did the lion's share of the work, the display will still be slightly adhered to the case. A plastic card will be necessary to free up the last of this adhesive.

    • Set the iMac face-up on a table.

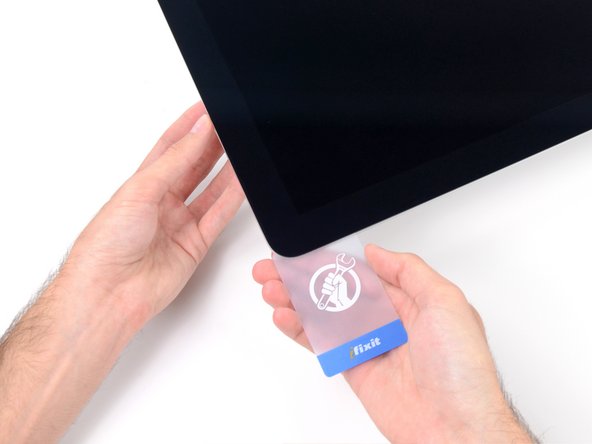
    • Starting from the top right corner of the iMac, insert a plastic card between the display and frame.

    • Be careful not to insert it more than 3/8" (9.5 mm), or you may damage internal components.

  11. Этот шаг не переведен. Помогите перевести

    : шаг 11, изображение 1 из 2 : шаг 11, изображение 2 из 2
    • Gently twist the plastic card to open the space between the display and frame, and cut any remaining adhesive near the corner.

    • Using too much force will crack the glass. Work carefully, and don't try to create a gap any larger than about 1/4" (6 mm).

  12. Этот шаг не переведен. Помогите перевести

    : шаг 12, изображение 1 из 3 : шаг 12, изображение 2 из 3 : шаг 12, изображение 3 из 3
    • Be sure to stop cutting before the iSight camera in this step, or you may damage it.

    • Slide the card toward the center of the display, to cut any remaining adhesive.

  13. Этот шаг не переведен. Помогите перевести

    : шаг 13, изображение 1 из 2 : шаг 13, изображение 2 из 2
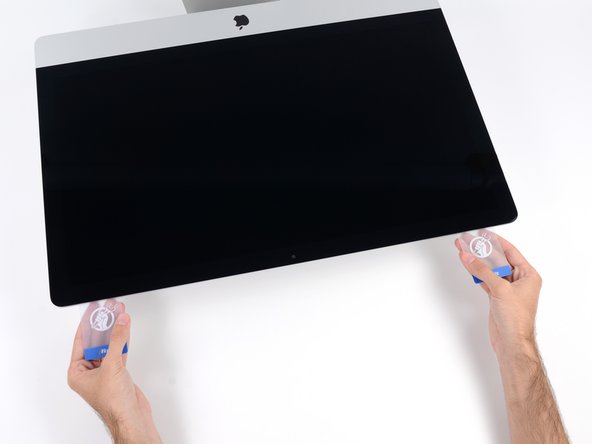
    • Put the card into the corner again and let it stay there to keep the adhesive from resettling.

  14. Этот шаг не переведен. Помогите перевести

    : шаг 14, изображение 1 из 3 : шаг 14, изображение 2 из 3 : шаг 14, изображение 3 из 3
    • Insert a second card into the gap between the display and frame in the top left corner.

  15. Этот шаг не переведен. Помогите перевести

    : шаг 15, изображение 1 из 2 : шаг 15, изображение 2 из 2
    • Gently twist the card, slightly increasing the space between the display and frame.

    • As with the other side, move slowly to allow the adhesive to break, and be careful not to over-stress the display glass.

  16. Этот шаг не переведен. Помогите перевести

    : шаг 16, изображение 1 из 3 : шаг 16, изображение 2 из 3 : шаг 16, изображение 3 из 3
    • Slide the plastic card toward the center, again stopping just before the iSight camera.

  17. Этот шаг не переведен. Помогите перевести

    : шаг 17, изображение 1 из 2 : шаг 17, изображение 2 из 2
    • Insert the card back into the top left corner.

  18. Этот шаг не переведен. Помогите перевести

    : шаг 18, изображение 1 из 3 : шаг 18, изображение 2 из 3 : шаг 18, изображение 3 из 3
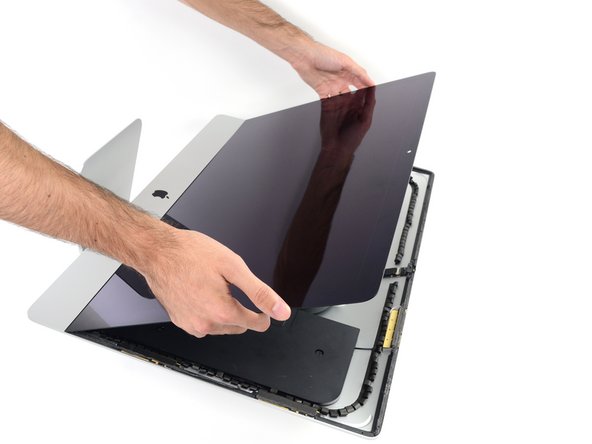
    • Only lift the display a few inches—it is still attached to the iMac by data and power cables.

    • With the cards inserted as shown near the corners, gently twist the cards to increase the gap between display and case.

    • If there are any sections that seem to stick and won't separate, stop twisting and use one of the cards to cut the adhesive in the problem area.

    • Begin to lift the top of the display up from the frame.

  19. Этот шаг не переведен. Помогите перевести

    : шаг 19, изображение 1 из 2 : шаг 19, изображение 2 из 2
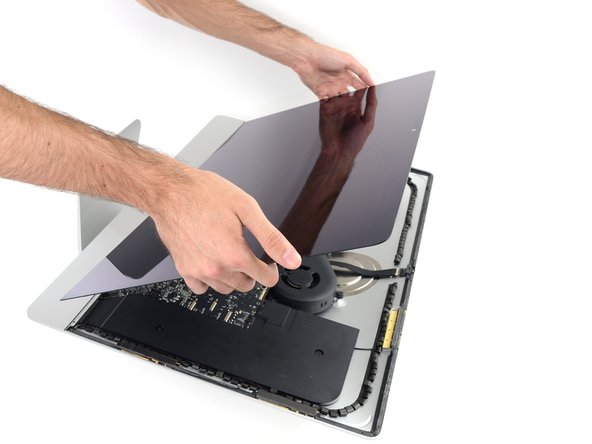
    • While holding the display up with one hand, use the other to unplug the display power cable.

    • Lift the display up enough to have easy access to the connections, but not so much that you stretch the cables and stress their connections (about 8").

  20. Этот шаг не переведен. Помогите перевести

    : шаг 20, изображение 1 из 3 : шаг 20, изображение 2 из 3 : шаг 20, изображение 3 из 3
    • Flip up the metal retaining bracket on the display data cable.

    • Disconnect the display data cable.

    • This is a delicate connection that can easily be broken. Be sure to pull the display data cable connector straight out of its socket, toward the top of the iMac.

  21. Этот шаг не переведен. Помогите перевести

    : шаг 21, изображение 1 из 2 : шаг 21, изображение 2 из 2
    • Lift the display up to a near-vertical position.

    • At this point there is still a strip of adhesive along the bottom of the display, that will hold the display to the frame like a hinge. You can loosen this adhesive by working the display up and down a few times.

    • Remove as much of the adhesive as possible by grabbing it at the outer edges, and then pulling or rolling it towards the middle.

  22. Этот шаг не переведен. Помогите перевести

    : шаг 22, изображение 1 из 3 : шаг 22, изображение 2 из 3 : шаг 22, изображение 3 из 3
    • Be very careful not to touch the capacitor leads or any exposed solder joints on the back of the power supply (boxed in red).

    • If necessary, a plastic card can be used to cut any remaining sections of the bottom adhesive strip.

  23. Этот шаг не переведен. Помогите перевести

    : шаг 23, изображение 1 из 3 : шаг 23, изображение 2 из 3 : шаг 23, изображение 3 из 3
    • Be very careful handling the display—it's big, heavy, and made of glass. The display has fragile edges. Avoid lifting the display by the corners.

    • Lift the display up from the frame and remove it from the iMac. Lay the display face down on a flat, soft surface.

    • It may be necessary to slowly lift from one side, to peel against the remaining adhesive.

    • After the adhesive is cut, it cannot be used to re-seal the display in place. Follow this guide when your repair is complete to replace the adhesive strips that secure the display to the rear enclosure.

  24. Этот шаг не переведен. Помогите перевести

    : шаг 24, изображение 1 из 1
    • If you are replacing the display panel, you may need to transfer additional components from the old panel to the new one. Compare the back of the old display with the replacement display. Note all cables, sensors, and foam cushioning that are missing from the new display.

    • If there is a wire or cable underneath adhesive tape, always pull the tape off first.

    • If the cable is glued to the chassis, use a heated iOpener or a hair dryer to soften the adhesive first. You can then slide an opening pick underneath the cable to loosen it. Never pull directly on the delicate connectors.

    • Slide an opening pick underneath the foam cushion pieces to separate them from the display, and gently pull them off. You may need some double sided tape to re-attach them to the new display.

  25. Этот шаг не переведен. Помогите перевести

    : шаг 25, изображение 1 из 1
    • Use a T10 driver to remove the two 10 mm screws securing the left speaker.

  26. Этот шаг не переведен. Помогите перевести

    : шаг 26, изображение 1 из 2 : шаг 26, изображение 2 из 2
    • Shift the loosened left speaker to the left—enough to uncover the hard drive bracket screws.

  27. Этот шаг не переведен. Помогите перевести

    : шаг 27, изображение 1 из 2 : шаг 27, изображение 2 из 2
    • Pull straight up on the SATA combo cable to disconnect it from the drive.

  28. Этот шаг не переведен. Помогите перевести

    : шаг 28, изображение 1 из 1
    • Use a T8 driver to remove the two 7.3 mm screws securing the left hard drive bracket to the rear case.

  29. Этот шаг не переведен. Помогите перевести

    : шаг 29, изображение 1 из 3 : шаг 29, изображение 2 из 3 : шаг 29, изображение 3 из 3
    • Grab the hard drive and left hard drive bracket together.

    • Tilt the left side away from the rear case, and slide the assembly to the left.

    • Remove the hard drive and left hard drive bracket from the iMac.

  30. Этот шаг не переведен. Помогите перевести

    : шаг 30, изображение 1 из 2 : шаг 30, изображение 2 из 2
    • Remove the left hard drive bracket.

  31. Этот шаг не переведен. Помогите перевести

    : шаг 31, изображение 1 из 1
    • Remove the four 8.1 mm T8 screw posts from the hard drive, and transfer them to the replacement drive enclosure.

  32. Этот шаг не переведен. Помогите перевести

    : шаг 32, изображение 1 из 3 : шаг 32, изображение 2 из 3 : шаг 32, изображение 3 из 3
    • Follow the remaining steps if you are replacing your hard drive with an SSD kit.

    • If your SSD enclosure looks like the first image, follow this guide instead.

    • Line up the SSD connectors with the metal enclosure's sockets.

    • Press the drive against the enclosure sockets until the SSD is firmly seated.

    • The SSD connects with the enclosure in only one direction. If the connectors don't line up, rotate the SSD and try again.

  33. Этот шаг не переведен. Помогите перевести

    : шаг 33, изображение 1 из 3 : шаг 33, изображение 2 из 3 : шаг 33, изображение 3 из 3
    • Use a Phillips screwdriver to install the four silver screws (two on each side) along the edges of the SSD to secure it to the enclosure.

  34. Этот шаг не переведен. Помогите перевести

    : шаг 34, изображение 1 из 2 : шаг 34, изображение 2 из 2
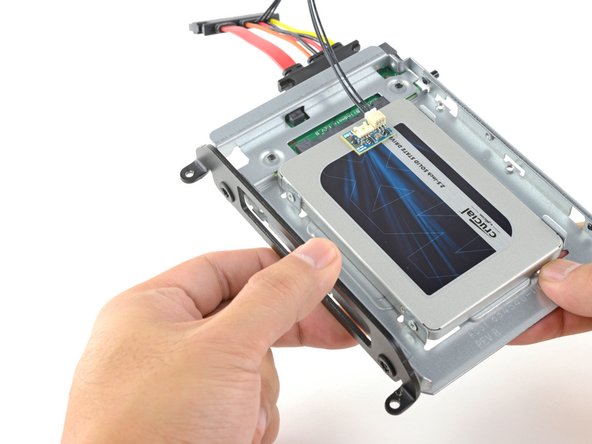
    • Plug the included sensor-enabled combo cable into the enclosure's port.

    • The cable is keyed to connect in only one orientation. If you can't connect the cable, rotate it 180° and try again.

  35. Этот шаг не переведен. Помогите перевести

    : шаг 35, изображение 1 из 3 : шаг 35, изображение 2 из 3 : шаг 35, изображение 3 из 3
    • Peel the white liner off the back of the small temperature sensor board in order to expose the adhesive.

    • Adhere the temperature sensor board to an exposed, metal surface of the SSD, close to the SATA connector.

    • Fold the excess temperature sensor wires so that they are out of the way while you install the enclosure.

  36. Этот шаг не переведен. Помогите перевести

    : шаг 36, изображение 1 из 2 : шаг 36, изображение 2 из 2
    • Use a T8 driver to install the mounting pins from the old hard drive onto the sides of the enclosure.

  37. Этот шаг не переведен. Помогите перевести

    : шаг 37, изображение 1 из 2 : шаг 37, изображение 2 из 2
    • Attach any mounting brackets removed from the old hard drive onto the enclosure.

  38. Этот шаг не переведен. Помогите перевести

    : шаг 38, изображение 1 из 2 : шаг 38, изображение 2 из 2
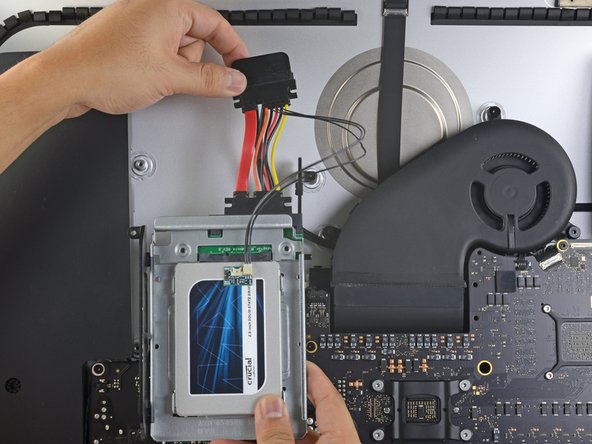
    • Connect the iMac's combo cable to the new temperature-enabled combo cable.

  39. Этот шаг не переведен. Помогите перевести

    : шаг 39, изображение 1 из 3 : шаг 39, изображение 2 из 3 : шаг 39, изображение 3 из 3
    • The images used in this step come from a 2017 iMac. Your cables may look slightly different, but the procedure remains the same.

    • Slide the SSD enclosure into the space previously occupied by the hard drive.

    • Route the cables so that they will not interfere with any other components.

    • Try to keep the cables free from any sharp bends, and route them such that they are not pinched.

Финишная черта

222 участников успешно повторили данное руководство.

54 Комментариев

Hi,

I'd like to buy this imac with ssd-pci, it's possible to add a new hard disk 3.5???

Do I need some cables???

thank you

Antonio - Ответить

Dear Antonio have solved your question? I would put a 1TB SSD instead of HDD, but having bought the model with pre-installed SSD pci. Before opening the mac I wanted to know what was needed to do the upgrade ...

obi2Kenob -

How are the temperature sensing and fan speeds affected by a swap? In the future if I install an SSD I wouldn't want the fans going full speed.

shaolindave - Ответить

The fans will go a little crazy because of the swap. At my work they swapped the HDD with an SSD and installed software to maintain that. You can download either, which I believe work just fine:

http://exirion.net/ssdfanctrl/

http://www.hddfancontrol.com/

Danny -

Didn’t affect my SSD replacement at all and I didn’t use any thermal sensor. iMac works just as before. SSD was Samsung 870QVO

James Clive -

Добавить комментарий

Просмотр статистики:

За последние 24часов: 38

За последние 7 дней: 237

За последние 30 дней: 1,158

За всё время: 256,700