Эта версия возможно содержит некорректные исправления. Переключить на последнюю проверенную версию.
Выберете то, что вам нужно
-
Этот шаг не переведен. Помогите перевести
-
With the hinge free to move, the iMac will be unbalanced and hard to work on. Repairs can be completed with the iMac laying down, but are faster and easier with an iMac service wedge.
-
If you are using the iFixit cardboard service wedge, follow these assembly directions to put it together.
-
-
Этот шаг не переведен. Помогите перевести
-
Starting on the left of the display, near the power button, insert the iMac Opening Tool into the gap between the glass panel and the rear case.
-
-
Этот шаг не переведен. Помогите перевести
-
Use the tool like a pizza cutter—roll it along through the gap, and it will cut the foam adhesive through the center.
-
Run the tool up along the left side of the display.
-
-
Этот шаг не переведен. Помогите перевести
-
Finish pushing the opening tool to the bottom of the right side of the display.
-
-
Этот шаг не переведен. Помогите перевести
-
Set the iMac face-up on a table.
-
Starting from the top right corner of the iMac, insert a plastic card between the display and frame.
-
-
Этот шаг не переведен. Помогите перевести
-
Gently twist the plastic card to open the space between the display and frame, and cut any remaining adhesive near the corner.
-
-
Этот шаг не переведен. Помогите перевести
-
Slide the card toward the center of the display, to cut any remaining adhesive.
-
-
Этот шаг не переведен. Помогите перевести
-
Put the card into the corner again and let it stay there to keep the adhesive from resettling.
-
-
-
Этот шаг не переведен. Помогите перевести
-
Insert a second card into the gap between the display and frame in the top left corner.
-
-
Этот шаг не переведен. Помогите перевести
-
Gently twist the card, slightly increasing the space between the display and frame.
-
-
Этот шаг не переведен. Помогите перевести
-
Slide the plastic card toward the center, again stopping just before the iSight camera.
-
-
Этот шаг не переведен. Помогите перевести
-
With the cards inserted as shown near the corners, gently twist the cards to increase the gap between display and case.
-
If there are any sections that seem to stick and won't separate, stop twisting and use one of the cards to cut the adhesive in the problem area.
-
Begin to lift the top of the display up from the frame.
-
-
Этот шаг не переведен. Помогите перевести
-
While holding the display up with one hand, use the other to unplug the display power cable.
-
-
Этот шаг не переведен. Помогите перевести
-
Flip up the metal retaining bracket on the display data cable.
-
Disconnect the display data cable.
-
-
Этот шаг не переведен. Помогите перевести
-
Lift the display up to a near-vertical position.
-
Remove as much of the adhesive as possible by grabbing it at the outer edges, and then pulling or rolling it towards the middle.
-
-
Этот шаг не переведен. Помогите перевести
-
If necessary, a plastic card can be used to cut any remaining sections of the bottom adhesive strip.
-
-
Этот шаг не переведен. Помогите перевести
-
Lift the display up from the frame and remove it from the iMac. Lay the display face down on a flat, soft surface.
-
It may be necessary to slowly lift from one side, to peel against the remaining adhesive.
-
-
Этот шаг не переведен. Помогите перевести
-
If there is a wire or cable underneath adhesive tape, always pull the tape off first.
-
If the cable is glued to the chassis, use a heated iOpener or a hair dryer to soften the adhesive first. You can then slide an opening pick underneath the cable to loosen it. Never pull directly on the delicate connectors.
-
Slide an opening pick underneath the foam cushion pieces to separate them from the display, and gently pull them off. You may need some double sided tape to re-attach them to the new display.
-
-
Этот шаг не переведен. Помогите перевести
-
Use a T10 driver to remove the two 10 mm screws securing the left speaker.
-
-
Этот шаг не переведен. Помогите перевести
-
Shift the loosened left speaker to the left—enough to uncover the hard drive bracket screws.
-
-
Этот шаг не переведен. Помогите перевести
-
Pull straight up on the SATA combo cable to disconnect it from the drive.
-
-
Этот шаг не переведен. Помогите перевести
-
Use a T8 driver to remove the two 7.3 mm screws securing the left hard drive bracket to the rear case.
-
-
Этот шаг не переведен. Помогите перевести
-
Grab the hard drive and left hard drive bracket together.
-
Tilt the left side away from the rear case, and slide the assembly to the left.
-
Remove the hard drive and left hard drive bracket from the iMac.
-
-
Этот шаг не переведен. Помогите перевести
-
Remove the four 8.1 mm T8 screw posts from the hard drive, and transfer them to the replacement drive enclosure.
-
-
Этот шаг не переведен. Помогите перевести
-
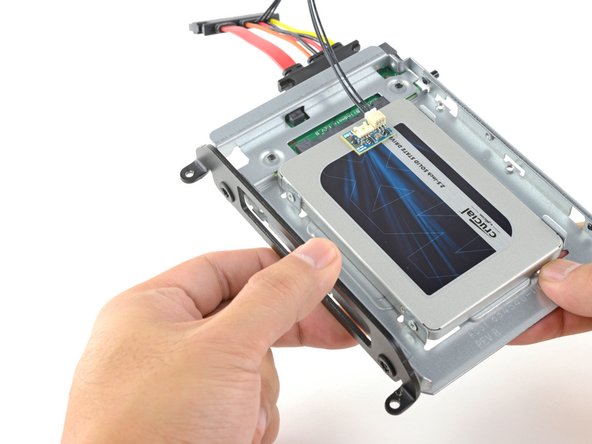
Line up the SSD connectors with the metal enclosure's sockets.
-
Press the drive against the enclosure sockets until the SSD is firmly seated.
-
-
Этот шаг не переведен. Помогите перевести
-
Use a Phillips screwdriver to install the four silver screws (two on each side) along the edges of the SSD to secure it to the enclosure.
-
-
Этот шаг не переведен. Помогите перевести
-
Plug the included sensor-enabled combo cable into the enclosure's port.
-
-
Этот шаг не переведен. Помогите перевести
-
Peel the white liner off the back of the small temperature sensor board in order to expose the adhesive.
-
Adhere the temperature sensor board to an exposed, metal surface of the SSD, close to the SATA connector.
-
Fold the excess temperature sensor wires so that they are out of the way while you install the enclosure.
-
-
Этот шаг не переведен. Помогите перевести
-
Use a T8 driver to install the mounting pins from the old hard drive onto the sides of the enclosure.
-
-
Этот шаг не переведен. Помогите перевести
-
Attach any mounting brackets removed from the old hard drive onto the enclosure.
-
-
Этот шаг не переведен. Помогите перевести
-
Connect the iMac's combo cable to the new temperature-enabled combo cable.
-
-
Этот шаг не переведен. Помогите перевести
-
Slide the SSD enclosure into the space previously occupied by the hard drive.
-
Route the cables so that they will not interfere with any other components.
-


Отменить: Я не выполнил это руководство.
310 участников успешно повторили данное руководство.


64 Комментариев
I did successed this. But after just turn on, main fan spins faster than ordinary status. About 1600 rpm. Ordinary rpm is just 1200.
How can I fix it? Not by software solution(i.e., fan control app), help me by hardware solutions, plz.
*Replacement HDD : WDC WD40EZRX-00SPEB0
*iMac (Retina 5K, 27-inch, Late 2014)
*3.5 GHz Intel Core i5
*AMD Radeon R9 M290X 2048 MB
Dear Changwon, i also own a Retina imac (i7 Radeon 295). Harddisk has been changed by the distributor – they sell customized "Edition iMacs". Now i have the same problem as you subscribed - from day one. Fan speeds up to 1700 / 1750 rpm after a few seconds after power on. Next week my Apple certified distributor will check my iMac and hopefully fix that "noisy" problem. I will inform you, when we will be successful ... Have a great time so long. Greetings, Markus (mr@i-map.de)
Markus -
Did you use a original HDD with apple Firmware or a normal HDD? If u use a nomal HDD with non apple Firmware, you have the Fan Problem.
Klausi -
This may work: