Перейти к основному содержанию

iPad 2 GSM Front Panel Replacement

Архивированное руководство
Это руководство сохранено для исторических целей. Используйте его обновлённую версию, чтобы выполнить ремонт.
Абсолютно необходимое руководство
Это руководство предназначено только для использования в качестве обязательного условия для других руководств. Оно не полностью само по себе.

Выберете то, что вам нужно

  1. iPad 2 GSM Front Panel Replacement, Front Panel: шаг 1, изображение 1 из 2 iPad 2 GSM Front Panel Replacement, Front Panel: шаг 1, изображение 2 из 2
    • The iPad 2 is an extremely difficult device to open. Before attempting this guide, be aware that you may break your front panel and/or deform the plastic bezel around it during the opening sequence.

    • In the following steps you will use a heat gun to soften the adhesive securing the front panel to the rear panel. Try not to allow the stream of hot air to contact the thin plastic strip around the outer perimeter of the front panel as it may melt, permanently deform, and lose texture.

    • When heating up the front panel, the goal is to loosen the adhesive located in the areas highlighted in red in the second picture. When prying up the front panel, be especially careful not to damage the Wi-Fi antenna in the area boxed in blue, the top antennas in the area boxed in yellow, or the digitizer cable in the area boxed in black in the second picture.

    • Use a heat gun to gently heat the front panel to the right of the home button.

    • Do not heat up the home button, as it is plastic and easily melts/deforms.

  2. iPad 2 GSM Front Panel Replacement: шаг 2, изображение 1 из 2 iPad 2 GSM Front Panel Replacement: шаг 2, изображение 2 из 2
    • Once the area of the front panel to the right of the home button has been heated adequately, it should be easy to insert a plastic opening tool between the outer plastic bezel and the front panel right next to the home button.

    • Use your plastic opening tool to gently create a small gap between the front panel and the outer bezel to the right of the home button.

    • If the adhesive is difficult to separate, don't be afraid to heat it up again. Excessively prying and bending the front panel when the adhesive is not pliable enough can easily cause it to crack.

    • Insert a guitar pick into the small gap created by the plastic opening tool.

  3. iPad 2 GSM Front Panel Replacement: шаг 3, изображение 1 из 1
    • Heat up the area of the front bezel to the right of the home button along the bottom edge and make your way closer to the bottom right corner of the iPad.

    • Remember that this is where the wifi antenna is located and it is very easy to tear it.

    • Slide the first guitar pick toward the bottom right corner of the iPad and insert another guitar pick to maintain the gap between the front panel and the iPad next to the home button.

  4. iPad 2 GSM Front Panel Replacement: шаг 4, изображение 1 из 1
    • Use your heat gun to heat the edge of the front panel near the bottom right corner of the iPad.

    • Gently slide a guitar pick around the edge of the bottom right corner of the front panel, being careful not to force it and reheating the panel if necessary.

  5. iPad 2 GSM Front Panel Replacement: шаг 5, изображение 1 из 2 iPad 2 GSM Front Panel Replacement: шаг 5, изображение 2 из 2
    • Continue heating the outer edge of the front panel and using guitar picks to separate/space the front panel from the rear panel.

    • Insert two guitar picks as placeholders on each side of the iPad.

    • Be very careful when separating the top edge of the iPad. Two antennas are directly in contact with the top edge of the front panel and may be damaged if separated improperly. When separating the top edge of the front panel, be sure your guitar picks are separating the antennas from the glass front panel.

    • Be careful when approaching the bottom left corner of the iPad. Be sure to follow the next step carefully.

  6. iPad 2 GSM Front Panel Replacement: шаг 6, изображение 1 из 3 iPad 2 GSM Front Panel Replacement: шаг 6, изображение 2 из 3 iPad 2 GSM Front Panel Replacement: шаг 6, изображение 3 из 3
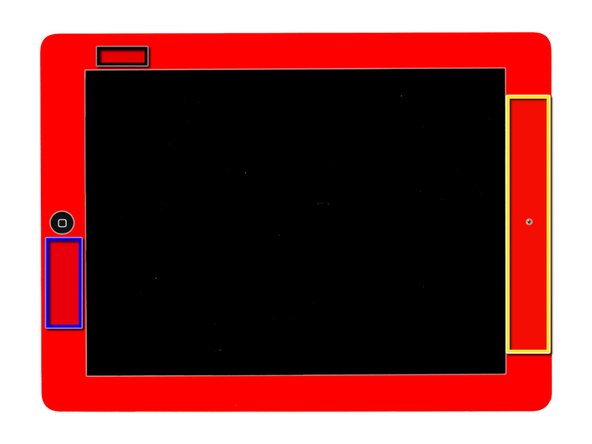
    • When separating the front panel from the bottom left corner of the iPad 2, be careful not to rip the digitizer cable (highlighted in red in the first picture). It is extremely thin and easy to tear.

    • Slightly lift the front panel near the dock connector to separate it from the foam adhesive securing it to the LCD.

    • Use a guitar pick to help cut the foam adhesive securing the perimeter of the LCD to the front panel.

  7. iPad 2 GSM Front Panel Replacement: шаг 7, изображение 1 из 1
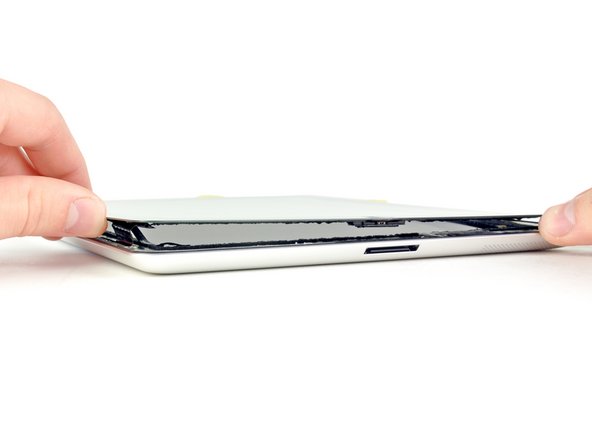
    • Carefully rotate the front panel away from the iPad, being sure that no adhesive is still attaching the two components.

    • Do not put excessive strain on the digitizer cable.

  8. iPad 2 GSM Front Panel Replacement: шаг 8, изображение 1 из 1
    • Lay the front panel next to the rest of the iPad 2.

    • Do not attempt to completely remove the front panel assembly just yet, as it is still attached to the logic board via the display ribbon cable.

Заключение

To reassemble your device, follow these directions in reverse and use our iPad 2 CDMA Front Panel Adhesive strip guide to reattach the front panel.

0 Комментариев

Добавить комментарий

Просмотр статистики:

За последние 24часов: 0

За последние 7 дней: 0

За последние 30 дней: 0

За всё время: 871