Перейти к основному содержанию

iPad Mini CDMA Battery Connector Replacement

Абсолютно необходимое руководство
Это руководство предназначено только для использования в качестве обязательного условия для других руководств. Оно не полностью само по себе.

Выберете то, что вам нужно

  1. iPad Mini CDMA Battery Connector Replacement, Battery Connector: шаг 1, изображение 1 из 1
    • Remove the three 1.3 mm Phillips #00 screws securing the connector shield to the logic board.

    • Be sure to not substitute these three screws with any other screws, specifically the screws securing the LCD shield plate to the rear case of the iPad. Any slightly longer screws may strip the screw holes and result in irreparable damage to the logic board.

  2. iPad Mini CDMA Battery Connector Replacement: шаг 2, изображение 1 из 1
    Инструмент, используемый на этом этапе:
    Tweezers
    $4.99
    • Use a pair of tweezers to grasp and remove the connector shield from the iPad.

  3. iPad Mini CDMA Battery Connector Replacement: шаг 3, изображение 1 из 2 iPad Mini CDMA Battery Connector Replacement: шаг 3, изображение 2 из 2
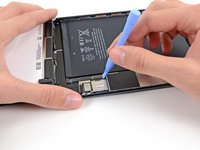
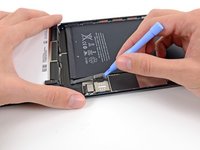
    • Use a plastic opening tool to gently pry the battery connector up from its socket on the logic board.

    • Be very careful to only pry up on the battery connector and not on the socket itself. If you pry up on the logic board socket, you may break the connector entirely.

Заключение

To reassemble your device, follow these instructions in reverse order.

Andrew Optimus Goldheart

Участник с: 10/17/09

508 700 Репутация

Автор 407 руководств

Команду

iFixit Участник iFixit

Staff

118 членов

Автор 19 450 руководств

0 Комментариев

Добавить комментарий

Статистика просмотров:

За последние 24 час(ов): 3

За последние 7 дней: 16

За последние 30 дней: 16

За всё время: 545