Этот документ имеет более свежие изменения. Перейти к последней непроверенной версии.
Введение
Use this guide to replace the home button in a 12.9" iPad Pro.
Parts of this guide were shot with a Wi-Fi model and as such the internals may look slightly different from the LTE model. The procedure is the same for both models except where noted.
Warning: the battery isolation method in this guide is outdated, and may result in irreversible damage to the battery pins of the logic board, effectively destroying it. If you choose to isolate the battery this way, heed all warnings and work extremely carefully. If you choose to complete the guide without isolating the battery, avoid using metal tools except when completely necessary (like when removing screws) to prevent shorting the battery and damaging sensitive circuit components
Выберете то, что вам нужно
-
-
Heat the iOpener for thirty seconds.
-
Throughout the repair procedure, as the iOpener cools, reheat it in the microwave for an additional thirty seconds at a time.
-
-
-
Remove the iOpener from the microwave, holding it by one of the two flat ends to avoid the hot center.
-
-
-
Fill a pot or pan with enough water to fully submerge an iOpener.
-
Heat the water to a boil. Turn off the heat.
-
Place an iOpener into the hot water for 2-3 minutes. Make sure the iOpener is fully submerged in the water.
-
Use tongs to extract the heated iOpener from the hot water.
-
Thoroughly dry the iOpener with a towel.
-
Your iOpener is ready for use! If you need to reheat the iOpener, heat the water to a boil, turn off the heat, and place the iOpener in the water for 2-3 minutes.
-
-
-
-
Remove all packing tape.
-
Peel any adhesive liners from the flex cables and press the cables in place onto the display panel.
-
Fold and connect the flex cable in the bottom left corner of the screen.
-
Don't peel and expose the perimeter adhesive until you've tested your repair and are ready to seal up the iPad.
-
-
-
Use the flat edge of a spudger to lift the flap on the connector that secures the cable.
-
-
-
Use an iOpener, heat gun, or hair dryer to soften the adhesive under the cable before you pry it up.
-
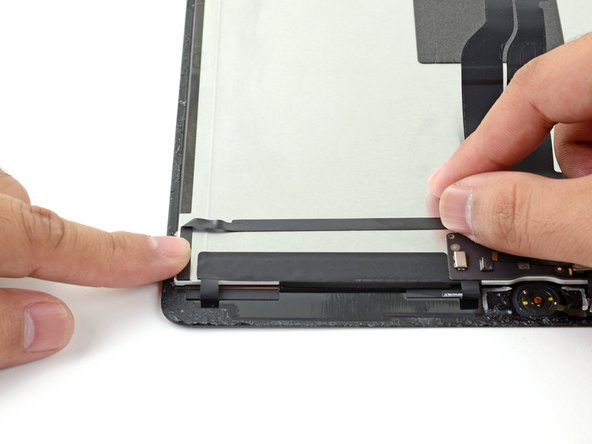
Starting from the ZIF connector, use the blade on a halberd spudger or the edge of an opening pick to separate the home button cable from the adhesive holding it in place. Stop when you reach the home button.
-
-
-
Gently pry off the home button cover by inserting the hook of a halberd spudger or the flat edge of a regular spudger between the cover and the LCD, and gently prying towards the bottom edge of the iPad.
-
-
-
Remove the home button bracket.
-
Scrape off as much of the old adhesive residue as you can, then clean it with acetone or high-concentration (90% or greater) isopropyl alcohol.
-
Secure the bracket with hot-melt glue, superglue, or high-strength double-sided tape. Make sure the bracket is aligned correctly before allowing your adhesive to cure, or the home button will not click when pressed.
Would be really nice if the adhesive strip kit for the screen included the adhesive bits needed to secure the existing home button to the new screen (or a new home button to an existing screen).
One more thing about the bracket: you really need a strong adhesive when you put it back, so that pushing the button doesn’t dislodge it. If it doesn’t hold the button firmly, you can push the button out of its socket during normal use. Getting the bracket in and aligning it without accidentally sticking it in the wrong place or (much worse) sticking it to the fragile ribbon cable takes some very careful work.
This is an excellent guide, but I’d like to see maybe the first two steps of reassembly, showing how to do this correctly.
When replacing the bracket, a very slight difference in the replacement part caused the bracket to make the home button click all the time. The little white washer between the home button and the back of the glass was about 0.3 mm thicker than the original, and i had already superglued those parts together.
Fortunately, the playing card included in the kit is about 0.3 mm thick. I cut 2 small rectangles and superglued them to the feet of the bracket, so it would stand away from the home button. Then superglued the bracket on, and now it clicks perfectly. Hopefully I don't have any issues with the playing card delaminating as the home button wears, because I definitely don't know if i could get this ipad apart again (the first time was easier because the screen was already shattered).
-
-
-
Gently push the home button from the front of the display inward using the tip of a finger.
-


Compare your new replacement part to the original part. You may need to transfer remaining components or remove adhesive backings from the new part before installing. To reassemble your device, follow the above steps in reverse order. Take your e-waste to an R2 or e-Stewards certified recycler. Repair didn’t go as planned? Check out our Answers community for troubleshooting help.
Compare your new replacement part to the original part. You may need to transfer remaining components or remove adhesive backings from the new part before installing. To reassemble your device, follow the above steps in reverse order. Take your e-waste to an R2 or e-Stewards certified recycler. Repair didn’t go as planned? Check out our Answers community for troubleshooting help.
Отменить: Я не выполнил это руководство.
27 участников успешно повторили данное руководство.

7 Комментариев
Yes. If you take the iPad apart most of the adhesive on the screen won’t be usable again. You can use either the specific kit for your ipad Pro that iFixIt sells, or get a roll of “red” tape (probably between 2-5mm size) and cut out pieces for all four side of the screen. You will probably also need tape or glue (such hot glue or something like B-7000) for the home button, and the metal bracket that holds the home button, since the old adhesive tends to not work a 2nd time.
Some LCD Assemblies come with Adhesive pre-applied, simply peel and seal. :)
Otherwise, plan on running some double-sided 3M tape before commencing new LCD Assembly Installation.
TIP: B7000 Adhesive in the bottom left and right corners will help keep it in place moving forward.
Replaced LCD and reattached home button, everything works, but the home button is lose and trying to fall inside, like it's missing something that is suppose to be between the home button and the cover that sets over it under the glass. The cover is stuck to the glass, but there's enough of a gap that the home button wants to fall inside?
I have the same issue, haven’t solved it yet but here is what I’ve found so far:
The home button appears to have several pieces not just one, including: 1. black gasket, 2. white or space-grey ring (paper or plastic?) around the metal part, 3. The actual glass circle button with fingerprint feature, and 4. electronics layer behind it.
When I took the button off, and re-adhered the button, the glue or tape between No. 2 and 3. above started to separate. Not sure how to put these back together since so small.
The guide plus a few videos made this a painless experience. my only problems are the home button no longer recognizes finger prints and iPad no longer auto shuts off when lid is closed. Not a great result for the price.
Successfully completed this one but I must have damaged the home button cable during removal, I was very careful but it does say the cable is very sensitive, as it will not enable touch ID. Oh well, my iPad Pro works again, yay!