Эта версия возможно содержит некорректные исправления. Переключить на последнюю проверенную версию.
Выберете то, что вам нужно
-
-
Если стекло дисплея разбито, то в процессе ремонта важно предотвратить его дальнейшее разрушение (которое, кстати, может повлечь за собой серьёзные травмы). Заклейте стекло клейкой лентой.
-
Наложите столько слоёв прозрачной ленты, сколько потребуется. Дисплей должен быть заклеен полностью.
-
-
-
Удалите два крестовых винта 3,7 мм (Philips #00) стороны док-коннектора.
-
-
-
Удалите металлическое кольцо с присоски. Это сделает использование присоски более простым и безопасным.
-
Прицепите маленькую присоску рядом с кнопкой Home, чтобы приподнять нижнюю часть модуля экрана iPhone.
-
-
-
Одной рукой удерживайте модуль дисплея, а другой с помощью диэлектрической лопатки отключите шлейф, обозначенный как "1". (Шлейф дисплея)
-
-
-
Поверните модуль дисплея вверх до прямого угла с корпусом iPhone. Это упростит доступ для отключения оставшихся шлейфов.
-
Используйте диэлектрическую лопатку, чтобы отключить чёрный шлейф, обозначенный "2". (шлейф сенсорной панели)
-
-
-
Диэлектрической лопаткой откиньте вверх пластиковую панель, удерживающую шлейф "3" на месте. Белая панель поворачивается на 90 градусов, освобождая шлейф.
-
Сдвиньте чёрный шлейф и удалите модуль дисплея.
-
-
-
Извлеките лоток SIM-карты из устройства с помощью скрепки или специального инструмента.
-
-
-
-
Удалите 8 винтов:
-
Пять крестовых 2,3 мм (Philips #00), фиксирующих материнскую плату.
-
Два крестовых 2,3 мм (Philips #00), удерживающих материнскую плату и камеру.
-
Один 2,9 мм (Philips #00) под наклейкой "Do not remove".
-
Для сборки:
-
Винт рядом с камерой, также фиксирует держатель камеры (Оранжевый в правом нижнем углу).
-
-
-
С помощью диэлектрической лопатки приподнимите материнскую плату со стороны док-коннектора.
-
-
-
Сдвиньте материнскую плату от док-коннектора и отложите.
-
При установке материнской платы предварительно подключите к ней камеру. После этого проверьте, правильно ли расположен слот для SIM-карты. Когда установлена верхняя часть платы, можно устанавливать её нижнюю часть. Когда материнская плата установлена правильно, слот SIM-карты и камера находятся точно на своих местах.
-
-
-
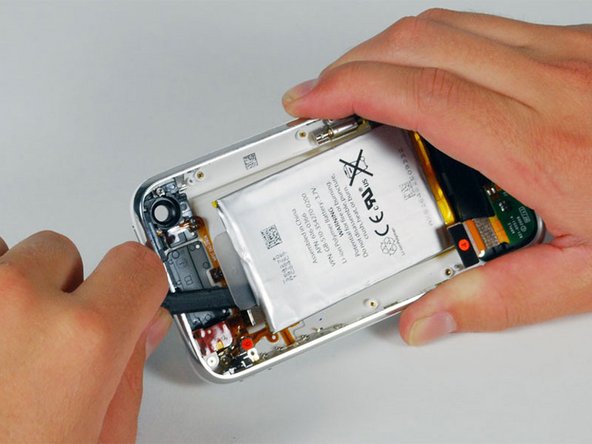
Используйте диэлектрическую лопатку для удаления батареи. Батарея зафиксирована на задней крышке липкой лентой по периметру.
-
-
Этот шаг не переведен. Помогите перевести
-
Remove the two Phillips #00 screws securing the on/off switch to the front bezel.
-
-
Этот шаг не переведен. Помогите перевести
-
Carefully peel up the orange ribbon cable from the rear case.
-
-
Этот шаг не переведен. Помогите перевести
-
Remove the following 4 screws:
-
Three 1.8 mm Phillips #00 screws securing the headphone jack and GPS antenna to the rear case. Note the order in which you remove the screws, as the left one has a slightly larger head.
-
One 3.8 mm Phillips #00 screw in the plastic loop near the headphone jack.
-
-
Этот шаг не переведен. Помогите перевести
-
Remove the four Phillips #00 screws securing the volume and mute switch.
-
The mute switch assembly screws should be tightened with the switch in the off position. Check the protrusion of the switch when turned on, since it may not stick out far enough to operate if the switch assembly is incorrectly positioned. (Check the gap between the switch frame and the bezel (white gap showing between the two screws near the 6). The screw on the far right is slightly longer than the other 3 screws. When reassembling the phone, keep this in mind.
-
-
Этот шаг не переведен. Помогите перевести
-
Carefully lift the headphone jack assembly out of the iPhone.
-
Switch the green mute switch down (towards the back side of the iPhone) into mute position. This will make it much easier to insert it, once the new mute button is in place.
-


Отменить: Я не выполнил это руководство.
147 участников успешно повторили данное руководство.

3 Комментариев
My mute/silent switch went bad. I obtained an assembly that included the metal bracket assembly for the mute switch. Here are some issues I ran into and I hope it helps someone out. This repair takes a while - plan on 2 hours or more! I did all my work in a cookie sheet with white paper on the bottom for contrast. It saved me from losing 1-2 screws. Magnetize your screwdriver. My flex cable needed a lot of careful bending to fit the contours needed to route within the phone. I forgot to fold the actual connector up before inserting the logic board, which meant it was hiding under the board, and I didn't notice until I had fully installed the board. This is easy to do on a new flex assembly because the connector want's to lie flat! On reassembly, I had success putting the mute button on the switch, then installing that combination first. Then the volume up/down, then the headphone jack. I placed small plastic shims on the case side and internal side of the headphone jack - for insulation. Part 1
Part 2: Also, there is a gold contact on the top of the headphone jack. There is a spring contact on the display assembly that contacts this - I had to bend my spring down a bit. If this contact is not good the symptom is you won't really be able to turn the headphone volume down low (it stays pretty loud), and you'll get a LOUD click when moving off minimum volume. Also, if you try the phone before fully assembling it keep in mind the "home" button won't work until the display is fully seated into the case.
Hi, -Yeasterday night i did it! Replacing iPhone 3GS Headphone Jack mission Completed!
advice: use a support to view better the screw.
use a 10x lens to help your view
make a sandwich falt cable as per original before put in place (can help and more easy)
bye Giampiero