Введение
iPhone 4の内部コンポーネントにアクセスするために、リアパネルを取り外します。
Выберете то, что вам нужно
Видео обзор
-
-
解体を始める前にiPhoneの電源を切ってください。
-
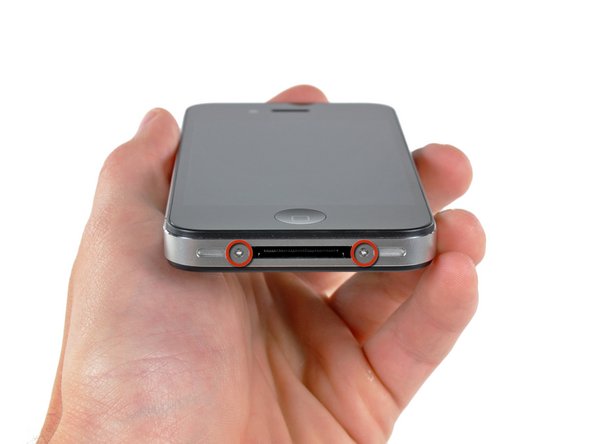
お持ちの iPhone 4のリアカバーは#000プラスネジ2本かAppleの星形ペンタローブネジ(2番目の画像)いずれかにより留められています。どちらのネジが使用されているか確認し、ネジを外すために必要なスクリュードライバーを準備してください。
-
ドックコネクター両側の3.6 mmのペンタローブか#000プラスネジを外します。
-
-
デバイスを再組み立てする際は、これらのインストラクションを逆の順番に従って作業を進めてください。
デバイスを再組み立てする際は、これらのインストラクションを逆の順番に従って作業を進めてください。
Отменить: Я не выполнил это руководство.
807 участников успешно повторили данное руководство.
Особая благодарность этим переводчикам:
100%
Эти переводчики помогают нам починить мир! Хотите внести свой вклад?
Начните переводить ›
Прикрепленные документы
9 Комментариев
The replacement part for the iPhone 4 rear panel has two thin, clear overlays on the inside surface--a larger one that runs the full length, and a small one that only covers the lens. These should be removed prior to installation. Also, the first rear panel replacement I got from iFixit was not an exact fit and would not easily "click" into place. They replaced it for free and the second one clicked right in.
On step 3 when replacing the back panel with a new one, they aren't kidding about removing ALL the protective slips. There's THREE of them.
1), the obvious back slip that protects the new back.
2). the one inside the back protecting the side with the camera lens
3). the little square one OVER the lens itself.
First time I tried to reinstall my back, that tiny little square over the lens prohibited my ability to actually get the back on completely. My husband jammed it for me, but the screws still wouldn't take. It's amazing that these things are so precise that the tiny little film on the lens would make it that much tighter.
Anyways, hope that helps somebody. :)
Easiest repair I've ever done. Thanks y'all!


