Эта версия возможно содержит некорректные исправления. Переключить на последнюю проверенную версию.
Выберете то, что вам нужно
-
-
Задняя панель вашего iPhone может быть прикручена #000 Phillips(крестовыми) винтами или Apple 5-ти конечными "Pentalob" винтами(второе изображение). Проверьте какие винты использованы у вас и убедитесь что у вас есть необходимая отвёртка для их удаления.
-
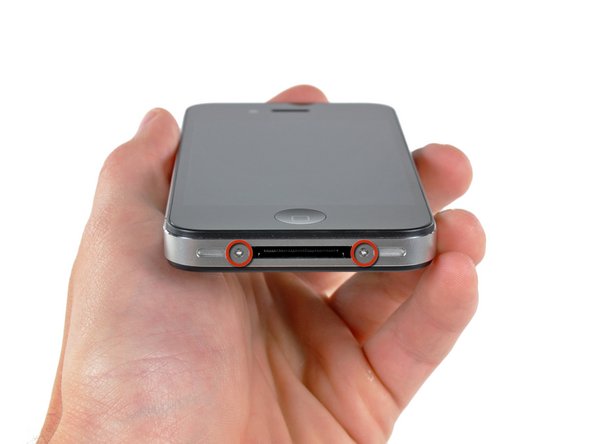
Удалите два 3.6 мм Pentalob или Phillips #000 винты около разъёма.
-
5-ти конечная отвёртка используется только один раз.
-
-
-
Зажмите заднюю панель между пальцами и потяните её от устройства. Также это можно сделать с помощью маленькой присоски.
-
-
-
Удалите 2.5 мм винти Phillips(крестовой), крепящий разъём аккумулятора к материнской плате.
-
-
-
Используйте пластиковый инструмент для отключения шлейфа аккумулятора от коннектора.
-
Удалите фиксатор антенны.
-
-
-
Потяните за пластиковый язычок чтобы отклеить аккумулятор.
-
Remove the contact clip from the iPhone.
-
-
Этот шаг не переведен. Помогите перевести
-
Remove the following two screws:
-
One 1.2 mm Phillips
-
One 1.6 mm Phillips
-
Remove the thin steel dock connector cable cover from the iPhone.
-
-
-
Этот шаг не переведен. Помогите перевести
-
Use a plastic opening tool to gently pry the dock cable connector up off the logic board from both short ends of the connector.
-
-
Этот шаг не переведен. Помогите перевести
-
Carefully peel the dock ribbon cable off the logic board and the lower speaker enclosure.
-
-
Этот шаг не переведен. Помогите перевести
-
Use a plastic opening tool to pry the lower antenna connector up off its socket on the logic board.
-
-
Этот шаг не переведен. Помогите перевести
-
Remove the following screws securing the speaker enclosure assembly to the outer case:
-
One 1.9 mm Phillips screw
-
One 2.4 mm Phillips screw
-
-
Этот шаг не переведен. Помогите перевести
-
Use a plastic opening tool to lift the speaker enclosure assembly out of the case, being sure not to damage the EMI fingers on the attached Wi-Fi antenna.
-
Remove the speaker enclosure assembly.
-
-
Этот шаг не переведен. Помогите перевести
-
Use the edge of a plastic opening tool to carefully peel the bottom edge of the dock connector assembly off the adhesive securing it to the rear case.
-
-
Этот шаг не переведен. Помогите перевести
-
Remove the two 1.3 mm Phillips screws securing the dock connector to the rear case.
-
-
Этот шаг не переведен. Помогите перевести
-
Use the tip of a spudger or your fingernail to flip up the home button ribbon cable retaining flap.
-
Use a pair of tweezers to gently pull the home button ribbon cable out of its socket. Note its position for reinsertion.
-
-
Этот шаг не переведен. Помогите перевести
-
Use the flat edge of a spudger to carefully peel the left edge of the dock connector assembly and its ribbon cable off the adhesive securing it to the rear case.
-
Pry the right edge of the dock connector off the rear case.
-
-
Этот шаг не переведен. Помогите перевести
-
Use the flat edge of a spudger to push the lower microphone away from the bottom edge of the iPhone.
-
-
Этот шаг не переведен. Помогите перевести
-
Remove the dock connector assembly from the iPhone, minding any cables that may get caught.
-
-
Этот шаг не переведен. Помогите перевести
-
Slide the rubber cover off the microphone attached to the old dock connector and transfer it to your new dock connector.
-
The ribbon is very fragile and can easily be torn when placing the rubber cover onto your new part.
-
Отменить: Я не выполнил это руководство.
503 участников успешно повторили данное руководство.
Прикрепленные документы
26 Комментариев
I found a cool iPhone 4 universal dock adapter that may help protect the connector from being damaged in the first place. It is called the LCYO Adapter (http://www.synthecept.com) and lets you dock the phone without removing the case. Just a thought, like I said it might help avoid a damaged connector!
I successfully did this, however now my mic is not working unless I am on speaker or using my headphones... anyone else have this problem?
thanks,
D
I had two different little pieces of plastic on my replacement on the mic that I needed to peel off. You may have left some on. Not the easiest to check, but a possibility.
I had the same problem - nonfunctioning lower mic upon reassembly after replacing dock connector. Took it apart again, removed and reinstalled the dock connector paying special attention to the mic. Still no luck upon reassembly the second time. Any ideas? Bad/damaged mic?
Removing the logic board seems to be unnecessary. I was able to replace the dock connector by simply removing the speakers and battery.
Also, it'd be nice if the dock connector came with a new moisture sensor.


