Перейти к основному содержанию

iPod Nano 7th Generation Front Panel Assembly Replacement

Абсолютно необходимое руководство
Это руководство предназначено только для использования в качестве обязательного условия для других руководств. Оно не полностью само по себе.

Выберете то, что вам нужно

  1. iPod Nano 7th Generation Front Panel Assembly Replacement, Front Panel Assembly: шаг 1, изображение 1 из 2 iPod Nano 7th Generation Front Panel Assembly Replacement, Front Panel Assembly: шаг 1, изображение 2 из 2
    • Lay the iOpener over the plastic tab to loosen the adhesive. Let the bag sit on the device for approximately 90 seconds before attempting to open the panel.

  2. iPod Nano 7th Generation Front Panel Assembly Replacement: шаг 2, изображение 1 из 3 iPod Nano 7th Generation Front Panel Assembly Replacement: шаг 2, изображение 2 из 3 iPod Nano 7th Generation Front Panel Assembly Replacement: шаг 2, изображение 3 из 3
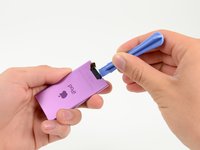
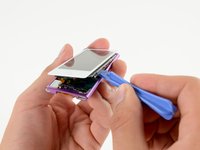
    • Use a plastic opening tool to pull the rear plastic cover away from the device until there is enough room to insert a spudger.

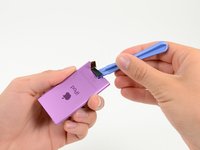
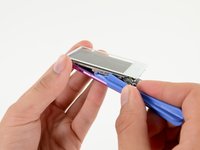
    • Insert a spudger under the cover, then pry it up and away from the device.

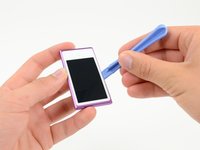
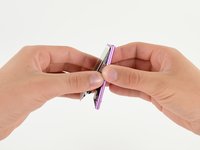
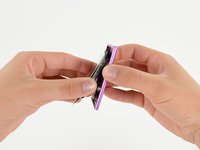
    • Remove the rear plastic cover from the iPod.

    • Be very careful in removing the plastic cover as the bluetooth antenna is adhered to it.

  3. iPod Nano 7th Generation Front Panel Assembly Replacement: шаг 3, изображение 1 из 1
    • Gently bend the Bluetooth antenna to the right, out of the way of the screws in the bottom of the device.

    • Remove the single 1.4 mm Phillips #000 screw from the black plastic spacer.

  4. iPod Nano 7th Generation Front Panel Assembly Replacement: шаг 4, изображение 1 из 2 iPod Nano 7th Generation Front Panel Assembly Replacement: шаг 4, изображение 2 из 2
    • Use a plastic opening tool to remove the black plastic spacer from the Nano.

  5. iPod Nano 7th Generation Front Panel Assembly Replacement: шаг 5, изображение 1 из 1
    • Remove the two 2 mm Phillips #000 screws from the bottom of the case.

  6. iPod Nano 7th Generation Front Panel Assembly Replacement: шаг 6, изображение 1 из 2 iPod Nano 7th Generation Front Panel Assembly Replacement: шаг 6, изображение 2 из 2
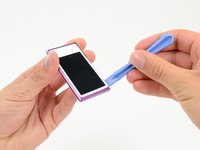
    • Insert a plastic opening tool into the seam between the white plastic front panel and the rear case.

    • Slide the opening tool along the edge of the front panel to free it from clips and adhesive.

  7. iPod Nano 7th Generation Front Panel Assembly Replacement: шаг 7, изображение 1 из 1
    • Use a spudger to press the midframe screw tab up and out of the rear case.

  8. iPod Nano 7th Generation Front Panel Assembly Replacement: шаг 8, изображение 1 из 1
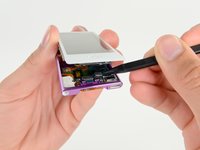
    • Use a metal spudger to carefully pry near the Lightning connector and under all parts of the front panel assembly: the front glass/digitizer, the LCD display and the metal midframe.

    • The adhesive under the metal midframe/display assembly is quite strong and the components are fragile, so go slowly and gently. Make sure you do not bend the LCD screen.

  9. iPod Nano 7th Generation Front Panel Assembly Replacement: шаг 9, изображение 1 из 2 iPod Nano 7th Generation Front Panel Assembly Replacement: шаг 9, изображение 2 из 2
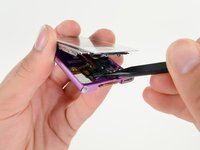
    • Continue prying along the edges under the front panel assembly, releasing the clips and adhesive along the sides of the device.

  10. iPod Nano 7th Generation Front Panel Assembly Replacement: шаг 10, изображение 1 из 2 iPod Nano 7th Generation Front Panel Assembly Replacement: шаг 10, изображение 2 из 2
    • Pull the front panel assembly slightly down and partially out of the device.

    • You only need to open the device enough to gain access to the display cable connectors near the sleep/power button.

    • Do not separate the two halves entirely, they are still connected by several cables.

  11. iPod Nano 7th Generation Front Panel Assembly Replacement: шаг 11, изображение 1 из 2 iPod Nano 7th Generation Front Panel Assembly Replacement: шаг 11, изображение 2 из 2
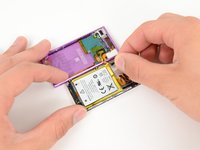
    • Use a spudger to release the digitizer cable and display data cable connectors.

  12. iPod Nano 7th Generation Front Panel Assembly Replacement: шаг 12, изображение 1 из 1
    • Gently unfold the two halves of the device to access the internal components.

    • Do not try to completely separate the two sections, yet, as they are still attached via a soldered cable.

  13. iPod Nano 7th Generation Front Panel Assembly Replacement: шаг 13, изображение 1 из 2 iPod Nano 7th Generation Front Panel Assembly Replacement: шаг 13, изображение 2 из 2
    • Pull up on the battery pull tab to free the battery from its adhesive.

    • Flip the battery over into the rear case for safekeeping.

  14. iPod Nano 7th Generation Front Panel Assembly Replacement: шаг 14, изображение 1 из 1
    • Completely separate the front panel assembly from the rest of the device.

Заключение

To reassemble your device, follow these instructions in reverse order.

Sam Goldheart

Участник с: 10/18/12

465 122 Репутация

Автор 538 руководств

Команда

iFixit Участник iFixit

Staff

135 членов

Автор 16 476 руководств

0 Комментариев

Добавить комментарий

Просмотр статистики:

За последние 24часов: 0

За последние 7 дней: 0

За последние 30 дней: 0

За всё время: 138