Перейти к основному содержанию

iRobot Roomba 655 Pet Series Motherboard Replacement

Выберете то, что вам нужно

  1. iRobot Roomba 655 Pet Series Motherboard Replacement, Removing the Side Brush: шаг 1, изображение 1 из 2 iRobot Roomba 655 Pet Series Motherboard Replacement, Removing the Side Brush: шаг 1, изображение 2 из 2
    • Flip the device over onto its back.

    • Find the side brush, and unscrew the single screw that connects to brush motor by using the Phillips head #2 screwdriver.

    • This screw doesn't completely come out of the yellow side brush.

  2. iRobot Roomba 655 Pet Series Motherboard Replacement, Removing the Back Panel: шаг 2, изображение 1 из 2 iRobot Roomba 655 Pet Series Motherboard Replacement, Removing the Back Panel: шаг 2, изображение 2 из 2
    • Using a Phillips #1 screwdriver, remove the four screws on the back panel.

    • Once the screws are loose gently pry the back plate away from the body by using the spudger tool.

    • The screws don't completely come out of the panel, but it will still come apart once unscrewed.

  3. iRobot Roomba 655 Pet Series Motherboard Replacement, Removing the Battery: шаг 3, изображение 1 из 3 iRobot Roomba 655 Pet Series Motherboard Replacement, Removing the Battery: шаг 3, изображение 2 из 3 iRobot Roomba 655 Pet Series Motherboard Replacement, Removing the Battery: шаг 3, изображение 3 из 3
    • Grab the two pieces of green tape with your thumb and index finger

    • Pull up on the battery in an upwards direction to remove it

  4. iRobot Roomba 655 Pet Series Motherboard Replacement, Battery Contact Points: шаг 4, изображение 1 из 2 iRobot Roomba 655 Pet Series Motherboard Replacement, Battery Contact Points: шаг 4, изображение 2 из 2
    • These are the contact points on the Roomba for the battery

    • These are the contact points on the battery

    • If these contact points are dirty, they can be cleaned with a moist microfiber cloth (distilled water recommended)

  5. iRobot Roomba 655 Pet Series Motherboard Replacement, Front Bumper: шаг 5, изображение 1 из 2 iRobot Roomba 655 Pet Series Motherboard Replacement, Front Bumper: шаг 5, изображение 2 из 2
    • Remove the ten 11mm screws that hold the front bumper to the plastic bumper protector with your Phillips #1 screwdriver.

    • Pull the plastic bumper protector up and off of the bumper.

  6. iRobot Roomba 655 Pet Series Motherboard Replacement: шаг 6, изображение 1 из 3 iRobot Roomba 655 Pet Series Motherboard Replacement: шаг 6, изображение 2 из 3 iRobot Roomba 655 Pet Series Motherboard Replacement: шаг 6, изображение 3 из 3
    • Flip the Roomba back over, so you are viewing the top.

    • Pull up on the front bumper to remove it.

    • Be careful not to pull too hard because there is wiring attached to the bumper.

    • Remove the two 7mm screws with your Phillips #1 screwdriver, holding the wire sensors in place to the front bumper.

  7. iRobot Roomba 655 Pet Series Motherboard Replacement, Front Face Plate: шаг 7, изображение 1 из 2 iRobot Roomba 655 Pet Series Motherboard Replacement, Front Face Plate: шаг 7, изображение 2 из 2
    • Remove the dust bin by pushing on the button for the dust bin removal

    • Pull the dust bin out

  8. iRobot Roomba 655 Pet Series Motherboard Replacement: шаг 8, изображение 1 из 2 iRobot Roomba 655 Pet Series Motherboard Replacement: шаг 8, изображение 2 из 2
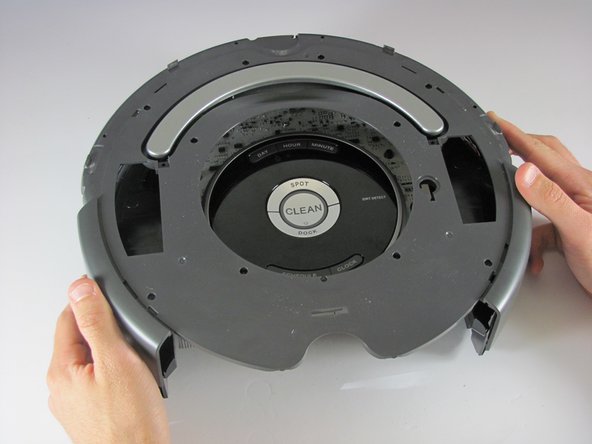
    • Pull up on the silver handle to release the top protectant plastic

    • Remove the top plastic carefully

  9. iRobot Roomba 655 Pet Series Motherboard Replacement, Internal Faceplate: шаг 9, изображение 1 из 3 iRobot Roomba 655 Pet Series Motherboard Replacement, Internal Faceplate: шаг 9, изображение 2 из 3 iRobot Roomba 655 Pet Series Motherboard Replacement, Internal Faceplate: шаг 9, изображение 3 из 3
    • The outside six - 10mm screws and the inside set of four - 10mm screws are the same here, use your Phillips head #2 to remove them

    • Use your Phillips head #0 to remove the one - 7mm bottom center screw

    • Use your Phillips head #2 to remove the two - 8mm screws by the handle

    • Push down the two release points to pull the plastic piece up

    • Pull the plastic piece up

  10. iRobot Roomba 655 Pet Series Motherboard Replacement, Display: шаг 10, изображение 1 из 3 iRobot Roomba 655 Pet Series Motherboard Replacement, Display: шаг 10, изображение 2 из 3 iRobot Roomba 655 Pet Series Motherboard Replacement, Display: шаг 10, изображение 3 из 3
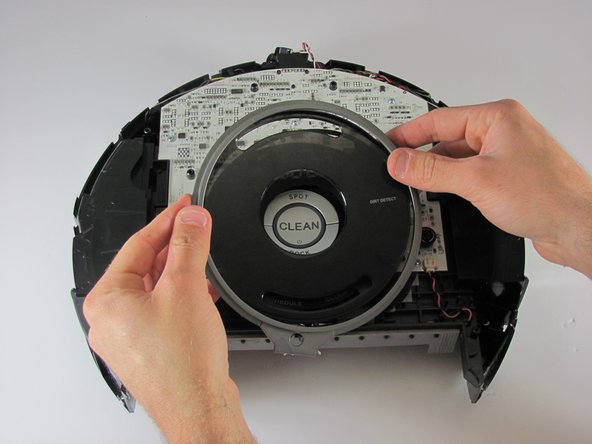
    • Pull the silver tab, and clear tinted display off

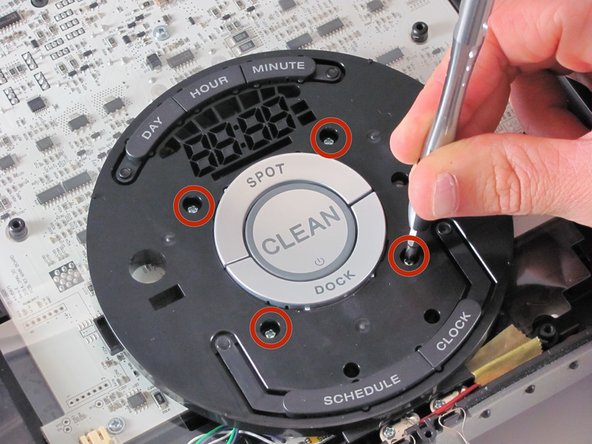
    • Remove the 4 - 9mm screws holding the display with your Phillips head #0

  11. iRobot Roomba 655 Pet Series Motherboard Replacement: шаг 11, изображение 1 из 3 iRobot Roomba 655 Pet Series Motherboard Replacement: шаг 11, изображение 2 из 3 iRobot Roomba 655 Pet Series Motherboard Replacement: шаг 11, изображение 3 из 3
    • Remove the display

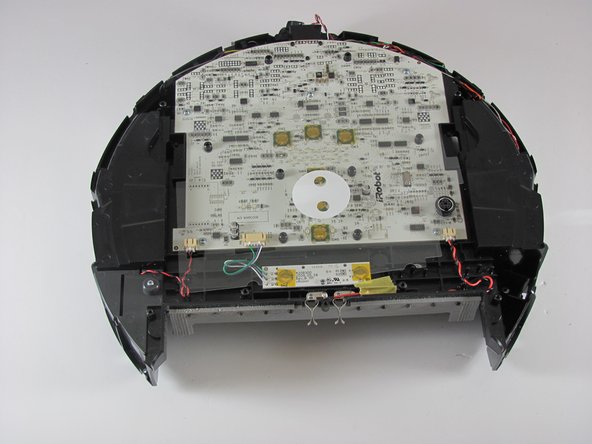
    • Remove the plastic protectant film from the motherboard

    Si recibe.una carga mayor y no enciende.que se debe hacer que pasados debo hacer.para que encienda el aparato.si tiene algún fusible .para poder rehiniciar.

    Jairo Laniado - Ответить

  12. iRobot Roomba 655 Pet Series Motherboard Replacement, Removing the Motherboard: шаг 12, изображение 1 из 2 iRobot Roomba 655 Pet Series Motherboard Replacement, Removing the Motherboard: шаг 12, изображение 2 из 2
    • Remove the five - 8mm screws with your Phillips head #1, holding the mother board in place to the Roomba

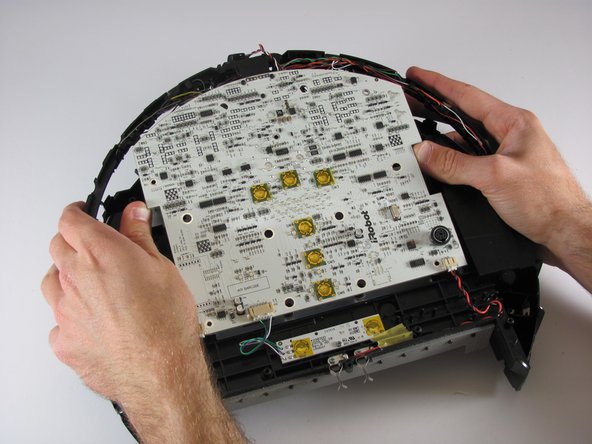
    • Pull the mother board up off the Roomba

    • Be careful not to pull hard because there are a lot of wires attached to the motherboard

  13. iRobot Roomba 655 Pet Series Motherboard Replacement, Unclipping the Wires: шаг 13, изображение 1 из 3 iRobot Roomba 655 Pet Series Motherboard Replacement, Unclipping the Wires: шаг 13, изображение 2 из 3 iRobot Roomba 655 Pet Series Motherboard Replacement, Unclipping the Wires: шаг 13, изображение 3 из 3
    • Remove the three sets of wires plugged into the back of the motherboard

    • Some of these can be difficult to remove, and you may need the help of the metal spudger

  14. iRobot Roomba 655 Pet Series Motherboard Replacement, Unclip the Cliff Sensor Wires: шаг 14, изображение 1 из 3 iRobot Roomba 655 Pet Series Motherboard Replacement, Unclip the Cliff Sensor Wires: шаг 14, изображение 2 из 3 iRobot Roomba 655 Pet Series Motherboard Replacement, Unclip the Cliff Sensor Wires: шаг 14, изображение 3 из 3
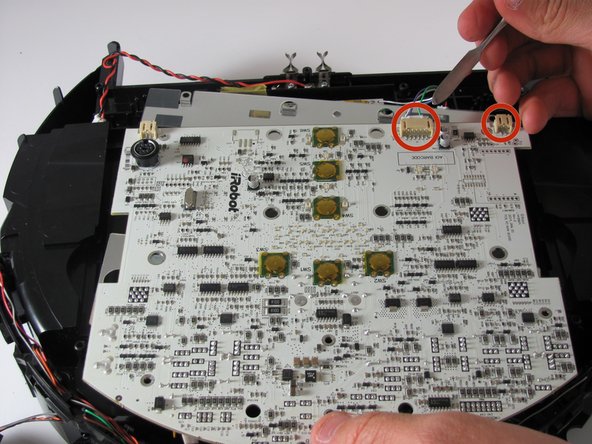
    • Flip the motherboard over

    • Remove the five wire connections using the same method as the previous two

    • Lastly, remove the bumper sensor wires from the motherboard

Заключение

To reassemble your device, follow these instructions in reverse order.

6 участников успешно повторили данное руководство.

Matt Davis

Участник с: 01/22/15

1 624 Репутация

Автор 7 руководств

Команда

Cal Poly, Team 21-20, Maness Winter 2015 Участник Cal Poly, Team 21-20, Maness Winter 2015

CPSU-MANESS-W15S21G20

4 членов

Автор 14 руководств

7 Комментариев

Regarding the reassembly process - there is a lack of clarity regarding reassembly and placement of the front bumper assembly. THe internal components are barely touched upon in the sequence above, and one picture shows the intenal sensor bar completely unattached. It is not.

james000222 - Ответить

anyone know how to bench test this? One of my capacitors blew up.. Well two did and I cannot seem to get it working after replacing them.

Eric - Ответить

HI Matt, I have an Roomba 650 that stop working and I’ve realized there is an resistor burned on the main board (R138) and it’s impossible to check its value. Do you know have to check it or have the schematic available? Many Thanks

Luiz Ribeiro - Ответить

Hi Luiz, I am trying to locate and test R138 but can’t find it on the board. Would you be able to give me a clue to find out where I should be looking? Thanks

CoKo A -

While pulling the wire connectors out, a wire came loose. How do you reattach the wire to the connector? Is it pressure fitted or soldered?

dogtrainered - Ответить

While replacing room a motherboard, I removed one of the connectors and a wire came loose. How do you reattach it to the connector? Is it fitted by just pushing it in or is it soldered?

dogtrainered - Ответить

My roomba 655 not charging charger is ok. I replaced battery charger voltage showing 20 but insidemother board comes 5 voltas how to i fixed

khushal sanghvi - Ответить

Добавить комментарий

Просмотр статистики:

За последние 24часов: 1

За последние 7 дней: 1

За последние 30 дней: 14

За всё время: 7,720