Перейти к основному содержанию

jp.ik Leap T304 LCD Replacement Replacement

Выберете то, что вам нужно

  1. jp.ik Leap T304 LCD Replacement Replacement, jp.ik Leap T304 LCD Replacement: шаг 1, изображение 1 из 2 jp.ik Leap T304 LCD Replacement Replacement, jp.ik Leap T304 LCD Replacement: шаг 1, изображение 2 из 2
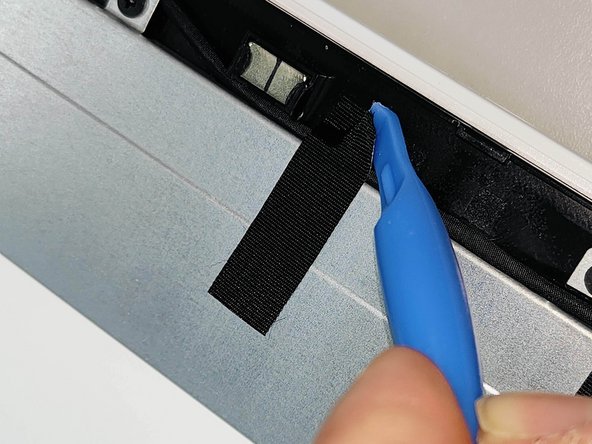
    • First make sure the notebook is turned off and check if you have the necessary tools.

  2. jp.ik Leap T304 LCD Replacement Replacement: шаг 2, изображение 1 из 2 jp.ik Leap T304 LCD Replacement Replacement: шаг 2, изображение 2 из 2
    • All screws are identified by circles. Pay special attention to the red circles as the rubber covers hide the screws.

    • With an utlility knife remove all the screw covers.

    • For this action, the procedure must be carried out with caution, as the covers are glued with a resistant glue.

  3. jp.ik Leap T304 LCD Replacement Replacement: шаг 3, изображение 1 из 1
    • Remove all screws with a Philips PH1 screwdriver

    • All screws are the same, don't worry about identifying them.

  4. jp.ik Leap T304 LCD Replacement Replacement: шаг 4, изображение 1 из 3 jp.ik Leap T304 LCD Replacement Replacement: шаг 4, изображение 2 из 3 jp.ik Leap T304 LCD Replacement Replacement: шаг 4, изображение 3 из 3
    • Using the plastic tool, insert it between the plastic and open it carefully.

    • You will feel and hear several clicks, which are perfectly normal. Remove the rear LCD Cover completely.

  5. jp.ik Leap T304 LCD Replacement Replacement: шаг 5, изображение 1 из 3 jp.ik Leap T304 LCD Replacement Replacement: шаг 5, изображение 2 из 3 jp.ik Leap T304 LCD Replacement Replacement: шаг 5, изображение 3 из 3
    • Unscrew both hinges.

    • All screws are the same, don't worry about identifying them.

  6. jp.ik Leap T304 LCD Replacement Replacement: шаг 6, изображение 1 из 2 jp.ik Leap T304 LCD Replacement Replacement: шаг 6, изображение 2 из 2
    • Carefully disconnect the cable identified in the figure, removing it from its connector.

  7. jp.ik Leap T304 LCD Replacement Replacement: шаг 7, изображение 1 из 3 jp.ik Leap T304 LCD Replacement Replacement: шаг 7, изображение 2 из 3 jp.ik Leap T304 LCD Replacement Replacement: шаг 7, изображение 3 из 3
    • Remove the mylers shown in the image.

  8. jp.ik Leap T304 LCD Replacement Replacement: шаг 8, изображение 1 из 2 jp.ik Leap T304 LCD Replacement Replacement: шаг 8, изображение 2 из 2
    • Peel off and remove the Wireless antennas

    • Before removing the wireless antennas, the cable route must always be analyzed to ensure that the antennas will be correctly replaced in their original position.

  9. jp.ik Leap T304 LCD Replacement Replacement: шаг 9, изображение 1 из 3 jp.ik Leap T304 LCD Replacement Replacement: шаг 9, изображение 2 из 3 jp.ik Leap T304 LCD Replacement Replacement: шаг 9, изображение 3 из 3
    • Remove the left and right LCD Bracket.

  10. jp.ik Leap T304 LCD Replacement Replacement: шаг 10, изображение 1 из 3 jp.ik Leap T304 LCD Replacement Replacement: шаг 10, изображение 2 из 3 jp.ik Leap T304 LCD Replacement Replacement: шаг 10, изображение 3 из 3
    • Remove the LCD from the Bezel.

    • To reassemble the LCD module, you must perform the previous steps in reverse.

    • After replacing the LCD, always check if flat cable is correctly connected and the protection tape is stuck in the original position.

Заключение

To reassemble your device, follow these instructions in reverse order.

Еще один человек закончил это руководство.

Особая благодарность этим переводчикам:

pt en

100%

Miguel Santosпомогает нам починить мир! Хотите внести свой вклад?
Начните переводить ›

Miguel Santos

Участник с: 01/29/24

509 Репутация

1 руководство автора

Команда

jp.ik Участник jp.ik

Business

2 членов

Автор 14 руководств

0 Комментариев

Добавить комментарий

Просмотр статистики:

За последние 24часов: 0

За последние 7 дней: 1

За последние 30 дней: 4

За всё время: 144