Введение
This guide is intended to help those whose reMarkable is no longer supported by the manufacturer, so only begin this repair if you have exhausted all other possible means to get the device fixed by the original manufacturer!
Because the aluminum backplate of the device is glued to the plastic frame it is very difficult to remove and put back. I would not recommend starting the repair without the proper tools and some prior fixing experience.
I do not take any responsibility for damages done by following this guide and as I stated above, first try connecting with official reMarkable support!
Выберете то, что вам нужно
-
-
First, make sure that your reMarkable is completely turned off before you start the repair process.
-
Warning: Do not let the display come in contact with alcohol or any solvent containing alcohol as this may damage the device.
-
Remove both the bottom and top rubber strips. It will reveal 6 small Philips head screws underneath.
-
Remove all 6 screws.
-
-
-
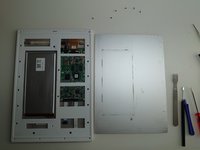
The aluminum backplate is glued to the device and you will need a good prying tool to be able the separate the back from the plastic holder.
-
The glue holds all 4 sides together, the glue also runs vertically and down the middle.
-
The hardest part is to start somewhere on the backplate where there is a big enough gap (between the backplate and the device) to put a prying tool in without bending the aluminum back.
-
Start from one of the upper corners. Slowly and carefully remove the aluminum back plate with a prying tool that is durable enough and can fit between the backplate and the device.
-
-
-
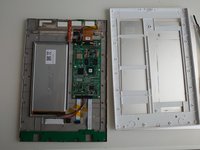
There are 6 screws on both sides and 3 in the middle upper part. Remove all (6+6+3 )15 screws. (The bottom 2 screws do not need to be removed).
-
After the screws are removed the plastic frame can be separated from the main logic board holding frame. THERE'S ALSO SOME GLUE/FILLER BETWEEN THE 2 PARTS! So be mindful when separating the two pieces.
-
-
-
-
Pull/pry the battery connector upwards to detach it from the mainboard.
-
-
-
Use similar battery to replace the original.
-
The battery is held in place by some glue. Use a durable tool to remove the battery from its place.
-
-
-
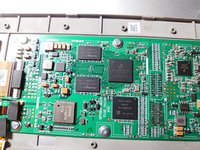
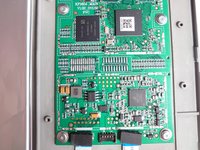
Remove all connectors if you want to replace the mainboard. All connectors work similarly - you need to turn up the black / back part of the connector and pull out the cables. The two exceptions are the battery connector which simply needs to be pulled or pried upwards. Same for the WiFi coax connector.
-
There are 6 screws with special washers that are holding the main board to the frame.
-
-
-
Interestingly, even the other side of the mainboard contains some elements near the CPU which require a semicircle hole cut into the frame... interesting design decision.
-
-
-
Remove the 2 screws that are holding the button/USB panel in place.
-
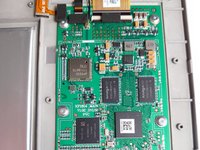
Disconnect the ribbon cable from the panel by turning/pulling up the black/back part of the connector (see picture)
-
-
-
Illustration on how the power button and WiFi cable are connected to the upper part of the mainboard.
-


To reassemble your device, follow these instructions in reverse order.
Отменить: Я не выполнил это руководство.
8 человек успешно провели ремонт по этому руководству.

11 Комментарии к руководству
The one thing I’m having difficulty with is simply identifying the proper battery. Suggestions/source would be greatly appreciated. Unfortunately “similar to” doesn’t give much guidance.
@crawfordlong, Unfortunately, it looks like Remarkable isn’t too keen on the end user replacing their own battery so they don’t provide the specific battery you would need. I did find this on their website. You could probably contact them directly and ask about battery specs? They’ll probably warn you about it voiding your warranty, but it’s worth a shot.
They have been awful. Completely ghosting any request for technical information after I rebuffed their attempt to turn a tech support request into an upsell opportunity (for a new tablet). I’m unlikely to support them in the future at this point, given the way they’ve handled this. I would have been fine with almost any answer, up to and including “I’m sorry, we do not recommend and do not assist with out of warranty self-repairs.” But losing all interest in communicating after I declined to spend several hundred dollars to replace a device that might simply need a battery? Horrendous.
I had a broken tablet, so I got it from there… but as far as I see from these old pictures a 3.7V 3000mAh battery with size 2867144 what was installed here. If you unable to find exact same size then I would go with any fitting size which is closely matching.
Obviously, if you do not know what you are doing then please DO NOT play with the battery! It can cause fire or other type of damages!!!
R,
PS: quick search gave me this (I have not tried to install it or buy it - this is only a search result)
The issue I’m running into is the connector + number and nature of wires (everything I’m finding has a single +/- wire pair, not 2 pair + yellow). Frustrating. (And your warning is both appreciated and received, but I’m comfortable with the attempt.)