Перейти к основному содержанию

Sostituzione gruppo schermo iPad Pro 12.9"

Примечание: Вы редактируете необходимое руководство. Любые внесённые вами изменения влияют на все 4 руководства, которые включают этот шаг.

Английский
Итальянский
Шаг 9
iPad Pro 12.9" Display Assembly Replacement: шаг 0, изображение 1 из 3 iPad Pro 12.9" Display Assembly Replacement: шаг 0, изображение 2 из 3 iPad Pro 12.9" Display Assembly Replacement: шаг 0, изображение 3 из 3
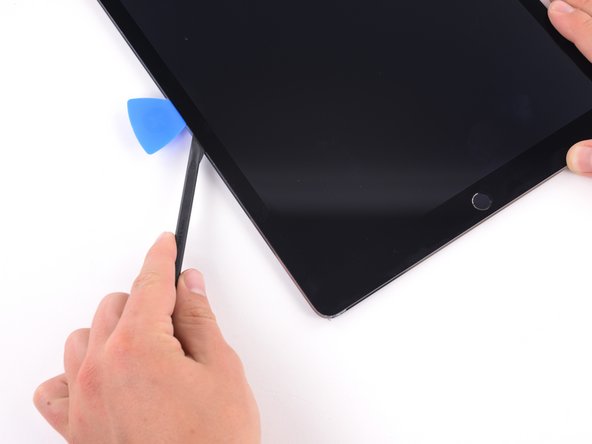
  • Lay a hot iOpener along the bottom left corner of the iPad, spanning from the opening pick to the home button.

  • After letting the adhesive soften, insert an opening pick or halberd spudger into the gap next to the Smart Connector.

  • Be careful not to insert the halberd spudger more than 2 mm.

  • Use an opening pick or halberd spudger to slice the adhesive along the bottom left side of the iPad. If the slicing becomes difficult, reheat the edge and try again.

Appoggia un iOpener caldo lungo l'angolo in basso a sinistra dell'iPad, dal plettro di apertura al tasto Home.

Dopo aver lasciato ammorbidire l'adesivo, inserisci un plettro di apertura o uno spudger halberd nella fessura vicino alla porta Smart Connector.

Fai attenzione a non inserire il plettro per più di 2 mm.

Usa un plettro di apertura o uno spudger halberd per tagliare l'adesivo lungo la parte inferiore del lato sinistro dell'iPad. Se diventa difficile tagliare, scalda di nuovo il bordo e riprova.

Ваш вклад лицензируется под свободной лицензией Creative Commons .