Перейти к основному содержанию

Drahtlos-Ladespule und Lautsprecher entfernen

Примечание: Вы редактируете необходимое руководство. Любые внесённые вами изменения влияют на все 11 руководства, которые включают этот шаг.

Английский
Немецкий

Перевод шага 1

Шаг 1
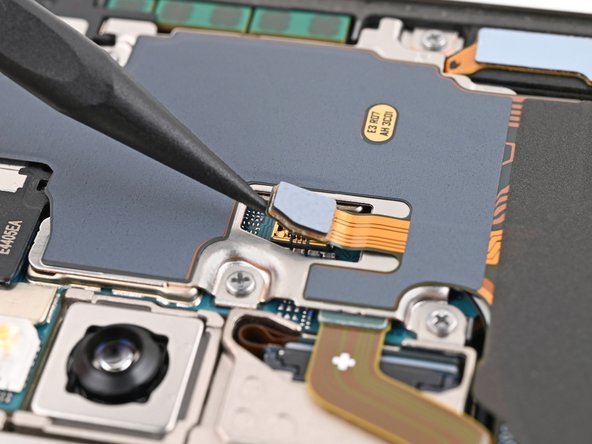
Wireless Charging Coil and Loudspeaker Removal, Disconnect the wireless charging coil: шаг 0, изображение 1 из 2 Wireless Charging Coil and Loudspeaker Removal, Disconnect the wireless charging coil: шаг 0, изображение 2 из 2
Disconnect the wireless charging coil
  • Use a spudger to pry up and disconnect the wireless charging coil press connector from the motherboard.

  • There's an arrow printed on the board near each press connector that indicates the recommended prying location. Only pry in this location for each press connector to avoid dislodging surface-mounted components.

  • To reconnect press connectors, align the connector carefully over its socket and press down with your fingertip—first on one side, then the other—until it clicks into place. Don't try to force the connector into place. If you're having trouble, reposition it and try again.

Heble den Druckstecker der Drahtlos-Ladespule mit der Spudgerspitze hoch und trenne sie von der Hauptplatine ab.

In der Nähe der Druckstecker ist ein Pfeil auf der Platine aufgedruckt. Heble genau an dieser Stelle, damit keine der umliegenden SMD-Bauteile beschädigt werden.

Um Druckstecker wieder anzuschließen, musst du ihn erst sorgfältig ausrichten und auf einer Seite festdrücken, bis er einrastet. Wiederhole das dann für die andere Seite. Drücke nicht in der Mitte. Wenn der Stecker schlecht sitzt, können die Kontakte verbogen und dauerhaft beschädigt werden.

Ваш вклад лицензируется под свободной лицензией Creative Commons .