Перейти к основному содержанию

Reemplazo de la batería del iPad mini 4 LTE

Примечание: Вы редактируете необходимое руководство. Любые внесенные вами изменения повлияют на руководство, которое включает эту стадию.

Английский
Испанский
Шаг 2
iPad mini 4 LTE Battery Replacement: шаг 0, изображение 1 из 1
  • In the following steps you will be cutting the adhesive under the battery, and prying it off of the rear case.

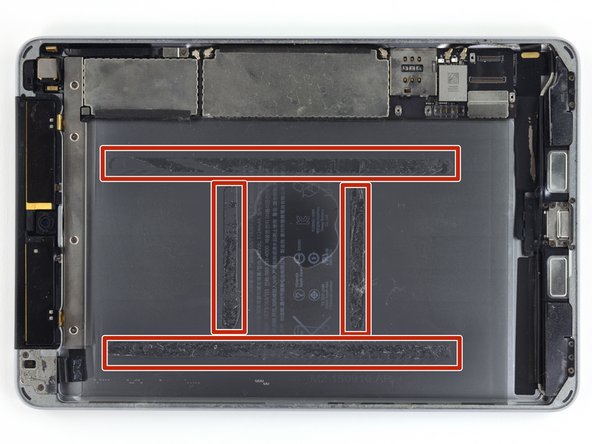
  • The adhesive is laid out as shown in this image: two strips along the long edges, and two shorter strips perpendicular in the center.

  • To avoid damaging the battery, use plastic tools, heat, and patience. Do not puncture, bend, or overheat the battery.

  • Do not pry near the logic board, you could damage your iPad.

  • If you are performing this procedure on the Wi-Fi version, it is safe to insert pry tools from the upper, lower, and left edges of the battery. For the LTE version, only pry from the lower and left edges to avoid damaging other components.

En los siguientes pasos, cortará el adhesivo debajo de la batería y lo sacará de la caja trasera.

El adhesivo se presenta como se muestra en esta imagen: dos tiras a lo largo de los bordes largos y dos tiras más cortas perpendiculares en el centro.

Para evitar dañar la batería, use herramientas de plástico, calor y paciencia. No perfores, dobles ni sobrecalientes la batería.

No hagas palanca cerca de la placa lógica, podría dañar tu iPad.

Si estás realizando este procedimiento en la versión de Wi-Fi, es seguro insertar herramientas de palanca de los bordes superior, inferior e izquierdo de la batería.Para la versión LTE, solo haga palanca desde los bordes inferior e izquierdo para evitar dañar otros componentes.

Para la versión LTE, solo haga palanca desde los bordes inferior e izquierdo para evitar dañar otros componentes.

Ваш вклад лицензируется под свободной лицензией Creative Commons .