Перейти к основному содержанию

Remplacement de la batterie de l'iPad Mini 4 LTE

Примечание: Вы редактируете необходимое руководство. Любые внесенные вами изменения повлияют на руководство, которое включает эту стадию.

Английский
Французский
Шаг 2
iPad mini 4 LTE Battery Replacement: шаг 0, изображение 1 из 1
  • In the following steps you will be cutting the adhesive under the battery, and prying it off of the rear case.

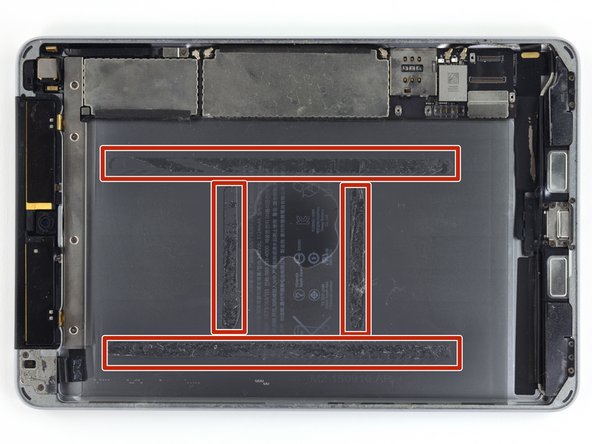
  • The adhesive is laid out as shown in this image: two strips along the long edges, and two shorter strips perpendicular in the center.

  • To avoid damaging the battery, use plastic tools, heat, and patience. Do not puncture, bend, or overheat the battery.

  • Do not pry near the logic board, you could damage your iPad.

  • If you are performing this procedure on the Wi-Fi version, it is safe to insert pry tools from the upper, lower, and left edges of the battery. For the LTE version, only pry from the lower and left edges to avoid damaging other components.

Dans les étapes suivantes, vous ferez céder l'adhésif sous la batterie et retirerez celle-ci de la coque arrière.

L'adhésif est disposé comme indiqué sur cette image : deux bandes le long des bords longs et deux bandes plus courtes perpendiculaires au centre.

Pour éviter d'endommager la batterie, utilisez des outils en plastique, de la chaleur et soyet patient. Ne pas percer, plier ou surchauffer la batterie.

Ne faites pas levier près de la carte mère, vous risqueriez d'endommager votre iPad.

Si vous effectuez cette procédure sur la version Wi-Fi, il est prudent d'insérer des outils à levier sur les bords supérieur, inférieur et gauche de la batterie. Sur la version LTE, ne faites levier que sur les bords inférieur et gauche pour éviter d'endommager d'autres composants.

Ваш вклад лицензируется под свободной лицензией Creative Commons .