Перейти к основному содержанию

why! N131WU Battery Replacement

Выберете то, что вам нужно

  1. why! N131WU Battery Replacement, Remove the Screws: шаг 1, изображение 1 из 1
    • Remove the case screws (red) and the keyboard screws (green).

    • Be sure not to lose these screws. You will need them to reassemble your laptop.

  2. why! N131WU Battery Replacement, Remove the Keyboard: шаг 2, изображение 1 из 3 why! N131WU Battery Replacement, Remove the Keyboard: шаг 2, изображение 2 из 3 why! N131WU Battery Replacement, Remove the Keyboard: шаг 2, изображение 3 из 3
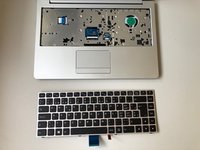
    • Using the hole provided under the case (see picture), push the keyboard out using a thin screwdriver or some other solid object.

    • Hold onto the keyboard as you push the keyboard so as not to damage the two cables still attached.

  3. why! N131WU Battery Replacement, Remove Keyboard Connections: шаг 3, изображение 1 из 3 why! N131WU Battery Replacement, Remove Keyboard Connections: шаг 3, изображение 2 из 3 why! N131WU Battery Replacement, Remove Keyboard Connections: шаг 3, изображение 3 из 3
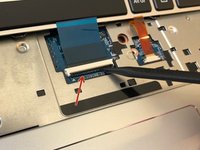
    • (Blue Cable) Push up on the thin black portion on the connector and gently pull out the blue ribbon cable until it comes out.

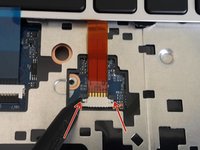
    • (Orange Cable) Remove the orange cable by sliding the gray part of the connector towards the screen, then gently pull on the ribbon cable.

  4. why! N131WU Battery Replacement, Remove the upper screws: шаг 4, изображение 1 из 2 why! N131WU Battery Replacement, Remove the upper screws: шаг 4, изображение 2 из 2
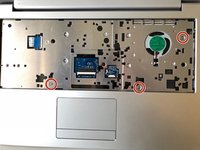
    • Unscrew the three screws that were under the keyboard. Be sure to hold onto these.

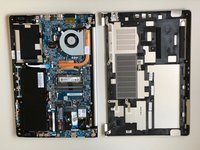
    • After these are removed, you can now remove the lower part of the case from the rest of the computer.

  5. why! N131WU Battery Replacement, Battery: шаг 5, изображение 1 из 2 why! N131WU Battery Replacement, Battery: шаг 5, изображение 2 из 2
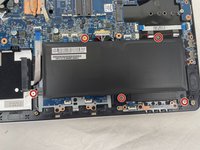
    • Remove the five Phillips screws securing the battery.

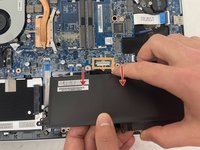
    • Unplug the power connector and lift the battery out in the direction of the arrows to remove it.

Заключение

To reassemble your device, follow these instructions in reverse order.

Еще один человек закончил это руководство.

Особая благодарность этим переводчикам:

fr en

100%

Эти переводчики помогают нам починить мир! Хотите внести свой вклад?
Начните переводить ›

Felice Suglia

Участник с: 06/15/13

33 538 Репутация

Автор 283 руководств

1 Комментарий к руководству

Merci beaucoup, tutoriel très bien fait qui nous a beaucoup aidé !

La Puce A l'Oreille - Ответить

Добавить комментарий

Статистика просмотров:

За последние 24 часов: 0

За последние 7 дней: 3

За последние 30 дней: 10

За всё время: 626