Перейти к основному содержанию

why! N240BU Hard Drive Replacement

Выберете то, что вам нужно

  1. why! N240BU Hard Drive Replacement, Battery: шаг 1, изображение 1 из 2 why! N240BU Hard Drive Replacement, Battery: шаг 1, изображение 2 из 2
    • Start by unlocking the right locking latch.

    • Then, by simultaneously unlocking the left latch, lift the battery out of its socket.

  2. why! N240BU Hard Drive Replacement, Access to main components: шаг 2, изображение 1 из 2 why! N240BU Hard Drive Replacement, Access to main components: шаг 2, изображение 2 из 2
    • Begin by spotting the dummy memory card.

    • Then, remove it and put it on your workplan.

  3. why! N240BU Hard Drive Replacement: шаг 3, изображение 1 из 3 why! N240BU Hard Drive Replacement: шаг 3, изображение 2 из 3 why! N240BU Hard Drive Replacement: шаг 3, изображение 3 из 3
    • Locate the 15 screws that hold the bottom cover of the device in place.

    • Unscrew them and place them on your work surface.

    • Then, un-clip the bottom cover, starting with the side shown in the third picture.

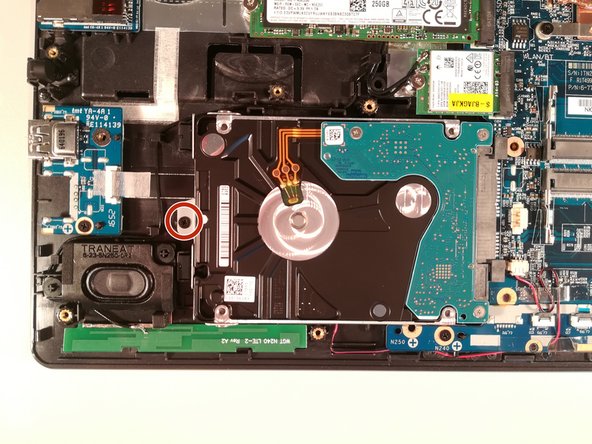
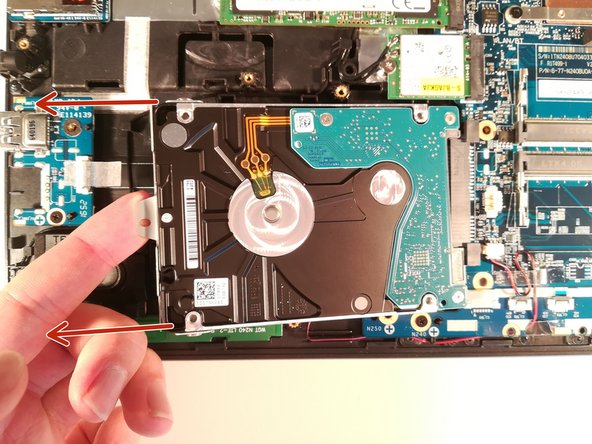
  4. why! N240BU Hard Drive Replacement, Hard Drive (mass storage): шаг 4, изображение 1 из 3 why! N240BU Hard Drive Replacement, Hard Drive (mass storage): шаг 4, изображение 2 из 3 why! N240BU Hard Drive Replacement, Hard Drive (mass storage): шаг 4, изображение 3 из 3
    • Remove the screw circled in red

    • Lift up the hard drive

    • Remove the hard drive in the direction of the red arrows

Заключение

To reassemble your device, follow these instructions in reverse order.

Еще один человек закончил это руководство.

Особая благодарность этим переводчикам:

fr en

100%

Эти переводчики помогают нам починить мир! Хотите внести свой вклад?
Начните переводить ›

Felice Suglia

Участник с: 06/15/13

30 731 Репутация

Автор 261 руководств

0 Комментариев

Добавить комментарий

Просмотр статистики:

За последние 24часов: 1

За последние 7 дней: 1

За последние 30 дней: 1

За всё время: 155