Перейти к основному содержанию

why! N240JU Replacement motherboard

Выберете то, что вам нужно

  1. why! N240JU Replacement motherboard, Battery: шаг 1, изображение 1 из 2 why! N240JU Replacement motherboard, Battery: шаг 1, изображение 2 из 2
    • Start by unlocking the right locking latch.

    • Then, by simultaneously unlocking the left latch, lift the battery out of its socket.

  2. why! N240JU Replacement motherboard, Access to main components: шаг 2, изображение 1 из 2 why! N240JU Replacement motherboard, Access to main components: шаг 2, изображение 2 из 2
    • Begin by spotting the dummy memory card.

    • Then, remove it and put it on your workplan.

  3. why! N240JU Replacement motherboard: шаг 3, изображение 1 из 3 why! N240JU Replacement motherboard: шаг 3, изображение 2 из 3 why! N240JU Replacement motherboard: шаг 3, изображение 3 из 3
    • Locate the 15 screws that hold the bottom cover of the device in place.

    • Unscrew them and place them on your work surface.

    • Then, un-clip the bottom cover, starting with the side shown in the third picture.

  4. why! N240JU Replacement motherboard, SSD M.2 disk: шаг 4, изображение 1 из 3 why! N240JU Replacement motherboard, SSD M.2 disk: шаг 4, изображение 2 из 3 why! N240JU Replacement motherboard, SSD M.2 disk: шаг 4, изображение 3 из 3
    • Locate the M.2 SSD in its slot.

    • Unscrew the fastening screw of the latter.

    • Lift and remove the SSD M.2 drive from its connector.

  5. why! N240JU Replacement motherboard, Hard disk (mass storage): шаг 5, изображение 1 из 3 why! N240JU Replacement motherboard, Hard disk (mass storage): шаг 5, изображение 2 из 3 why! N240JU Replacement motherboard, Hard disk (mass storage): шаг 5, изображение 3 из 3
    • Locate the hard drive in its location.

    • Lift it slightly.

    • Finally remove it from its SATA connector.

  6. why! N240JU Replacement motherboard, BIOS stack: шаг 6, изображение 1 из 2 why! N240JU Replacement motherboard, BIOS stack: шаг 6, изображение 2 из 2
    • To reassemble your device, follow the instructions in reverse order.

    • Lift it gently and take it out of its place.

  7. why! N240JU Replacement motherboard, WLAN card: шаг 7, изображение 1 из 2 why! N240JU Replacement motherboard, WLAN card: шаг 7, изображение 2 из 2
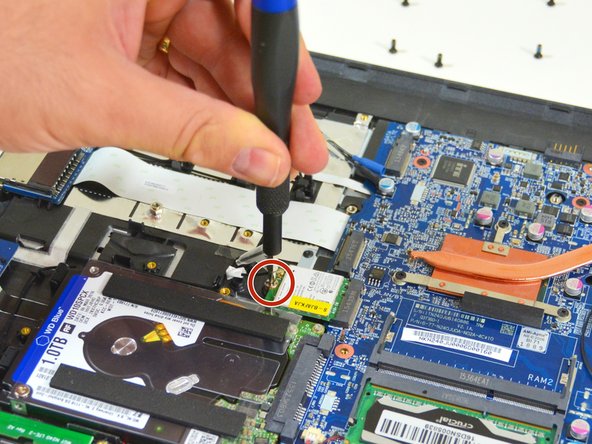
    • Carefully unplug the MAIN and AUX antennas.

    • Unscrew the fixing screw with the Philips # 0 screwdriver. Then lift the chipset slightly and remove it from the connector.

  8. why! N240JU Replacement motherboard, RAM Memory: шаг 8, изображение 1 из 3 why! N240JU Replacement motherboard, RAM Memory: шаг 8, изображение 2 из 3 why! N240JU Replacement motherboard, RAM Memory: шаг 8, изображение 3 из 3
    • Find and separate the spring blades that maintain the memory module in place (right).

    • Find and separate the spring blades that maintain the memory module in place (left).

    • Remove the memory module (RAM) from its connector.

  9. why! N240JU Replacement motherboard, The fan: шаг 9, изображение 1 из 3 why! N240JU Replacement motherboard, The fan: шаг 9, изображение 2 из 3 why! N240JU Replacement motherboard, The fan: шаг 9, изображение 3 из 3
    • Remove the power cable from the fan.

    • Unscrew the two screws securing the fan.

    • Finally remove the fan and place it on your worktop.

  10. why! N240JU Replacement motherboard, The keyboard: шаг 10, изображение 1 из 3 why! N240JU Replacement motherboard, The keyboard: шаг 10, изображение 2 из 3 why! N240JU Replacement motherboard, The keyboard: шаг 10, изображение 3 из 3
    • Unscrew the circled screws in green and red

    • Put the computer in the position of the second image while pushing a paper clip into the hole of the screw circled in green until you hear a click

    • Lift the keyboard

  11. why! N240JU Replacement motherboard: шаг 11, изображение 1 из 3 why! N240JU Replacement motherboard: шаг 11, изображение 2 из 3 why! N240JU Replacement motherboard: шаг 11, изображение 3 из 3
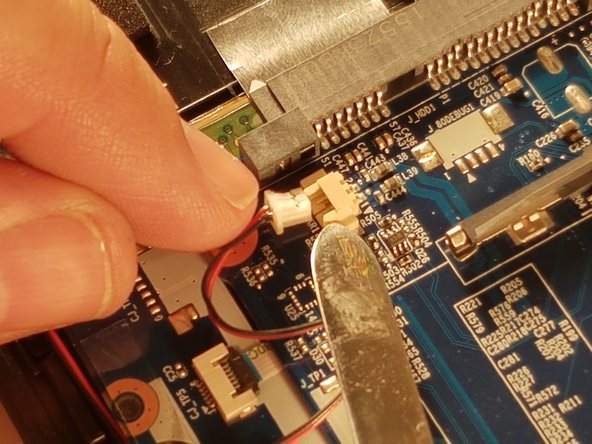
    • Disconnect the connector circled in red in the direction of the arrow

  12. why! N240JU Replacement motherboard, Motherboard: шаг 12, изображение 1 из 3 why! N240JU Replacement motherboard, Motherboard: шаг 12, изображение 2 из 3 why! N240JU Replacement motherboard, Motherboard: шаг 12, изображение 3 из 3
    • Locate the two flat cables and remove them carefully.

  13. why! N240JU Replacement motherboard: шаг 13, изображение 1 из 3 why! N240JU Replacement motherboard: шаг 13, изображение 2 из 3 why! N240JU Replacement motherboard: шаг 13, изображение 3 из 3
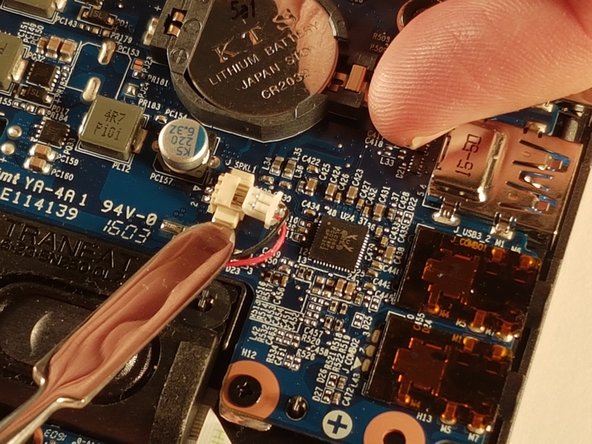
    • Locate the five connectors on the motherboard

    • Unplug all connectors

  14. why! N240JU Replacement motherboard: шаг 14, изображение 1 из 3 why! N240JU Replacement motherboard: шаг 14, изображение 2 из 3 why! N240JU Replacement motherboard: шаг 14, изображение 3 из 3
    • Unplug all connectors

  15. why! N240JU Replacement motherboard: шаг 15, изображение 1 из 2 why! N240JU Replacement motherboard: шаг 15, изображение 2 из 2
    • Unscrew the four screws circled in red

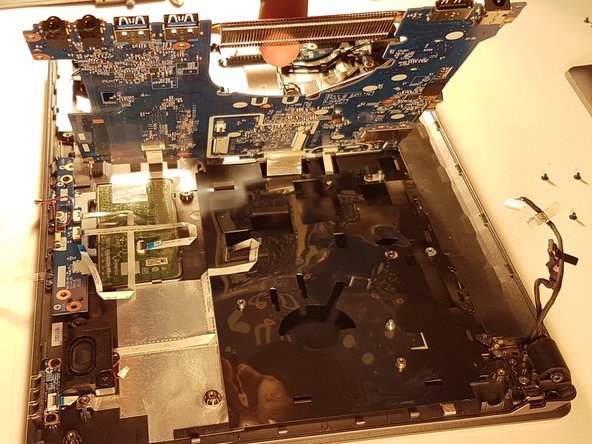
    • Lift the motherboard by taking it through the radiator

  16. why! N240JU Replacement motherboard: шаг 16, изображение 1 из 3 why! N240JU Replacement motherboard: шаг 16, изображение 2 из 3 why! N240JU Replacement motherboard: шаг 16, изображение 3 из 3
    • Disconnect the two connectors circled in red

Заключение

To reassemble your device, follow the instructions in reverse order.

Еще один человек закончил это руководство.

Особая благодарность этим переводчикам:

fr en

100%

irlandaпомогает нам починить мир! Хотите внести свой вклад?
Начните переводить ›

Felice Suglia

Участник с: 06/15/13

30 908 Репутация

Автор 264 руководств

0 Комментариев

Добавить комментарий

Просмотр статистики:

За последние 24часов: 1

За последние 7 дней: 5

За последние 30 дней: 9

За всё время: 363