Введение
I bought this keyboard off eBay broken just to tear it down for posterity. I found very little that could be repaired on it. But you get to see its guts. This teardown destroys the keyboard!
Выберете то, что вам нужно
-
-
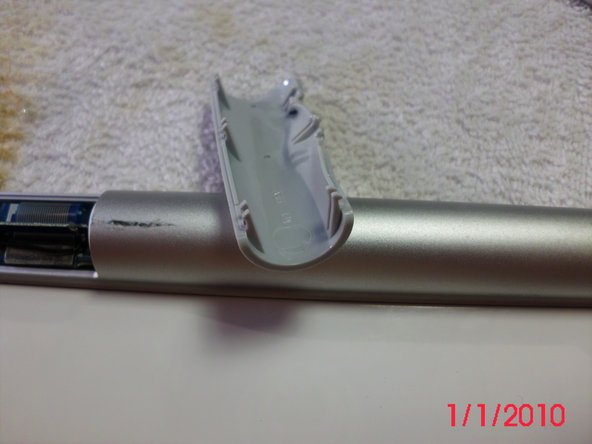
To open the battery compartment, on the left side of the keyboard use a coin to loosen the screw off cover.
-
The keyboard's power button is on the right side
-
-
-
The upper left hand corner (when turned over) of the keyboard contains the On/Off switch and the bluetooth board.
-
The removable plastic covering plate may be removed by squeezing it together to release the retaining hooks, Do one side at a time, Squeeze and rotate upward.
-
-
-
The plastic is very stiff and there are three sets of two hooks on each side. This one has been deformed on the back right hand side from a heat gun.
-
There is a 90 mm by 12 mm circuit board intersected by a vertical 53 mm by 7 mm board forming a T shape. The vertical board appears to be the bluetooth antenna.
-
Part # 820-2181 is printed on the board.
-
This board also has the Power Indicating LED light. This board fits inside the round casing unit by the power button. The power button, battery connector and keyboard all connect to this board.
I was able to get the cover off by using a combination of channel lock pliers and a 2mm thick rubber garlic peeler sheet. I put the rubber sheet over the plastic cover and gently gripped it with the pliers, wiggling it until I heard a click. One side came up and was able to squeeze the other side with my fingers and remove it. No marring or distortion to the cover. Obviously, being gentle is key.
-
-
-
Using the tip of a spudger, flip up the keyboard ribbon cable retaining flap. Pull the keyboard ribbon cable straight out of its socket. It slides out from under the 'vertical' board. Shouldn't be too difficult.
-
-
-
The board is held in place with a small Phillips screw.
-
Ater removing the screw the board can be gently extricated from the tube. The white plastic disc to the right of the screw needs to be pushed to the right to free up the board.
-
Note the red and black wires. This connector inserts laterally. The wires go to the battery receptor in the middle of the tube.
-
The screw is in two parts, a phillips screw goes into a post screw. The top screw holds in the board and the post screw holds the On/Off switch in place.
I used a T-8 and it fits perfectly. The T-7 has some slack.
-
-
-
Here's the obverse of the board. There is a black two prong connector that plugs into the board from the power switch.
-
The wires run under a small plastic retaining tab and can be moved downward and out.
-
-
-
-
The power switch is held in place by the Main Board Bracket. Apple Part # 815-9674. The end of the bracket has a small round protrusion that fits into a crescent shaped cut out on the power switch.
-
The Power Button Board can be pushed out from the inside.
-
-
-
The internal battery terminal can be knocked out with a long screwdriver. It is spring loaded and held in place by a metal expansion ring.
-
I could not discern how the exact placement is determined as the interior of the tube appears to be perfectly smooth.
How did you manage to knock out the battery terminal with only a screwdriver?
note that the picture shows the battery terminal is broken by knocking it out with a screwdriver. You need a special set of long nosed pliers that can remove the circlip by contracting it.
I used two extension bars and a socket of a 1/4" socket set to knock out the battery terminal form the logic board side to the battery load hole without destroying anything. I have not removed the circlip beforehand.
The battery terminal is hold in place by a small heel in the tube. The circlip will clip in when you later push the battery terminal back.
I used a circlip pliers (Hazet 1843a - 12) to squeeze the circlip an bring the whole battery terminal back into the battery tube. I used the same tools to knock in the battery terminal until it latches into its designated position.
I’m experiencing the crazy but well-known issue where this only works when there’s a tiny pea of aluminum foil inserted into the cylinder -> https://gigaom.com/2009/11/05/how-to-rev...
Without breaking something that’s already working well enough, does anyone have any insight into what might be causing this behaviour?
I believe this is caused by a combination of the internal terminal in the hole in the plastic end where the battery terminal is supposed to seat being seated a little to far back. This appears to happen over time and can happen faster when the AA batteries you use have a higher positive terminal “nub” than others. The rechargeable batteries I had switched to started having issues and I switched to standard AA batteries but eventually the issue came back and then neither type of batteries worked. The foil solution is either a solution or a stop gap measure until you can get inside and remove the battery/spring section to re-seat the internal terminal in the hole again.
I’ve just been through the above bits to get at it and decided to put it all back together and go with the foil solution myself.
Hope that all helps fill in some gaps :)
Julz -
-
-
-
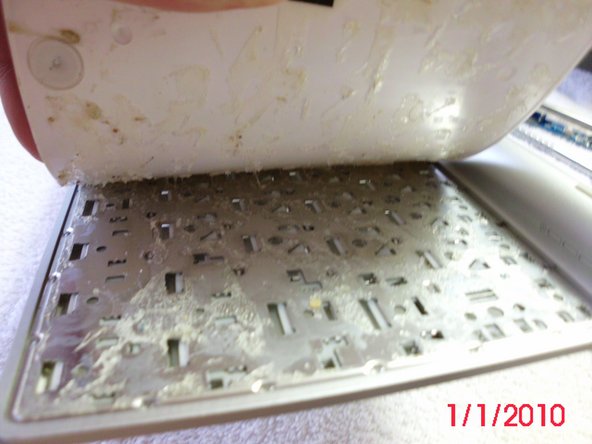
Removal of the back of the keyboard was done using a heat gun and a scalpel.
-
Heating the board quickly warps and destroys it.
-
Glue is all over the bottom plate. It was separated by pulling it apart and slicing the glue with a scalpel.
Hi! I was wondering if you had a temperature scale to give us.
There is lot of plastic on these pretty things, I'd prefer not to deform any part of it with too many heat.
My idea is to use a heat table which is more accurate, and non destructive.
Using a small screwdriver to get under the plastic cover, it is possible to gradually work around prising the plastic away from the adhesive sheet.
All to no avail though as once all the screws are removed, you realise that the metal backplate is spot- welded to the aluminium frame all the way around the edge and dozens of spots in between.
No separating the layers I'm afraid, so little point in prising off the back.
-
-
-
There are ten 2 mm screws located on the back of the board.
-
-
-
The layers are pulled apart. Frame, plastic separator layer, printed circuit layer
-
-
-
Here can be seen the layers of the frame, separator, circuit board and metal back plate.
-
-
-
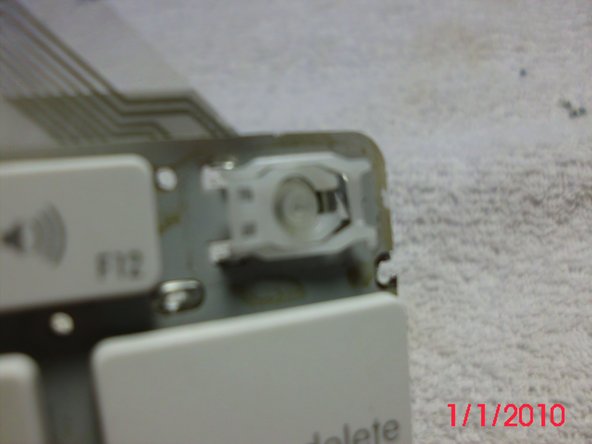
Keys can be easily removed by using a scalpel or fingernail under the left side and lifted.
I had an easier time popping out the keys by gently wedging something under the bottom of the key and then prying shallowly from the top. As I noticed that the supports on the bottom of the key are crazy fragile and pop out automatically once the top ones give anyway.
Then when putting them back in, gently set the bottom of the key by wiggling it in. Then when the bottom is flush with the board and held by your thumbs you can use your index fingers to pop in the tops in one push.
***some of the keys supports are oriented differently so keep that in mind too -
-
-
Here you can see the pole that the screw went in. You can remove this, which allows you to remove the power button and the white housing.
-
Also, here is the battery terminal (spring loaded) which had to be forced out. It's held in the tube by the expansion ring, which unfortunately is the best-made bit of this keyboard. I forced it out using a long screw driver, but unfortunately broke the wires. Keyboard had died anyway, thanks Apple.
-


Команда

25 Комментариев
This keyboard holds 3 AA batteries not 2.
No quibble at all. My keyboard ca. 2010 years old is two batteries. No question but that the A1255 had three, the A1314 which I have is two. Duh! (for me). I didn't think initially about model numbers and I got enough out of this to make it work
Thanks to this post I managed to remove a stuck battery on an A1314, pushing the battery out with a letter opener.
The ribbon cable is not hard to remove, but a little trick to open and relock it back? I just had cataract surgery which didn't help, but it's pretty obvious when you take a close look.
There was no corrosion; the keyboard was working. Someone installed off-brand batteries, no leaks just stuck. New name brand (copper tops) slide in and out without a problem.
jmc56 -
If you kept the keys, I'd like to buy an "L" key and the plastic/rubber part that goes underneath. Little accident with my keyboard left L key inoperable .... ;-)
Kevin
]can I buy new buttons, the up arrow fell off ?
How did you manage to knock out the battery terminal with only a screwdriver and from which end of the aluminum encasement did you knock it out?
Hi!
Do you know where i can buy the logic board for this keyboard??
Thanks
Wow.. you destroyed this thing! It would be great to have a guide that wouldn't need you to replace every component after opening it up! I'm looking into powder coating (once I remove the anodizing) this and my apple trackpad, so I would like to not destroy any part. I wonder what kind of glue can be used to re-bond the base to the frame...? Thank you for at least showing us what "not" to do when tearing it down.
I had this keyboard fail on me, and the 'ball of tin foil in the battery compartment' didn't work.
The grey plastic pops off with a small screwdriver - 6 clips hold it in place.
Re: the screw that’s at the ‘button’ end. Remove the screw, then you remove the ‘pole’ that the screw went into (it unscrews too). This will allow you to remove the board (it’s a squeeze, but you can pull it out) - you might need to push in the white plastic beside the button wall to allow you to get it out.
I was unable to non-destructively remove the internal battery terminal. The metal expansion ring which holds it in place appears to be the most well-made part of this entire £59 keyboard :( Only way I found was to knock it through forcefully with a long screwdriver - from the 'internal' end, out through the battery hole. The red wire became disconnected when I did this. It was connected to the point that sticks out the bottom of the battery terminal. Black wire connects to the expansion ring.
Good luck
Thanks a lot for the detailed tear down description! I was able to repair my keyboard and have no to by a new one. I don know how it can happen, but after a battery change the plastic cap on the end of the battery terminal was flipped around and the battery's positive terminal had no contact with the current collector.
Well I have two of these and both have failed with the 789, bio, jul, m,. keys. Strange eh? BTW, if you just lever the white plastic panel carefully with a longish blade, you can get it off non-destructively.
My ones have the grey cover in the centre rather than at the end.
I will stick them in the shed and if anyone wants them for spares (just pay the post) , try and get in touch
Any idea what may be causing typing “C” or X to type “XC” or “D” or “S” to type “SD”, “R” or “E “to type “ER”, “2” or “3'“ to type “23”?
Any idea why type C or X produces XC, S or D —> SD, R or E —> ER or 3 or 2 —> 23?
I had some Juice fall on this KeyBoard and the keys have become sticky and not pressing down freely.
How do I wash off the juice that has seeped under the keys.
Is the KeyBoard area Water Proof?
Same here! :-/
IF ANYONE KNOWS A GOOD FIX FOR THIS STICKY SITUATION - PLEASE FEEL FREE TO SHARE! :-)
It’s soo frustrating…
Thanks!
i would like to buy a vowel Alex. And a “T”.
So, I had two of these. One had the small plastic cap on the internal spring come out years ago and I had tried to put it back in and it went in upside down. I couldn’t get it back out so the keyboard didn’t work. I had kept it around for parts.
Then, a day ago my other A1255 keyboard wasn’t working and the batteries were low/dead. I replaced the batteries but no green light.
So, I took it (the failed one) apart with this guide. BTW, the internal battery seat is held in place by an internal snap ring. To properly remove it, you need a very long set of snapring pliers to displace the ring and push it out towards the battery end. I didn’t have the pliers so forced it out as noted above but this basically breaks the plastic base plug to which the snap ring is attached.
I took out the battery base, replaced the end plastic cap in the correct direction and then carefully and with difficulty put the battery base plug back in. I had to force the assembly down inside. Voilá works. Still have one for parts
I wanted to write back here - thanks so so much for your clear, detailed and simplified strip down. I actually came here to try and fix my keyboard - I suspected the bluetooth board was defective. It may well be I have damaged the board with batteries in for a long period of time without using - no visible damage but I did wonder. The keyboard was appearing on bluetooth devices for a few seconds at start up but only for a few seconds and then disappeared. Anyway kindly found a replacement board and hooked up the component and even for a novice person like me it wasn’t that hard just by being methodical and taking my time. Here I am writing from the said keyboard (it’s the A1255 with the transmitter board at the end as opposed to the one where the opening is in the middle which is I think newer (i.e mine is the older one). Anyway, just wanted to say how grateful I am and also nice to recycle something and continue using it rather than disposing and buying new (amazing all my keys still work)! Thanks again.