Выберете то, что вам нужно
-
-
Free the top by unscrewing the 2 screws in the front shiny cupwarmer section and the 2 screws in the plastic part in the back.
-
Carefully take off the top to reveal the inside of the Gaggia.
-
Be sure to unplug the power cord before working on your Old White Coffee Gaggia!!
-
-
-
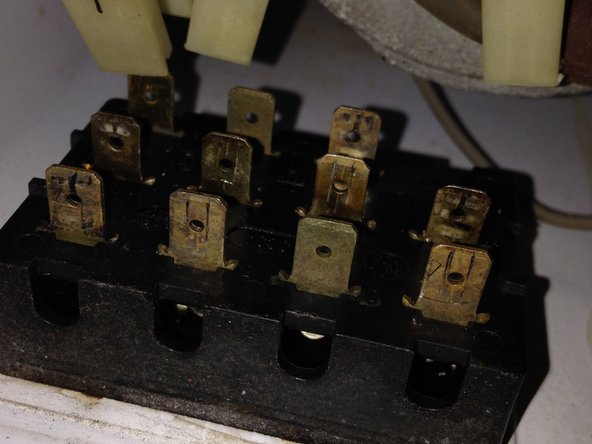
Label the connectors on the top connecting the wires to the switch assembly with a marker or ball pen. This way you'll be able to put them in the right place when reassembling your device.
-
Gently pull the labeled connectors of the switch assembly.
-
Continue with second row.
-
-
-
Pull the last two connectors off the switch assembly.
-
The switch assembly is held in place by two clamps on its sides that have to be pushed in.
-
Gently pull/push the switch assembly to the front to release it from the case.
-
-
-
Label and pull off the connectors to the warning light just right where the switches used to be.
-
There is one upper and one lower, divided by a plastic tab.
-
Next, unscrew the tab securing the grounding wire and the water hose to the top of the boiler.
-
-
-
Free the tab with the grounding wire.
-
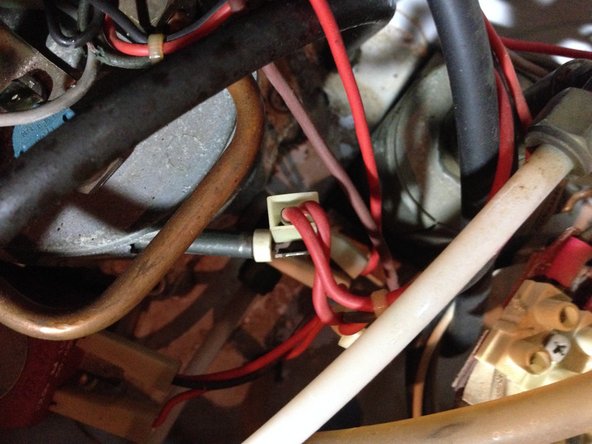
Next up is the two connectors that go into the blue (thermostate?) on the top of the boiler.
-
Label and gently pull off the first...
-
-
-
...and the second connector.
-
Next thing to pull off is the connecor that connects the red wire to the the duct that protrudes outward of the boiler. (The heating element)
-
Remember to label every connector you take off to remember where it goes.
-
-
-
At the magnetic valve next to the big round boiler, there are two more connectors to label and pull off.
-
-
-
Still not done with labelling and pulling off connectors, this time at the back of the boiler.
-
-
-
Left of the boiler and a little hard to reach sits connector no. 19 (if you followed my labelling method) once again on a ducty thing.
-
Right next to it, you can see the Over Pressure Valve Assembly (with the black hose coming out of the top)
-
-
-
Here you see the water intake hose, sucking water from out of the water tank and delivering it to the water pump.
-
The hose connects to the pump at its bottom side, so you can't quite see it.
-
The hose is secured to a black plastic piece in the bottom of the case by a metal clip that can be loosened with pliers.
-
Take off the hose and be careful not to lose the metal clip!
-
You can't take off both endings yet as the end that goes into the pump is still hidden!
-
-
-
-
Very dirty but functional, this is where the power cable is connected to all the wires we just freed.
-
You will only need to take out the cables on the right (bottom side on the picture), starting with the 3 from the power cable. (ground, brown and blue)
-
Unscrewing the whole luster terminal can make your life easier here.
-
-
-
Next, remove the two white cables (distinguishable by the one having an extra luster terminal)...
-
...and the grounding wire that go to the water pump.
-
-
-
You can now carefully pull the whole wiring out of the machine.
-
Mind any cables that still might be connected or stuck!
-
-
-
Next, we will take the black water hose, that connects the Over Pressure Valve to the water tank, off.
-
Pinch the clip holding the hose in place together to release it
-
-
-
Label the hoses as well as they have different lengths!
-
Proceed with the 2nd black hose that goes from the magnetic valve to the water outlet in the front.
-
-
-
With all silicone hoses disconnected, proceed by unscrewing the fitting that connects the steam lance to the steam valve.
-
Take the steam lance out through the top.
-
-
-
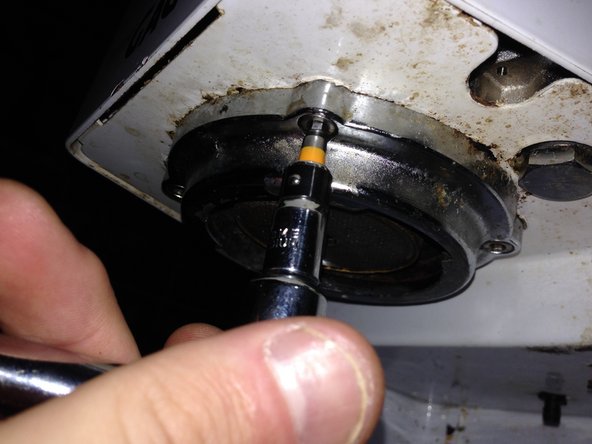
At the top of the water pump, there is a high pressure teflon hose that needs to be unscrewed in order to free the pump.
-
-
-
The steam valve is connected to the top of the boiler by a conducto pipe.
-
Unscrew both endings and take the duct off.
-
-
-
Unscrew the nut securing the steam valve assembly to the top of the boiler.
-
You can just pull the steam assembly out of the way for now.
-
If you have the fitting Allen key, you can also take out the steam assembly by taking off the black knob and pulling the assembly out to the back.
-
-
-
The vibratory water pump sits on a rubber fitting.
-
Unscrew both screws to free the pump.
-
Take out the whole pump/fitting assemby.
-
Unfortunately, the black rubber thing on the bottom of the pump originally connecting to the high pressure teflon hose is broken, be careful with this piece as there may not be a replacement!
-
-
-
Let's have a look at the portafilter holder and the screen at the front of your machine. As you can see, mine has its share of rust and gross dirt.
-
Unscrew the single screw in the middle of the screen.
-
The screen might be held in place by dirt and coffee of decades past.
-
-
-
Ewwwww...
-
I managed to take the screen off by jiggling a little on it with a screwdriver.
-
There are 4 screws holding the outer ring in place, unscrew those and the outer ring should come free.
-
-
-
With the outer ring/portafilter holder off, 2 more screws are uncovered.
-
Unscrew those.
-
-
-
There still is a black rubber gasket that needs to be taken off.
-
Not sure if those are still for sale, so check if you might use this gasket again.
-
-
-
Return to the inside of the machine and unscrew the 4 screws at the top of the boiler. Be careful not to strip the screws!! Gently pull the top of the boiler off.
-
Prepare to be grossed out.
-
Somewhere below the white/brownish stuff in the 3rd picture there is a black gasket hiding. Can you find it?
-
-
-
You can further disassemble the lower part of the boiler.
-
Unscrew the nut holding the magnetic valve in place, and pull all parts off.
-
Unscrew the 4 screws at the bottom of the valve assemby and it is free.
-
-
-
The Over Pressure Valve can also be unscrewed and taken apart.
-
Unscrew the thing holding the screw in place.
-
-
-
The power cable can be pulled out if you turn the plastic nut a little bit.
-
Close-Up of the pump, Ulka H53.
-
I hope I can get a replacement for the rubber thing that went here...
-