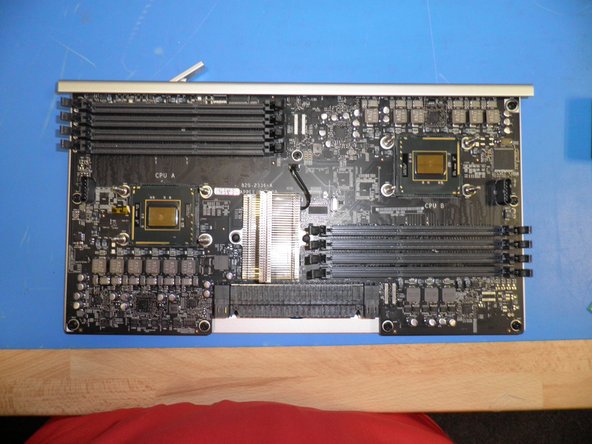
Перейти к основному содержанию

Выберете то, что вам нужно

Это демонтаж а неруководство по ремонту. Чтобы отремонтировать Mac Pro 2009-2012, воспользуйтесь нашим сервисным руководством.

  1. Mac Pro Early 2009 Teardown, Mac Pro Early 2009 Teardown: шаг 1, изображение 1 из 1
    • Ich habe den Mac Pro auseinander genommen.

  2. Mac Pro Early 2009 Teardown: шаг 2, изображение 1 из 1
    • Das Netzteil hinzugefügt.

  3. Mac Pro Early 2009 Teardown: шаг 3, изображение 1 из 1
    • Die Rückwandplatine hinzugefügt.

    I believe the image in step 3 is the graphics card and not the backplane.

    tpisellijr - Ответить

    yeah this is the graphics card.

    Ssamydla - Ответить

  4. Mac Pro Early 2009 Teardown: шаг 4, изображение 1 из 1
    • Die Frontplatine.

  5. Mac Pro Early 2009 Teardown: шаг 5, изображение 1 из 1
    • Hier kannst du die LEDs des Mac Pro sehen und die DIAG_LED am Boden.

  6. Mac Pro Early 2009 Teardown: шаг 6, изображение 1 из 1
    • Das Kabel, das die Rückwandplatine und die Frontplatine verbindet.

  7. Mac Pro Early 2009 Teardown: шаг 7, изображение 1 из 1
    • Eine weitere Ansicht der Frontplatine.

  8. Mac Pro Early 2009 Teardown: шаг 8, изображение 1 из 1
    • Eine weitere Ansicht auf die Rückwandplatine.

  9. Mac Pro Early 2009 Teardown: шаг 9, изображение 1 из 1
    • Hier sind die Rückwandplatine und die Frontplatine mit dem Kabel verbunden.

  10. Mac Pro Early 2009 Teardown: шаг 10, изображение 1 из 1
    • Die Bluetoothantenne wird mit dem Kabel mit der Rückwandplatine verbunden. Du musst vorsichtig sein und die Antenne auf jeden Fall anschließen, denn wenn keine Antenne angeschlossen ist wird die Rückwandplatine kurzgeschlossen.

  11. Mac Pro Early 2009 Teardown: шаг 11, изображение 1 из 1
    • Eine Ansicht auf die PCI Steckplätze des Mac Pro Anfang 2009

  12. Mac Pro Early 2009 Teardown: шаг 12, изображение 1 из 1
    • Die Anschlusskabel des optischen Laufwerkes auf der Rückwandplatine.

  13. Mac Pro Early 2009 Teardown: шаг 13, изображение 1 из 1
    • Hier sieht man die Einschalttaste, die mit der Frontplatine verbunden werden muss.

  14. Mac Pro Early 2009 Teardown: шаг 14, изображение 1 из 1
    • Prozessor-Gehäuse

  15. Mac Pro Early 2009 Teardown: шаг 15, изображение 1 из 1
    • Der linke Lüfter des Prozessorgehäuse mit Lautsprecher.

  16. Mac Pro Early 2009 Teardown: шаг 16, изображение 1 из 1
    • Der rechte Lüfter des Prozessorgehäuses. Beachte, dass er von zwei Klammern oben und unten zusammengehalten wird.

    What size are the fans?

    Luis Trejjo - Ответить

  17. Mac Pro Early 2009 Teardown: шаг 17, изображение 1 из 1
    • Das Gehäuse mit Netzteil, Rückwandplatine, Frontplatine.

    At this point, will it start power up? with only PSU and Boards.

    I'm trying to troubleshoot 2010 PSU/Processor issue.

    Ssamydla - Ответить

  18. Mac Pro Early 2009 Teardown: шаг 18, изображение 1 из 1
    • Kleine Abdeckungen bedecken das Netzteilkabel und das Super Drive-Kabel.

  19. Mac Pro Early 2009 Teardown: шаг 19, изображение 1 из 1
    • Prozessorkühlkörper des 8 Core.

  20. Mac Pro Early 2009 Teardown: шаг 20, изображение 1 из 1
    • Kühlkörper eines 4 Core.

    hola, me podrían apoyar con decir cual es el desarmador que se utiliza para desmontar los procesadores, saludos

    atomo182 - Ответить

  21. Mac Pro Early 2009 Teardown: шаг 21, изображение 1 из 1
    • Hier kann man den Unterschied zwischen einem 8 Core und einem 4 Core gut erkennen.

  22. Mac Pro Early 2009 Teardown: шаг 22, изображение 1 из 1
    • Prozessorgehäuse sowie linker und rechter Lautsprecher.

  23. Mac Pro Early 2009 Teardown: шаг 23, изображение 1 из 1
    • Ein netter Blick auf das Prozessorboard eines 8 Core.

  24. Mac Pro Early 2009 Teardown: шаг 24, изображение 1 из 1
    • CPU B auf dem Prozessorboard.

  25. Mac Pro Early 2009 Teardown: шаг 25, изображение 1 из 1
    • CPU A auf dem Prozessorboard.

  26. Mac Pro Early 2009 Teardown: шаг 26, изображение 1 из 1
    • Prozessor und Kühlkörper.

  27. Mac Pro Early 2009 Teardown: шаг 27, изображение 1 из 1
    • Raid-Karte für den Mac Pro Early 2009

  28. Mac Pro Early 2009 Teardown: шаг 28, изображение 1 из 1
    • Grafikkarte.

  29. Mac Pro Early 2009 Teardown: шаг 29, изображение 1 из 1
    • Fibre Channel Karte

  30. Mac Pro Early 2009 Teardown: шаг 30, изображение 1 из 1
    • Endlich ist er wieder zusammengebaut.

Особая благодарность этим переводчикам:

en de

100%

Эти переводчики помогают нам починить мир! Хотите внести свой вклад?
Начните переводить ›

zongo

Участник с: 11/24/09

453 Репутация

1 руководство автора

23 Комментариев

Hello,

I have Mac Pro 5,1 intel Xeon W3565 at 3.2 GHz Quad-Core.

It is easy to upgrade in W3565 at 3.33 GHz 6-Core ???

Any intel Xeon W3565 fit in my Mac Pro ?

What CPU sockets supported for ?

Thank you,

Stefanos.

StefMacGR - Ответить

It is socket-b(LGA 1366)

I think it is easy to upgrade your CPU

sendercustom - Ответить

It should be easy to upgrade a single-cpu Pro, they use standard lidded Xeons. I am planning on upgrading to W3690s in a couple of 4,1 machines that have had their firmware flashed to 5,1.

tobiasboyd - Ответить

Please let me know how you handle that upgrade!! Or add a tutorial id vey much like to see that and maybe follow suit but im not very savy with these upgrades

Will -

Is it possible to easily remove and service right processor fan (the back one)? It makes too much noise, so needs some oil apparently. I didn't find any way to remove it.

Andriy Tevelyev - Ответить

I replaced sockets in motherboard 820-2336-А and lose two resistors R5400 and R3613.Prompt please resistors face values.Thanks!

fpiteful - Ответить

Is it possible to replace the fans with quieter fans?

Patrick van Bavel - Ответить

I have acquired a MacPro 4,1 from my friend who no longer needed it and couldn't get it working anyway. The weirdest thing is none of the internal drives show up, not even when booting off an external OS drive, and the ethernet ports as well. Everything else seems to work, installed a fresh copy of El Capitan on an external and all works but these two items. Makes me believe that there may be a disconnected or bad cable to the backplane but I am having a hard time finding the info online and any pictures on what to look for. Any ideas or suggestions?

Allen Berrebbi - Ответить

Hello barrebbi, I just had the same problem happen to me the macpro was working well and all of the sudden the drives disappear and the internet connection was gonne too . I try to unplug everything and do a pram clean and nothing, the next thing I will do is run the ahd diagnose utility for this computer. what I am missing is the internal drivers the 4 internal sata’s but the optical drives are working fine, also I lost the wifi, ethernet and the optical audio port. the external audio is fine. I was browsing online nothing really taxing for the computer. if I cannot fix it I will install a pci usb 3 port to run external drives and a usb3 to ethernet port to get the network and internet back and a usb bluetooth dongle. If anyone can help or guide us to find a solution I will great appreciated. Berrebbi if you find anything please advice I will do so too. Thanks in advance.

Titaniumark -

Sorry, I have not been able to get an answer yet. And for some reason, this model won’t upgrade bootcamp to Windows 10 (or 8) either, black screen. I’ve updated older models but not this one.

Allen Berrebbi - Ответить

Still no answer for me

Allen Berrebbi -

Missing connection of HDD bays and, more importantly, the connections between the HDD bays and the logic board.

Konrad Skeri Ekblad - Ответить

Still haven’t figured it out yet

Allen Berrebbi - Ответить

I’m lost as to why this is titled as a “Teardown” when it is in fact an “Assembly”…

Chatbox - Ответить

Is the Bluetooth connector on the motherboard a standard USB single port [Vcc, D-, D+, GND] connector ?

dan.streaman - Ответить

Nope, there’s a picture in step 10- I think it’s a PCI-E connector of some type. Definitely not USB though.

Josh Calvetti -

Anyone ever figured out how to “teardown” the fan-cage assembly from the PCI lane area (the one hovering that has the PCI lock bar mechanism). The assembly is easy to remove, but !&&* if I can figure out how to free the fan from it.

I got as far as being able to release the female plug so that it could slide through the plastic, and the fan appears seated on rubber type posts, just can’t separate the two cage elements to get to it. (at least not without worrying amounts of force).

clickykbd - Ответить

I need to know how you removed the bottom case with the fans. I cant find any documentation on it. Thanks

’’

marcussunde - Ответить

Hello,

I disassembled my mac pro 2009 for cleaning, and putted it back together. Everything works fine, except for the power button LED. It not longer lights up. I tried reconnecting everything and resetting SMC and PRAM with no success.

KANG LOBSTAH - Ответить

Hi !

Is it possible to show where is the SMC Controller Chip on the board ?

Thanks

Sly - Ответить

Is the logicboard of those type same ? Can I change the quad-core logicboard with 8-core logicboard or vice versa ? Thanks.

Lazuardi Deril - Ответить

You can swap the trays with another model of the same generation, yes. 2010/2012 are interchangeable , but you have to swap 2009 with 2009 parts, otherwise the fans will run at full speed due to differing low-level firmware between the 2009 and 2010 models.

Josh Calvetti -

How to connect the WiFi card to the board? Cables to connect. Screws to use? Thanks

LAB - Ответить

Добавить комментарий

Просмотр статистики:

За последние 24часов: 8

За последние 7 дней: 35

За последние 30 дней: 157

За всё время: 116,084