Перейти к основному содержанию

Выберете то, что вам нужно

Это демонтаж а неруководство по ремонту. Чтобы отремонтировать Sony Ericsson s710a, воспользуйтесь нашим сервисным руководством.

  1. Sony Ericsson s710a Teardown, Battery: шаг 1, изображение 1 из 1
    • Remove the back cover by sliding it off.

  2. Sony Ericsson s710a Teardown: шаг 2, изображение 1 из 1
    • Pull the battery out using your finger.

  3. Sony Ericsson s710a Teardown: шаг 3, изображение 1 из 1
    • The battery can now be replaced.

    • The battery is a 780 mAh rechargeable Lithium Ion battery.

  4. Sony Ericsson s710a Teardown, Sony Ericsson s710a Teardown: шаг 4, изображение 1 из 1
    • Remove the four 6mm screws behind the battery.

  5. Sony Ericsson s710a Teardown: шаг 5, изображение 1 из 2 Sony Ericsson s710a Teardown: шаг 5, изображение 2 из 2
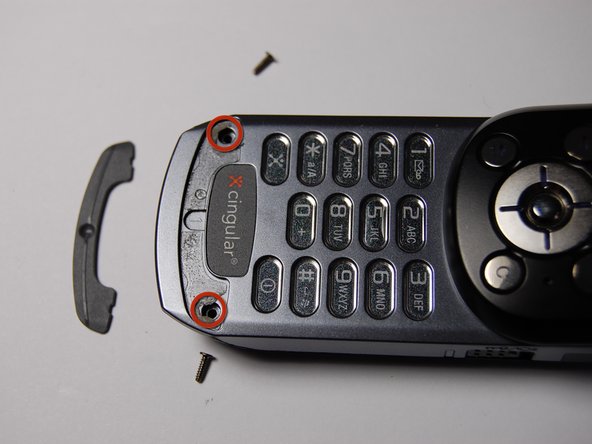
    • Remove the plastic piece near the base of the keypad.

    • This will require prying it off with a plastic opening tool and breaking the seal with the glue. Unfortunately there is no way around this.

    • Then remove the two 6mm screws beneath the plastic cover with a Phillips head screwdriver.

  6. Sony Ericsson s710a Teardown: шаг 6, изображение 1 из 2 Sony Ericsson s710a Teardown: шаг 6, изображение 2 из 2
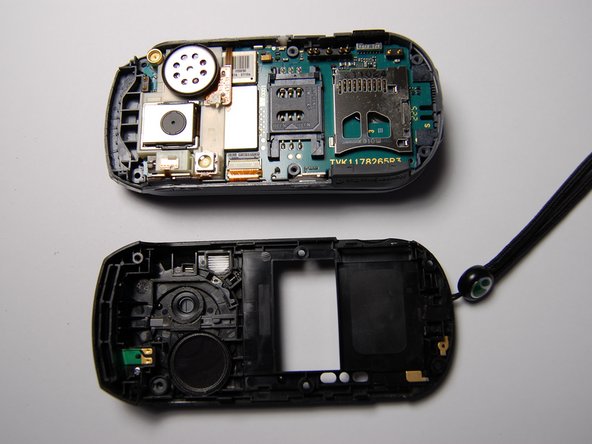
    • Use the plastic opening tool to pry off the back cover of the phone. This will require a bit of careful work.

    • You should start prying the back cover from the SD card slot. Alternate prying the back cover on each side until it pops off.

  7. Sony Ericsson s710a Teardown: шаг 7, изображение 1 из 1
    • Once you have removed the back cover, use the plastic opening tool to carefully pry out the circuit board.

  8. Sony Ericsson s710a Teardown: шаг 8, изображение 1 из 1
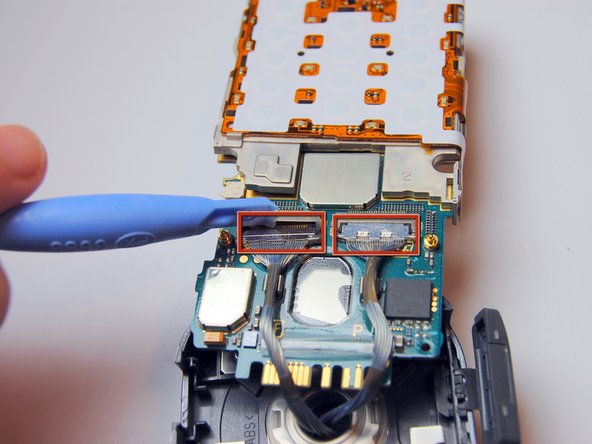
    • Remove the LCD cable connectors coming from through the hinge hole with a flathead screwdriver.

    • Be sure to record which port each cable was in, including the orientation in which they were plugged into each socket.

    • Now the two parts of the phone are separated.

  9. Sony Ericsson s710a Teardown: шаг 9, изображение 1 из 1
    • On the non-camera side of the phone, remove the four 3mm screws and two 2.3mm screws holding down the twist-structure.

    • When you lift this off, you will need to disconnect the cables from the other side using the same method as in Step 5.

    • Again, be sure to record which port each cable was in, and the orientation in which they were plugged into each socket.

  10. Sony Ericsson s710a Teardown: шаг 10, изображение 1 из 2 Sony Ericsson s710a Teardown: шаг 10, изображение 2 из 2
    • Remove the plastic piece near the bottom of this side of the phone with the plastic opening tool. This will give you access to two additional screws.

    • Remember you will have to break the glue seal, but that is alright.

    • Remove the four visible 6mm screws. Then remove the back cover.

  11. Sony Ericsson s710a Teardown: шаг 11, изображение 1 из 2 Sony Ericsson s710a Teardown: шаг 11, изображение 2 из 2
    • In order to remove the LCD screen, use the plastic opening tool to pry the plastic piece from the LCD. Perform this step carefully to avoid scratching the glass screen.

  12. Sony Ericsson s710a Teardown: шаг 12, изображение 1 из 1
    • In this picture, you can see all of the parts in the non-camera side of the phone.

    • Interestingly, the four control buttons are all one piece

  13. Sony Ericsson s710a Teardown: шаг 13, изображение 1 из 1
    • This phone has an array of capabilities:

    • Bluetooth

    • Megapixel Camera

    • MP3 capable

    • Messaging options

    • This photograph shows the final result of a complete teardown.

Alexander

Участник с: 10/29/11

75 Репутация

Автор 4 руководств

Команда

University of Maryland, Team 1-1, Calloway Fall 2011 Участник University of Maryland, Team 1-1, Calloway Fall 2011

UMD-CALLOWAY-F11S1G1

3 членов

Автор 14 руководств

0 Комментариев

Добавить комментарий

Просмотр статистики:

За последние 24часов: 0

За последние 7 дней: 0

За последние 30 дней: 0

За всё время: 4,055