Перейти к основному содержанию

ASUS Eee Pad Transformer Buttons Replacement

Выберете то, что вам нужно

  1. ASUS Eee Pad Transformer Buttons Replacement, Back Panel: шаг 1, изображение 1 из 2 ASUS Eee Pad Transformer Buttons Replacement, Back Panel: шаг 1, изображение 2 из 2
    • Use T5 Torx Screwdriver to remove two 4.5 millimeter T5 screws on either side of the port on the bottom of the tablet.

  2. ASUS Eee Pad Transformer Buttons Replacement: шаг 2, изображение 1 из 3 ASUS Eee Pad Transformer Buttons Replacement: шаг 2, изображение 2 из 3 ASUS Eee Pad Transformer Buttons Replacement: шаг 2, изображение 3 из 3
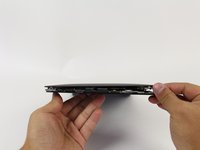
    • Use the Plastic Opening Tool to pry between the main tablet body and the outer rim casing. Remove the outer rim casing by prying all the way around the device and pulling the rim upward.

    • The physical buttons are located on the outside of the rim on the right side, proceed with the guide to locate internal buttons.

  3. ASUS Eee Pad Transformer Buttons Replacement: шаг 3, изображение 1 из 1
    • Remove the four 2 millimeter Phillips #00 screws at the corners of the tablet.

  4. ASUS Eee Pad Transformer Buttons Replacement: шаг 4, изображение 1 из 1
    • Use a Phillips #00 Screwdriver to remove the three 3 millimeter screws securing the front panel to the back panel found above the camera area, on the top portion of the tablet.

  5. ASUS Eee Pad Transformer Buttons Replacement: шаг 5, изображение 1 из 1
    • Use a Phillips #00 Screwdriver to remove the three 3 millimeter screws securing the front panel to the back panel found on the bottom portion of the tablet near the port.

  6. ASUS Eee Pad Transformer Buttons Replacement: шаг 6, изображение 1 из 2 ASUS Eee Pad Transformer Buttons Replacement: шаг 6, изображение 2 из 2
    • Remove back panel by pulling away from the remaining device.

  7. ASUS Eee Pad Transformer Buttons Replacement, Remove button screws: шаг 7, изображение 1 из 2 ASUS Eee Pad Transformer Buttons Replacement, Remove button screws: шаг 7, изображение 2 из 2
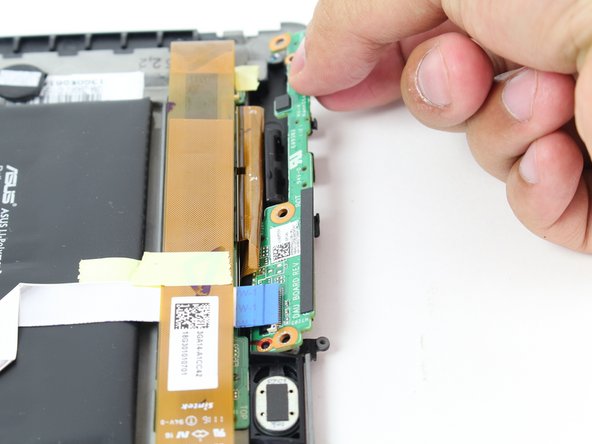
    • Use a Phillips #00 Screwdriver to remove the three 3 millimeter screws securing the buttons to the back panel.

  8. ASUS Eee Pad Transformer Buttons Replacement, Locate and lift button clip: шаг 8, изображение 1 из 3 ASUS Eee Pad Transformer Buttons Replacement, Locate and lift button clip: шаг 8, изображение 2 из 3 ASUS Eee Pad Transformer Buttons Replacement, Locate and lift button clip: шаг 8, изображение 3 из 3
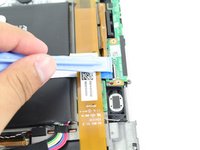
    • Use Plastic Opening Tool to pry off the clip located towards the bottom of the button component near the metallic strip with a blue end, capped by the black button clip.

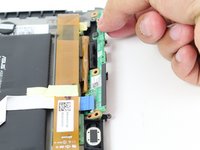
    • Remove button component by pulling straight outward from the device.

Заключение

To reassemble your device, follow these instructions in reverse order.

3 участников успешно повторили данное руководство.

Joe Payne

Участник с: 09/29/14

534 Репутация

1 руководство автора

Команда

Cal Poly, Team 13-9, Forte Fall 2014 Участник Cal Poly, Team 13-9, Forte Fall 2014

CPSU-FORTE-F14S13G9

5 членов

Автор 12 руководств

0 Комментариев

Добавить комментарий

Просмотр статистики:

За последние 24часов: 0

За последние 7 дней: 2

За последние 30 дней: 32

За всё время: 6,336