Перейти к основному содержанию

ASUS PadFone X Front Facing Camera Replacement

Выберете то, что вам нужно

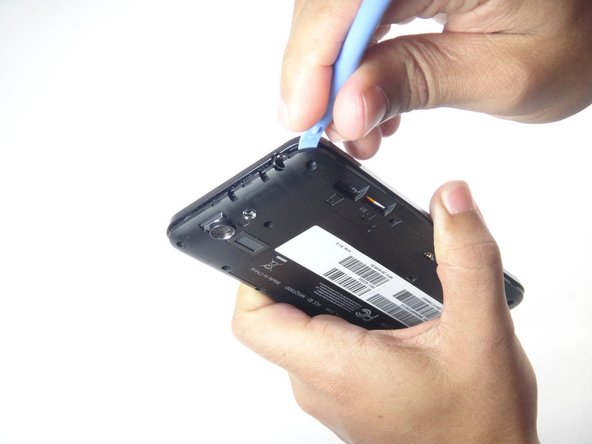
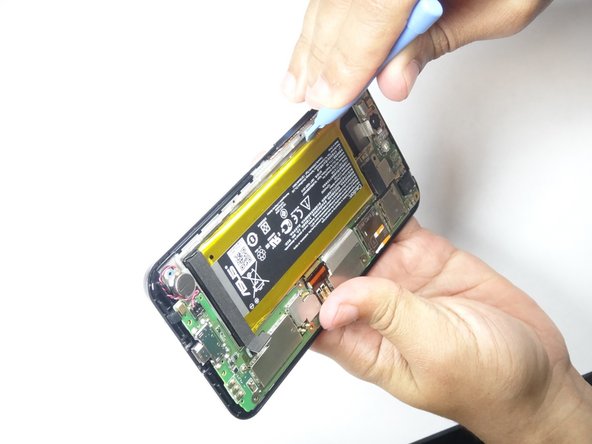
  1. ASUS PadFone X Front Facing Camera  Replacement, Motherboard: шаг 1, изображение 1 из 2 ASUS PadFone X Front Facing Camera  Replacement, Motherboard: шаг 1, изображение 2 из 2
    • Using the blue plastic opening tool, insert the tip into the crease between the back cover and the phone and pry it upwards.

    • Work your way around the phone until the entire back cover is loose.

  2. ASUS PadFone X Front Facing Camera  Replacement: шаг 2, изображение 1 из 2 ASUS PadFone X Front Facing Camera  Replacement: шаг 2, изображение 2 из 2
    • Remove the thirteen 3.6 mm screws using the Torx T5 bit in the screwdriver.

  3. ASUS PadFone X Front Facing Camera  Replacement: шаг 3, изображение 1 из 2 ASUS PadFone X Front Facing Camera  Replacement: шаг 3, изображение 2 из 2
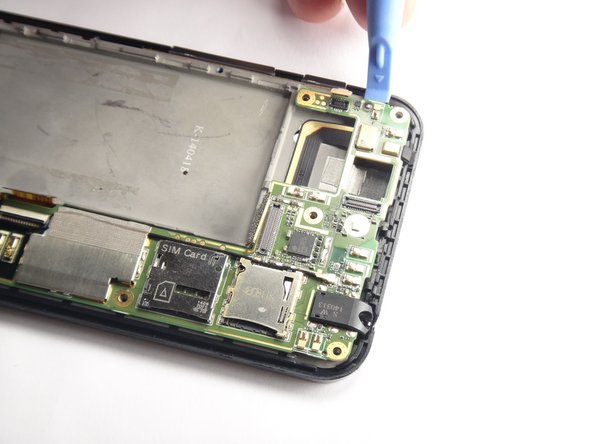
    • Using the blue plastic opening tool, insert the tip into the crease between the mid-frame and the phone and pry it upwards.

    • Work your way around the phone until the entire back cover is loose and remove the mid-frame.

  4. ASUS PadFone X Front Facing Camera  Replacement: шаг 4, изображение 1 из 1
    • Using the plastic blue plastic opening tool, gently disconnect the battery cable from the motherboard.

    • Applying too much force will damage the connector.

  5. ASUS PadFone X Front Facing Camera  Replacement: шаг 5, изображение 1 из 2 ASUS PadFone X Front Facing Camera  Replacement: шаг 5, изображение 2 из 2
    • Use the blue plastic opening tool to pry the battery pack from the phone. Pry along edge away from the motherboard as this might damage the motherboard.

    • The battery pack is held on by double sided tape, you will have to apply some force when prying out the battery.

  6. ASUS PadFone X Front Facing Camera  Replacement: шаг 6, изображение 1 из 1
    • Using a spudger, pry the vibration motor connector from the motherboard.

  7. ASUS PadFone X Front Facing Camera  Replacement: шаг 7, изображение 1 из 1
    • Use the blue plastic opening tool to gently pry the camera connector up from its socket on the motherboard.

    • Applying too much force will damage the conector

  8. ASUS PadFone X Front Facing Camera  Replacement: шаг 8, изображение 1 из 1
    • Using the tweezers, remove the rear camera from the Padfone X.

    • The camera is lightly glued to the motherboard. You may need to use a plastic opening tool to loosen the adhesive under the camera.

  9. ASUS PadFone X Front Facing Camera  Replacement: шаг 9, изображение 1 из 2 ASUS PadFone X Front Facing Camera  Replacement: шаг 9, изображение 2 из 2
    • Insert the tip of the flat head screwdriver between the panel and the metal clip then gently push down until the clip is slightly bent away from the panel.

    • Do this for all the clips holding the panel down.

    • After all clips are bent away, remove the panel.

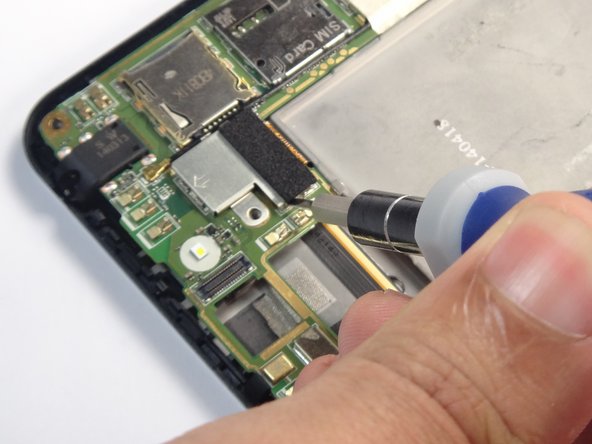
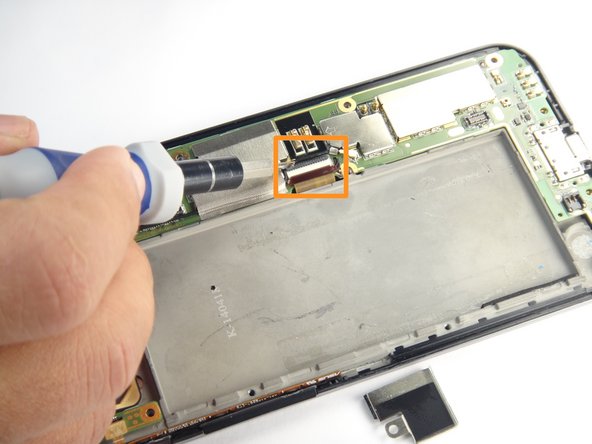
  10. ASUS PadFone X Front Facing Camera  Replacement: шаг 10, изображение 1 из 2 ASUS PadFone X Front Facing Camera  Replacement: шаг 10, изображение 2 из 2
    • Disconnect the first connector by prying it upward using the blue plastic opening tool.

    • Disconnect the second connector by first lifting the lock then pulling the connector outward.

  11. ASUS PadFone X Front Facing Camera  Replacement: шаг 11, изображение 1 из 3 ASUS PadFone X Front Facing Camera  Replacement: шаг 11, изображение 2 из 3 ASUS PadFone X Front Facing Camera  Replacement: шаг 11, изображение 3 из 3
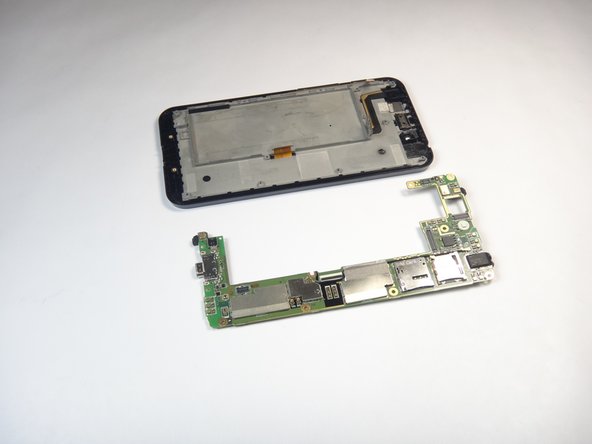
    • Insert the tip of the blue plastic opening tool under the motherboard and gently pry upward.

    • Work your way around until the motherboard is free.

  12. ASUS PadFone X Front Facing Camera  Replacement: шаг 12, изображение 1 из 1
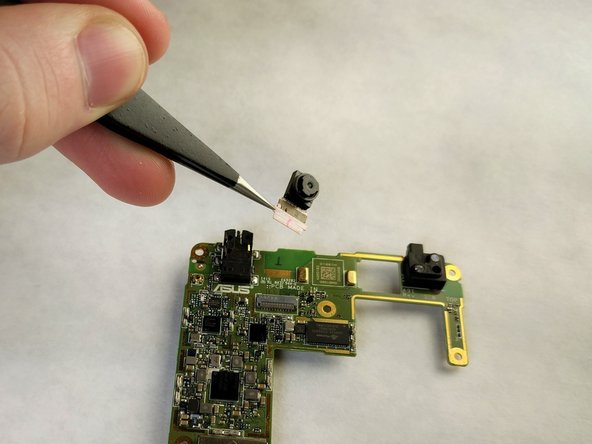
    • Flip the motherboard over and locate the front facing camera.

    • Using the tweezers gently remove the black locking mechanism.

    • The black locking mechanism is very fragile and extreme care should be exercised during removal.

  13. ASUS PadFone X Front Facing Camera  Replacement: шаг 13, изображение 1 из 2 ASUS PadFone X Front Facing Camera  Replacement: шаг 13, изображение 2 из 2
    • Use the tweezers to gently pull on the connector to remove the camera.

Заключение

To reassemble your device, follow these instructions in reverse order.

Еще один человек закончил это руководство.

Keith Cooper

Участник с: 01/24/17

122 Репутация

1 руководство автора

Команда

IUPUI, Team 2-1, Baechle Spring 2017 Участник IUPUI, Team 2-1, Baechle Spring 2017

IUPUI-BAECHLE-S17S2G1

4 членов

Автор 4 руководств

0 Комментариев

Добавить комментарий

Просмотр статистики:

За последние 24часов: 0

За последние 7 дней: 1

За последние 30 дней: 1

За всё время: 256