Перейти к основному содержанию
Присоединяйся к сообществу ремонтников - Создай аккаунт

Alienware P18G M14X R1 Optical Drive Replacement

Выберете то, что вам нужно

  1. Alienware P18G M14X R1 Optical Drive Replacement, Back Cover: шаг 1, изображение 1 из 1
    • Loosen the top left and top right 6.5mm PH1 screws that hold down the back cover.

    • The screws will not be able to be removed from the back cover. They can only be loosened or tightened.

    Спросите у FixBot
  2. Alienware P18G M14X R1 Optical Drive Replacement: шаг 2, изображение 1 из 1
    • Slide back cover forward using your thumbs.

    Спросите у FixBot
  3. Alienware P18G M14X R1 Optical Drive Replacement: шаг 3, изображение 1 из 1
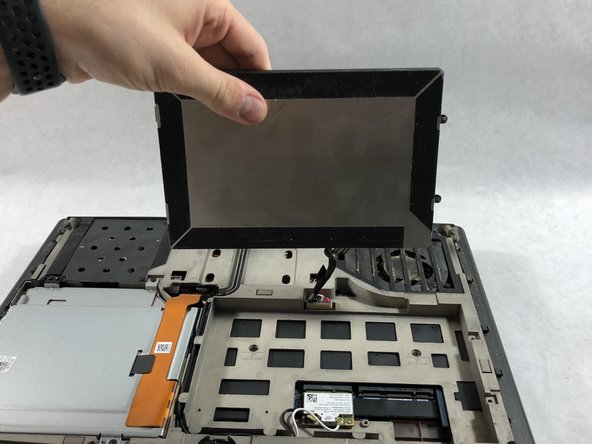
    • Lift up the cover and set aside exposing the internals of the computer.

    Спросите у FixBot
  4. Alienware P18G M14X R1 Optical Drive Replacement, Battery: шаг 4, изображение 1 из 1
    • Make sure the laptop is turned off before starting.

    • Using PH1 screwdriver loosen the two screws on the right of the battery.

    • The screws will not be able to be removed from the battery. They can only be loosened or tightened.

    Спросите у FixBot
  5. Alienware P18G M14X R1 Optical Drive Replacement: шаг 5, изображение 1 из 2 Alienware P18G M14X R1 Optical Drive Replacement: шаг 5, изображение 2 из 2
    • Pull battery up using the tab provided.

    Спросите у FixBot
  6. Alienware P18G M14X R1 Optical Drive Replacement: шаг 6, изображение 1 из 1
    • Disconnect the clip connecting the battery to the computer.

    • Set battery aside.

    Спросите у FixBot
  7. Alienware P18G M14X R1 Optical Drive Replacement, Optical Drive: шаг 7, изображение 1 из 1
    • Unscrew the four 6.35mm screws using the PH1, that hold down the optical drive.

    Спросите у FixBot
  8. Alienware P18G M14X R1 Optical Drive Replacement: шаг 8, изображение 1 из 1
    • Using the plastic opening tool unclip the white connector holding down the orange cable.

    Спросите у FixBot
  9. Alienware P18G M14X R1 Optical Drive Replacement: шаг 9, изображение 1 из 1
    • Using the tab on the optical drive, lift the optical drive out of the computer and set it aside.

    Спросите у FixBot
Заключение

To reassemble your device, follow these instructions in reverse order.

Andonaq Grozdani

Участник с: 03/01/18

892 Репутация

Автор 5 руководств

Команда

UMass Dartmouth, Team S2-G2, Simcock Spring 2018 Участник UMass Dartmouth, Team S2-G2, Simcock Spring 2018

UMASSD-SIMCOCK-S18S2G2

3 членов

Автор 5 руководств

0 Комментарии к руководству

Добавить комментарий

Статистика просмотров:

За последние 24 часов: 0

За последние 7 дней: 11

За последние 30 дней: 49

За всё время: 689