Введение
A common problem with the mighty mice is that dirt gets in the scrollball assembly and will make scrolling extremely aggravating. There are other solutions like washing the ball in rubbing alcohol and using that to clean the rollers, but I found it much more effective to attack the problem at the source. I would assume that this guide would loosely work for the USB version though I have not tried.
Выберете то, что вам нужно
-
-
Before disassembling the mouse, first try scrubbing the mouse ball with a toothbrush and isopropyl alcohol. Be sure to get the bristles between the ball and the housing as this will help remove dirt and dust that is clogging the rollers inside.
-
You can also try blowing into the "ball hole" with a can of compressed air.
-
-
-
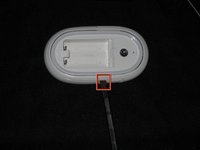
Begin by flipping the mouse over, as shown.
-
Remove the bottom panel by pushing the release latch down and to the left.
-
You may need to pry the edge of the bottom panel up in the indicated area.
-
Remove the batteries.
-
-
-
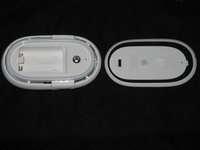
Insert spudger between button and outer white ring.
-
Twist the spudger to separate the ring from the body of the mouse. Work the spudger around the whole mouse until the ring is completely detached.
I found this step to be easier when starting at the side buttons as pictured, working around the back of the mouse to loosen the back half of the ring, and then carefully prying the front portions of the ring, which seem to have the most adhesive that you need to loosen. If you get stuck or the rings starts to bend from one direction, resume on the other side.
While a little bit dangerous, I used an Exacto knife to cut through the adhesive. A slight rocking motion does the trick. Just be sure you don’t have a body parts between the knife edge and the hard surface you’re using to steady the mouse.
Safest and easiest way to remove the bottom ring is rock a razor blade over each glued regions. Here are pics of all glued regions on a wireless mighty mouse
Most difficult region for me was the bottom 2 glue points. But this likely will vary on every mouse.
-
-
-
-
Undo two clips using a spudger.
-
Similarly, use the spudger to unhook two pivot points.
-
-
-
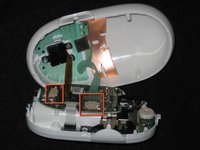
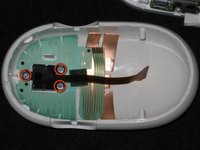
Disconnect both flex cables.
-
The second photo shows how far to pull the latches.
-
When reassembling the mouse, both cables should be inserted into the connectors contact-side-up.
The latches referred to are on the able connection block. The blocks are white, the latches are grey. Push the sides of the grey latches with any small flat screw driver or spudger.
-
-
-
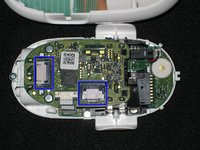
Remove three Phillips #00 screws that attach the scrollball assembly to the upper shell.
-
-
-
Pry the white ball cover out of the black housing with a small flat-head screwdriver.
-
-
Инструмент, используемый на этом этапе:Tweezers$4.99
-
Remove the four rollers from the black housing with tweezers. They are held in place magnetically.
Abou 2 years ago I have followed these instructions to clean my mouse and everything was perfect. But now I tried this procedure again, but the mouse ball isn't working anymore. I thought I had the flat cables in the wrong position, and then I checked it, and I think they are in the correct position. The photos are small and I cannot be sure the position of the flat cables are correct. I would like to know how can I check this. What is the correct side to insert these flat cables? I'm sure I close the ball box correctly and it's running smooth inside it.
Be careful : the little black wheels don’t touch the metal tabs.
-


To reassemble your device, follow these instructions in reverse order.
To reassemble your device, follow these instructions in reverse order.
Отменить: Я не выполнил это руководство.
143 человек успешно провели ремонт по этому руководству.

50 Комментариев
Confirmed: these instructions work just fine for the usb version. The ribbon cable connectors are positioned slightly differently, but otherwise, exactly the same process. My usb mighty mouse is now like brand new. Thanks.
thanks, it worked perfectly.
Great guide. I followed it and re-assembled my wireless mighty mouse, only problem though, now the ball only scrolls up. When I scroll up, down, left, or right, the page scrolls upwards in all cases. Any tips?
Great guide! My usb mighty mouse is now clean and 100% functional! At first, i was a little scared about step 3 (i thought i could break it) but everything went ok. All i needed was Just a little patience. This plastic piece turned out to be of much more quality and rigidity than i expected!
Thanks a lot to the member who made this guide! You've saved me $49! =)
Excellent instructions: clear explanations and photographs. My mouse, despite Apple's faulty design, is now working as it should. BTW, it's a USB mouse and the instructions work just fine.
I added an additional step for my USB mouse: after disconnecting the flex cables in Step 6, it was no trouble to carefully remove the circuit board in order to get at the accumulated dust and gunk that had collected underneath.
take a clean piece of paper, or a pad of paper, and turn the mouse with the trackball down. apply the slightest pressure, and draw figure 8's or the infinity sign for 30seconds.. repeat with another piece of paper.
turn over and use scrollball again.
This trick is so easy! Thank you for the idea!
Bekah -
This method works for me, no need to take anything apart.
You can do the same thing with a non-linty cloth dampened with high-test isopropyl. It'll work great the first couple of times, and you may get most of a year more out of it, but eventually you WILL need to disassemble the mouse to remove the crud.
The roller shafts should be brushed lengthwise with a soft toothbrush dipped in isopropyl; this is where the crud settles that disables the ball motion.
macsrwe -
Excellent guide, thank you. This was a pretty simple operation. I skipped the step of disconnecting the cables as I didn't want to risk breaking a connector on my 8 year old MM. It was a bit awkward at times but I was careful and it worked out fine. Like a new mouse!
Just dug up the mouse to replace the broken one temporarily, and found the ball not working in two out of four directions.
When I disassembled the whole thing, each wad of dirt was nearly as big as the black magnetic wheels inside the assembly. Ended up just soaking them in a small vial of alcohol. Works perfectly.
And after all these years and all that dirt, I only just realised that the "click" sounds of the scrollball is actually generated by the buzzer inside the mouse. I feel deceived in a weird way. At least iPod clickwheels were stationary (except the very first one, I guess).
Mine has a little piece broken inside the tracking ball system (the white square), avoiding to track up movement. I've been looking for a replacement, with no luck. help?
Great - thanks OP for publishing. I have a USB A1152 Mouse - followed this - I'm back in business! Works 100%, great response from the mouse scrollball now... ;]
Hi there,
Excellent tutorial thanks for posting it. Does anyone know where I could buy a replacement scroll ball? My kids tried to "fix" it with sand paper... all scratched now and very jumpy.
Thanks!
has anyone changed the shell of the mouse to a clear and black "2000: Apple Pro Mouse (Model M5769)" ?
Perfect, thank you. I used your guide for a USB version and it was very similar. Works like new!
Try this first - it may save you the hassle:
Turn the mouse upside down and, while pushing down, run the mouse on its scroll ball over a mouse mat. You are vigorously exercising the ball.
Voila - works for me!
Note: I see this technique has been posted above also; never mind - this tip is probably useful enough to bear repeating :)
I fall in love with iFixIt.. I had repaired my macbook always with help you and this time mouse scroll button is working charm… I never gone to any service centre for any types of repair.. hats off!! keep it up!!
I've never taken anything apart to fix it before, but this tutorial worked great! I also didn't totally unplug everything, which made it a little awkward but it still worked. I didn't soak anything in alcohol either, I just wiped all the grime off and put it back together and it's working great! Thanks for the help.
One clarification, when you pull out the two wires, the housing on top is white, the housing on the bottom is black, the wires go between. It is the lower (black) housing that moves to release and then lock in the wires. When putting the wires back, make sure the bottom (black) housing is still out, as it is really easy to knock it back in when you put the wires back. Otherwise, perfect fix. Thanks much.
Great tutorial, thank you. My 9 year old mighty mouse is as new…
For anyone having trouble with the scrolling not working in certain directions after re-assembly. Take it apart again and make sure the little black rings on the rollers are in line with the metal plates. The metal plates are the sensors and are reading the rolling from the little black magnetic rings. One of mine was slightly out of line, very easy to miss at a glance, I nudged it back in place and scrolling was restored in all directions.
Hi! Very good guide indeed. I am interested to find out why the middle click is not working anymore and if there is a good / easy way to fixit. Thanks!
I have a corded Mighty Mouse, so no batteries. I was able to disassemble it and cleaned up the ball rollers. The side buttons are attached to the main housing and I am having trouble getting them to engage the bottom cover (figures 5 & 6.). I have not found a way to insert them from the outside in main housing. They don’t seem to be able to back out of the housing enough to allow the base to properly set in place. Suggestions?
Appears much better now.
Couple notes:
File the rough edges off after you take the retaining ring off. Make the mouse body and ring surface flat again. And breaking isn’t a big deal. Just use super glue in the BREAK ONLY. For putting the ring back on, which really just keeps dust from getting in, use white school glue or rubber cement etc. It will hold it on and let you get back in later. There’s no stress here and it’s just a dust cover.
Don’t dump a bunch of low percentage isopropyl alcohol into the ball while it’s all assembled. You’ll get condensate and have to dry it on a fan. I ended up disassembling it anyway.
One of my magnetic wheels touches the metal tab. It still works but I considered using a sharp toothpick and putting the TINIEST bit of lithium grease on it, so little that it won’t end up elsewhere to lower the resistance to turning. The white retaining part appears defective/broke but it still works ok.
Brilliant guide, my mouse now scrolls both up AND down!
Took a couple of minutes to get apart, and an hour to get back together.
One of the little rollers decided to make a break for it and I spent 30 minutes searching the carpet for it.
They are so fiddly, next time I will buy a new mouse to preserve my sanity :)
Isopropyl alcohol melted the plastic on the mouse. Really bad advise.
Update for this article - my mouse was all cleaned out but still not working. So I readjusted the metal tabs to the right place so that they sensed the rollers correctly and this sorted it all out :)
I bent the tabs towards the rollers. At first they were touching when I reassembled, but then I poked a small screwdriver between the roller and the tab and this seems to have set the distance right.
Worked great for old USB mouse. For USB, Steps 7-9 are the same, key steps fro the fix.
For USB disassembly:
Step 3: This works best starting at the side buttons working around the rear of the unit (opposite the cord), then carefully prying up the front.
Step 4: There are only 3 pivot points on the USB mouse: 2 rear/side, one just under the cord entry point. If you can see it, you can push the front pivot in a bit to release the unit. I had no issues working from the back, though, before I knew this was the case.
Step 6: Flex cables are a differently located, as others have noted. I found I could remove the assembly (Step 7) without disconnecting the cables. I did disconnect the one attached to the assembly prior to cleaning.
Scrolling along happily now…
Had a bit of a problem with the final stage, and had to airfix the retainer ring with superglue, but even so, all goo.
thanks
Great Guide. I repaired the USB version. Like mentioned before the cable connectors are upright instead of lying flat. For the rest same procedure.
Many thanks, that works.
I just disassembled my mouse then cleaned it. This guide was perfect.
If you hear a buzzing noise like the scrolling click a thousand times in a second and the page goes insane scrolling then disassemble it again. The touch flex cable (green cable) somehow interferences with the scroll flex (orange cable) so move it around till the buzzing sound goes off. Your mouse must be on, so be careful. You can do it while powered off, but it would take forever. BTW I wouldn't say it is a 3/3 difficulty procedure.
New life to my mouse ! Easy to do with the instructions, thank you.
Perfect, just cleaning fixxed it :-)
Do not use acetone on plastic (ie including fingernail polish remover). It can very easily dissolve, or cause it to fragment. I suspect that is what may have caused a commenter to say that is what alcohol did to the mouse.
If anyone has problems with small parts breaking, there is now Bondic glue. Instead of having to hold pieces for a while, while the glue dries, a UV light is used and the glue is hard immediately, after a few seconds. Since the glue does not dry without that, there is also no period, when vapors, like from superglue, are condensing and drying on other parts. I once glued in a replacement watch lens, with superglue, and it badly fogged the inside surface of it, ie with a white film.
Top, der Tipp mit der Bürste hat geklappt! Danke!