Введение
If the device crashes while doing multiple tasks simultaneously, it is possibly due to insufficient amounts of ram. Replacing your ram will improve your computer's performance. This guide will properly demonstrate how to replace the RAM in the Asus Q500A laptop effectively.
Выберете то, что вам нужно
-
-
Flip device upside-down.
-
Remove back-plate by unscrewing the two screws on either side of the back-plate.
-
Remove the plastic cover.
 Спросите у FixBot
-
-
-
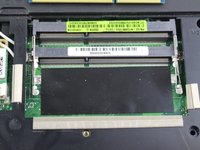
There are two metal brackets holding each ram stick in.
-
To unlock the RAM, you'll need to remove the metal brackets. To do this, carefully push out the brackets.
-
-
-
-
Now simply remove the ram by pulling it out using a set of pliers to be safe and careful not to damage the ram.
-
-
-
To insert the ram line up the ram stick and the slot.
-
Next you will have to push the ram down until it snaps into place.
-


To reassemble your device, follow these instructions in reverse order.
Команда

USF Tampa, Team 12-5, Eyestone Spring 2017 Участник USF Tampa, Team 12-5, Eyestone Spring 2017
USFT-EYESTONE-S17S12G5
3 членов
Автор 3 руководств