Перейти к основному содержанию

Asus Vivobook Q301LA-BHI5T02 Fan and Heatsink Replacement

Выберете то, что вам нужно

  1. Asus Vivobook Q301LA-BHI5T02 Fan and Heatsink Replacement, Back Cover: шаг 1, изображение 1 из 1
    • Make sure the computer is turned off.

    • Flip the device over so that the back cover is facing you.

  2. Asus Vivobook Q301LA-BHI5T02 Fan and Heatsink Replacement: шаг 2, изображение 1 из 2 Asus Vivobook Q301LA-BHI5T02 Fan and Heatsink Replacement: шаг 2, изображение 2 из 2
    • Remove the four 5mm Phillips #1 screws from the top of the laptop.

    • Remove the two 6mm Phillips #1 screws from the sides of the laptop.

    • Remove the four 2mm Phillips #1 screws from the bottom of the laptop.

  3. Asus Vivobook Q301LA-BHI5T02 Fan and Heatsink Replacement: шаг 3, изображение 1 из 3 Asus Vivobook Q301LA-BHI5T02 Fan and Heatsink Replacement: шаг 3, изображение 2 из 3 Asus Vivobook Q301LA-BHI5T02 Fan and Heatsink Replacement: шаг 3, изображение 3 из 3
    • Use a plastic opening tool to gently pry the bottom of the laptop up. Slowly slide it along the edges, twisting it every so often to pop the bottom of the laptop out of the clips holding it in place.

  4. Asus Vivobook Q301LA-BHI5T02 Fan and Heatsink Replacement: шаг 4, изображение 1 из 1
    • Lift off the cover and remove the back cover from the device.

  5. Asus Vivobook Q301LA-BHI5T02 Fan and Heatsink Replacement, Fan and Heatsink: шаг 5, изображение 1 из 3 Asus Vivobook Q301LA-BHI5T02 Fan and Heatsink Replacement, Fan and Heatsink: шаг 5, изображение 2 из 3 Asus Vivobook Q301LA-BHI5T02 Fan and Heatsink Replacement, Fan and Heatsink: шаг 5, изображение 3 из 3
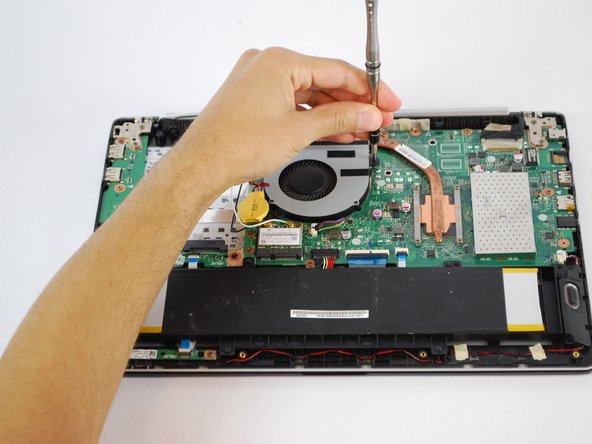
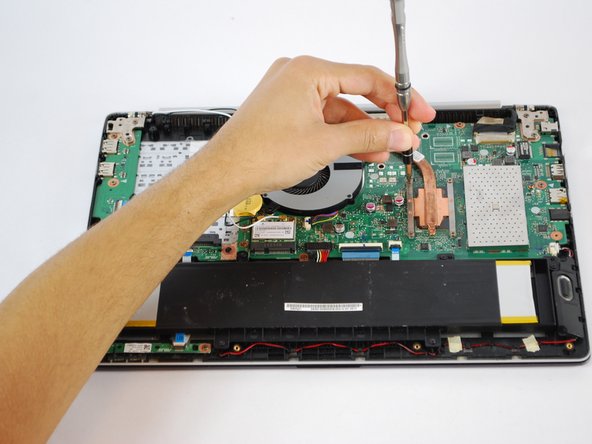
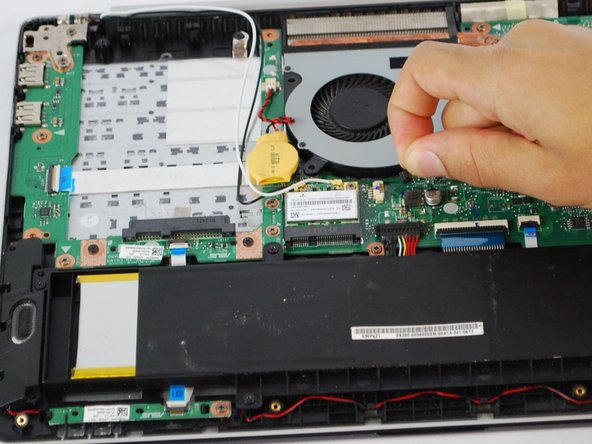
    • Using a Phillips #1 Screwdriver remove the three 3 mm black screws and four 2 mm copper screws holding the fan and heat sink in place.

  6. Asus Vivobook Q301LA-BHI5T02 Fan and Heatsink Replacement: шаг 6, изображение 1 из 2 Asus Vivobook Q301LA-BHI5T02 Fan and Heatsink Replacement: шаг 6, изображение 2 из 2
    • Remove the wire connecting the fan to the motherboard.

  7. Asus Vivobook Q301LA-BHI5T02 Fan and Heatsink Replacement: шаг 7, изображение 1 из 2 Asus Vivobook Q301LA-BHI5T02 Fan and Heatsink Replacement: шаг 7, изображение 2 из 2
    • Gently remove the fan and heat sink from the motherboard.

    • On reassembly, be sure to clean the CPU and heat sink and reapply thermal compound to the CPU. Follow this guide to learn how.

Заключение

To reassemble your device, follow these instructions in reverse order.

Royce Gunter

Участник с: 10/02/17

101 Репутация

1 руководство автора

Команда

USF Tampa, Team S10-G3, Thompson Fall 2017 Участник USF Tampa, Team S10-G3, Thompson Fall 2017

USFT-THOMPSON-F17S10G3

4 членов

Автор 6 руководств

0 Комментариев

Добавить комментарий

Просмотр статистики:

За последние 24часов: 0

За последние 7 дней: 3

За последние 30 дней: 12

За всё время: 563