Перейти к основному содержанию

BlackBerry KeyONE partial Disassembly

Выберете то, что вам нужно

  1. BlackBerry KeyONE partial Disassembly, Remove top cover: шаг 1, изображение 1 из 1
    • Carefully remove the top plastic cover. It is held in place by adhesive.

  2. BlackBerry KeyONE partial Disassembly, Remove top frame: шаг 2, изображение 1 из 2 BlackBerry KeyONE partial Disassembly, Remove top frame: шаг 2, изображение 2 из 2
    • Remove the two Philipps #0 screws that hold in place the top of the phone frame and slide it off.

  3. BlackBerry KeyONE partial Disassembly, Remove back cover: шаг 3, изображение 1 из 1
    • Remove the back cover. It mostly just clips off, but has some adhesive in the lower area.

  4. BlackBerry KeyONE partial Disassembly, Disconnect Battery: шаг 4, изображение 1 из 2 BlackBerry KeyONE partial Disassembly, Disconnect Battery: шаг 4, изображение 2 из 2
    • Remove the two Philipps #0 screws securing the battery connector and unplug the later.

  5. BlackBerry KeyONE partial Disassembly: шаг 5, изображение 1 из 1
    • Remove the 6 Philipps #0 screws securing the lower cover and remove it.

    • Remove the three Philipps #0 screws holding down the bar that secures the two main lego-style plugs and remove it.

  6. BlackBerry KeyONE partial Disassembly, Remove top cover: шаг 6, изображение 1 из 1
    • Remove the three Philipps #0 screws securing the upper cover and remove it.

  7. BlackBerry KeyONE partial Disassembly: шаг 7, изображение 1 из 1
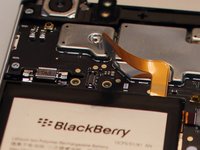
    • Unplug the remaining ribbon cables

    • Remove the last three Philipps #0 screws securing the Motherbard.

    • Now you should be able to replace most components.

    • The screen is held in place from the front by adhesive (or not, in the earlier versions), its cable slides trough the phone to the PCB - It's the large connector in the middle.

    • The battery is glued to the frame firmly. There are three pultabs located underneath the motherboard.

    • Don't forget to remove the sim-tray if you're removing the motherboard.

Заключение

To reassemble your device, follow these instructions in reverse order.

14 участников успешно повторили данное руководство.

raven

Участник с: 09/02/15

1 080 Репутация

Автор 4 руководств

0 Комментариев

Добавить комментарий

Просмотр статистики:

За последние 24часов: 7

За последние 7 дней: 30

За последние 30 дней: 80

За всё время: 9,507