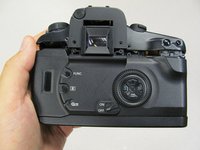
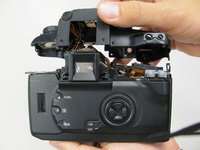
Перейти к основному содержанию

Canon EOS 30 Top Panel Replacement

Выберете то, что вам нужно

  1. Canon EOS 30 Top Panel Replacement, Front Panel: шаг 1, изображение 1 из 1
    • Remove the two 4.8 mm black screws above the lens on the front of the camera.

  2. Canon EOS 30 Top Panel Replacement: шаг 2, изображение 1 из 1
    • Remove the 4.3 mm black screw under the lens ring, and the 4.8 mm black screw under the camera.

  3. Canon EOS 30 Top Panel Replacement: шаг 3, изображение 1 из 1
    • Remove the 4.8 mm black screw on the left side of the camera.

  4. Canon EOS 30 Top Panel Replacement: шаг 4, изображение 1 из 1
    • Remove the front panel by lifting it away from the camera's body.

  5. Canon EOS 30 Top Panel Replacement, Top Panel: шаг 5, изображение 1 из 1
    • Slide the outer eyepiece upward to remove it.

  6. Canon EOS 30 Top Panel Replacement: шаг 6, изображение 1 из 1
    • Remove the two 4.75 mm black screws located on the top of the camera.

  7. Canon EOS 30 Top Panel Replacement: шаг 7, изображение 1 из 1
    • Remove the four 4.3 mm black screws near the bottom corners of the eyepiece at the back of the camera.

  8. Canon EOS 30 Top Panel Replacement: шаг 8, изображение 1 из 2 Canon EOS 30 Top Panel Replacement: шаг 8, изображение 2 из 2
    • Slowly separate the top panel from the camera by pushing it upward.

    • Separating the top panel too far or quickly can damage the ribbon cable and connecting wires that are still attached to the top panel of the camera.

Заключение

To reassemble your device, follow these instructions in reverse order.

Еще один человек закончил это руководство.

Sterling Vinson

Участник с: 04/17/11

259 Репутация

Автор 5 руководств

Команда

Cal Poly, Team 8-8, Regan Spring 2011 Участник Cal Poly, Team 8-8, Regan Spring 2011

CPSU-REGAN-S11S8G8

5 членов

Автор 22 руководств

0 Комментариев

Добавить комментарий

Просмотр статистики:

За последние 24часов: 0

За последние 7 дней: 7

За последние 30 дней: 20

За всё время: 2,704