Перейти к основному содержанию

Dell Inspiron 1525 CPU Replacement

Выберете то, что вам нужно

  1. Dell Inspiron 1525 CPU Replacement, Battery: шаг 1, изображение 1 из 1
    • Locate the battery release switch on the bottom of the laptop.

  2. Dell Inspiron 1525 CPU Replacement: шаг 2, изображение 1 из 2 Dell Inspiron 1525 CPU Replacement: шаг 2, изображение 2 из 2
    • Slide the battery release switch away from the lock symbol until you hear the battery click.

    • Slide the battery towards the back of the laptop until it comes free.

  3. Dell Inspiron 1525 CPU Replacement, Bottom Cover: шаг 3, изображение 1 из 2 Dell Inspiron 1525 CPU Replacement, Bottom Cover: шаг 3, изображение 2 из 2
    • Remove/loosen the eight 4.80 mm Phillips #1 screws securing the bottom panel.

    • The screws may only need to be loosened, as they are generally retained by plastic washers.

    • Remove the bottom panel.

  4. Dell Inspiron 1525 CPU Replacement, Heat Sink: шаг 4, изображение 1 из 3 Dell Inspiron 1525 CPU Replacement, Heat Sink: шаг 4, изображение 2 из 3 Dell Inspiron 1525 CPU Replacement, Heat Sink: шаг 4, изображение 3 из 3
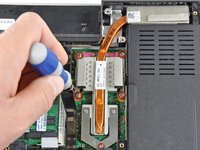
    • Loosen the five #1 Phillips screws securing the heat sink and clean it with compressed air

    • These screws are attached to the heat sink assembly.

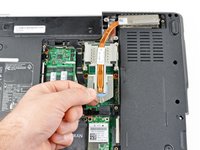
    • Gently lift the heat sink from side indicated in the picture.

    • The heat sink may feel like it is glued to the chips because of the thermal paste. Gently wiggle the heat sink back and forth to help break it free.

    • Be sure to thoroughly clean off the old thermal paste and apply new thermal paste before reinstalling the heat sink. Follow our thermal paste application guide for detailed instructions.

  5. Dell Inspiron 1525 CPU Replacement, CPU: шаг 5, изображение 1 из 2 Dell Inspiron 1525 CPU Replacement, CPU: шаг 5, изображение 2 из 2
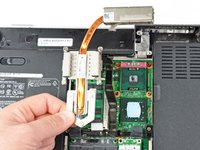
    • Use a small flathead screwdriver to turn the ZIF-socket cam screw counterclockwise until it can't be turned anymore.

    • Lift the CPU out of its socket, being careful not to bend its pins.

    • Processor orientation can be determined by matching the corner of the processor with a small triangle to the corner of the pink module with a small triangle.

    • Don't forget to apply thermal paste to the new processor. Also clean and apply fresh thermal paste to the video processor. Follow our thermal paste application guide for detailed instructions.

Заключение

To reassemble your device, follow these instructions in reverse order.

3 участников успешно повторили данное руководство.

0 Комментариев

Добавить комментарий

Просмотр статистики:

За последние 24часов: 1

За последние 7 дней: 3

За последние 30 дней: 10

За всё время: 8,524