Перейти к основному содержанию

Disassembling Compaq Mini 110 Power Pass-Through Board

Выберете то, что вам нужно

  1. Disassembling Compaq Mini 110 Power Pass-Through Board, Battery: шаг 1, изображение 1 из 2 Disassembling Compaq Mini 110 Power Pass-Through Board, Battery: шаг 1, изображение 2 из 2
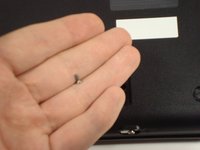
    • Locate the battery and the battery tabs on the bottom of the Compaq Mini.

  2. Disassembling Compaq Mini 110 Power Pass-Through Board: шаг 2, изображение 1 из 3 Disassembling Compaq Mini 110 Power Pass-Through Board: шаг 2, изображение 2 из 3 Disassembling Compaq Mini 110 Power Pass-Through Board: шаг 2, изображение 3 из 3
    • Push both tabs inward simultaneously and slide the battery out.

  3. Disassembling Compaq Mini 110 Power Pass-Through Board, RAM: шаг 3, изображение 1 из 2 Disassembling Compaq Mini 110 Power Pass-Through Board, RAM: шаг 3, изображение 2 из 2
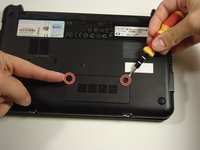
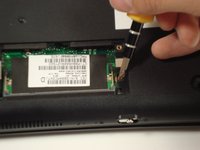
    • Use a Philips #0 screwdriver to unscrew the two screws covering the memory compartment on the bottom of the laptop and remove the cover.

  4. Disassembling Compaq Mini 110 Power Pass-Through Board: шаг 4, изображение 1 из 1
    • Push out the side tabs simultaneously and pull out the old RAM module.

    • When inserting a new RAM stick, be sure to evenly insert the gold pins in the same orientation that the old module was removed. While sliding the module in, press the side tabs in place.

  5. Disassembling Compaq Mini 110 Power Pass-Through Board, Keyboard: шаг 5, изображение 1 из 2 Disassembling Compaq Mini 110 Power Pass-Through Board, Keyboard: шаг 5, изображение 2 из 2
    • Remove the rubber pads located on the corners of your Compaq Mini.

    • There may be junk underneath it. This is residue left from the glue that held on the rubber pad. Just scrape it away to find the screw.

  6. Disassembling Compaq Mini 110 Power Pass-Through Board: шаг 6, изображение 1 из 2 Disassembling Compaq Mini 110 Power Pass-Through Board: шаг 6, изображение 2 из 2
    • Unscrew all the corner screws. There are four total, one under each rubber pad.

  7. Disassembling Compaq Mini 110 Power Pass-Through Board: шаг 7, изображение 1 из 2 Disassembling Compaq Mini 110 Power Pass-Through Board: шаг 7, изображение 2 из 2
    • Unscrew the screw for the bottom case located in the RAM compartment.

  8. Disassembling Compaq Mini 110 Power Pass-Through Board: шаг 8, изображение 1 из 2 Disassembling Compaq Mini 110 Power Pass-Through Board: шаг 8, изображение 2 из 2
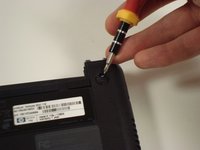
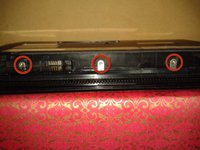
    • Remove the three screws in the silver tabs at the back of the keyboard.

    • These are located at the back of the base under the screen.

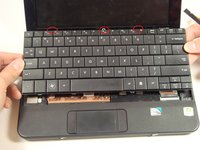
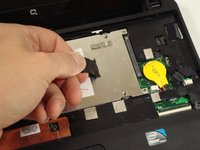
    • Lift the keyboard away from the laptop.

  9. Disassembling Compaq Mini 110 Power Pass-Through Board, Top Cover: шаг 9, изображение 1 из 1
    • Remove the eight screws that are from the plastic top cover.

  10. Disassembling Compaq Mini 110 Power Pass-Through Board: шаг 10, изображение 1 из 3 Disassembling Compaq Mini 110 Power Pass-Through Board: шаг 10, изображение 2 из 3 Disassembling Compaq Mini 110 Power Pass-Through Board: шаг 10, изображение 3 из 3
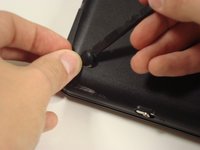
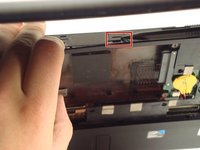
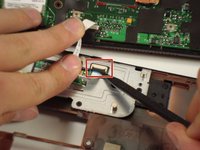
    • Pry up the top plastic cover using a spudger.

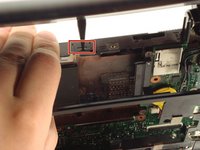
    • These two tabs under the screen need to be pushed in with a spudger.

  11. Disassembling Compaq Mini 110 Power Pass-Through Board: шаг 11, изображение 1 из 2 Disassembling Compaq Mini 110 Power Pass-Through Board: шаг 11, изображение 2 из 2
    • Remove the cable by carefully pulling it up.

    • Be careful when lifting up the cover because the track pad is still attached.

  12. Disassembling Compaq Mini 110 Power Pass-Through Board, Hard Drive: шаг 12, изображение 1 из 1
    • Remove the three screws holding the panel in place.

  13. Disassembling Compaq Mini 110 Power Pass-Through Board: шаг 13, изображение 1 из 2 Disassembling Compaq Mini 110 Power Pass-Through Board: шаг 13, изображение 2 из 2
    • Pull up on the tab to remove the hard drive.

  14. Disassembling Compaq Mini 110 Power Pass-Through Board, Power Pass-Through Board: шаг 14, изображение 1 из 1
    • Detach the cables.

  15. Disassembling Compaq Mini 110 Power Pass-Through Board: шаг 15, изображение 1 из 1
    • Remove the two screws keeping the board in place.

Заключение

To reassemble your device, follow these instructions in reverse order.

3 участников успешно повторили данное руководство.

alea

Участник с: 10/06/10

1 405 Репутация

Автор 14 руководств

Команда

Cal Poly, Team 22-2, Maness Fall 2010 Участник Cal Poly, Team 22-2, Maness Fall 2010

CPSU-MANESS-F10S22G2

6 членов

Автор 20 руководств

Один комментарий

I am so glad I found your website. I took my netbook in to a computer shop and told it would cost me $122 dollars to fix this power board piece. My AC Adapter socket is loose and wont hold the ac adapter plug anymore. To say the least, I was quite unhappy with that expense, as I only paid a couple of hundred dollars for this new. So, I bought the replacement piece on eBay for 12 dollars and will use this wonderful guide to fix this on my own. Even though I have done minor drive and cable changes in larger computers, I feel that your instructions are super easy and even an amateur like myself should be able to accomplish good results. Thank you.

gloriafeil - Ответить

Добавить комментарий

Просмотр статистики:

За последние 24часов: 0

За последние 7 дней: 0

За последние 30 дней: 1

За всё время: 4,789