Введение
Use this guide to remove the rear cover of a DualShock 3 controller.
Выберете то, что вам нужно
-
-
Remove the five 7.2 mm Phillips screws securing the rear cover to the controller.
-
-
-
-
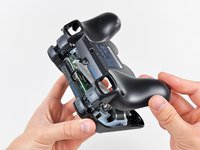
Press on the rear cover between the analog sticks and slightly lift the lower edge of it away from the rest of the controller.
-
-
-
Push the rear cover slightly toward the top edge of the controller to clear the front edge of the #2 triggers.
-
Pull the rear cover away from the rest of the controller, being careful not to pop off the #2 triggers.
-


To reassemble your device, follow these instructions in reverse order.
Отменить: Я не выполнил это руководство.
27 человек успешно провели ремонт по этому руководству.

3 Комментарии к руководству
i have a different dualshock 3 than yours. mine is built in a different way and has a different battery
Sony did that throughout the Dualshock 3’s production as they found out what would cause them to malfunction and fixed the issue. It should be alright as long as you are able to replace the battery when needed.
iran:
نحوهی تعویض طلق دسته پلی سه هم بذارین. لطفان