Введение
Если щетка не вращается, пылесос во время работы на ковре издает неприятный щелкающий или скрежещущий звук. После пяти-десяти обычных уборок мусора, как правило, скапливается столько, что он начинает проникать под торцевые крышки, и тогда требуется глубокая чистка.
В идеале, эту процедуру нужно проводить до того, как щетку настолько забьет волосами, что из-за трения они начнут плавиться. Это руководство создано для того, чтобы вы могли учиться на ошибках других!
Выберете то, что вам нужно
-
-
-
Снимите валик щетки, следуя инструкции для пылесоса Dyson DC14.
 Спросите у FixBot
-
-
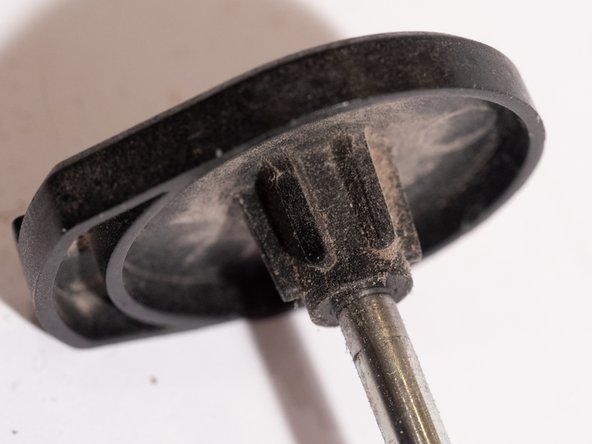
Они не имеют резьбы.
-
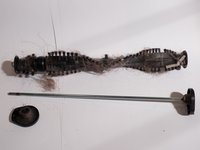
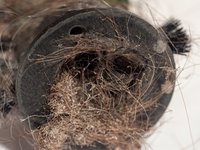
Аккуратно придерживайте одну торцевую заглушку и потяните за другую. Раскачивайте из стороны в сторону, чтобы сдвинуть заглушку со стержня, проходящего через центр щетки.
-
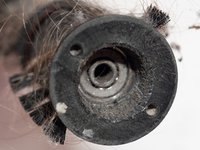
Места, где необходимо удалить волосы и мусор, обведены красным на третьей фотографии.
-
-
-
-
Это просто: просто возьмитесь за волосы или скопившийся мусор и потяните.
-
-
-
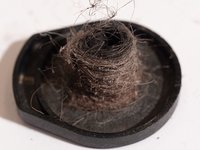
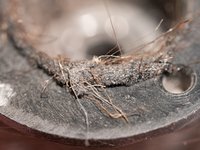
Проблем, вызванных трением и нагревом, можно легко избежать с помощью регулярного обслуживания, если знать, что оно необходимо. Мусор вызывал достаточно трения и тепла, чтобы расплавить щетку.
-
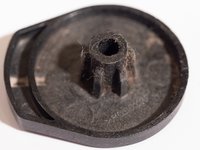
Сам подшипник представляет собой металлическое кольцо с шариками на конце щетки.
-
Участок втулки, где волосы и пластик сплавились вместе, не предназначен для работы в качестве поверхности подшипника. Это значит, что он не должен быть идеально гладким, поэтому грубой очистки канцелярским ножом от расплавленного пластика и мусора будет достаточно для восстановления работоспособности.
-
Используйте канцелярский нож, чтобы срезать или соскрести расплавленный пластик и мусор до тех пор, пока они не перестанут мешать торцевой заглушке. Эстетическая красота здесь не важна.
-
При необходимости замените щетку целиком, если она слишком сильно повреждена или ремонт прошел неудачно.
-
-
-
Вставьте стержень внутрь валика щетки и установите колпачок на место, надавив на него.
-
Самое сложное — завести конец валика щетки под тугой ремень двигателя. Найдите место, где он цепляется, и используйте стержень отвертки, чтобы потянуть в нужном направлении и дать валику щетки продвинуться еще немного.
-
Когда валик установлен, расположите узкие концы колпачков по направлению к задней части пылесоса (как показано на рисунке).
-
При установке крышки сначала защелкните ее переднюю часть, затем вставьте фиксаторы в отверстия и поверните их с помощью монеты.
-
Поздравляем! Вам не нужен новый пылесос или дорогостоящий ремонт!
-
-


Отменить: Я не выполнил это руководство.
4 человек успешно провели ремонт по этому руководству.
Особая благодарность этим переводчикам:
100%

Translation Bot помогает нам починить мир! Хотите внести свой вклад?
Начните переводить ›

10 Комментарии к руководству
Thank you, finding info on the proper brush placement was difficult. Thanks for your help. Scott
It worked! Beater bar spins strongly now! Some much hair and debris under the end caps! And the pain in my my fingers when they pinched between the belt and the bar is slowly going away lol. Seriously, my wife was ready to buy a new vacuum, so thank you!!!
My beater bar on my DC33 is not moving and there is no suction. There is strong suction on the attachment tool. My husband did get all
the hair and debris from the beater bar.
Oh my gosh..so many videos just said to clean the brush..finding your tutorial for deep cleaning was a godsend- THANK YOU for sparing me the expense of replacing..thiswas the "last ditch effort" before I bought the bullet and bought a new one tomorrow! I am sending positive karma vibes your way-- without your lesson, the black dust and "uck" would have never been found and eliminated!!
I have a Dyson dc 33 and I done this and the brush spins but whenever I put the cleaner on the floor it stops spinning on hardwood floor and carpet what’s going on or what can I do to fix it ?