Введение
If your HP Chromebook 14-q029wm has been having overheating problems recently try placing it in a space with better airflow or using compressed air and cleaning it out. If both of these don’t work your computer may have a faulty fan. After you determine if it is a faulty fan follow this guide below to remove and replace it. For more troubleshooting advice click here. This guide will walk you through how to take apart your HP Chromebook 14-q029wm safely and install a new fan. Make sure the power is completely off and no external power is plugged in.
Выберете то, что вам нужно
-
-
Remove nine 5mm Phillips #0 screws from the back case.
-
Remove the rubber caps using a spudger.
-
Remove the four remaining 5mm Phillips #0 screws.
-
-
-
Use an opening tool to unclip the bottom plastic covering of the laptop.
-
Go around the sides of the laptop until the bottom unclips completely and comes off of the laptop.
-
-
-
Once the bottom is completely unclipped, remove the covering slowly so you do not pull and rip the wires.
-
There is a little black lever that you have to pull in order to remove the wires. They are found on top of where the wires are connected.
-
Remove the larger wire first.
-
Then remove the smaller wire.
-
From there the keyboard should completely come off.
-
-
-
-
Use your fingers to pull the white tab out of the black slot above the battery.
-
-
-
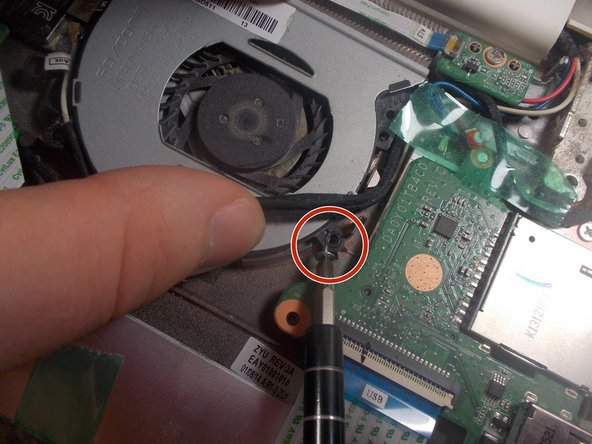
Using your fingers or an opening tool, remove the cable connecting the fan to the motherboard.
-
Gently remove the fan.
-


To reassemble your device, follow these instructions in reverse order.
To reassemble your device, follow these instructions in reverse order.
Отменить: Я не выполнил это руководство.
2 участников успешно повторили данное руководство.
Команда

UMass Dartmouth, Team S1-G5, Barthe Fall 2019 Участник UMass Dartmouth, Team S1-G5, Barthe Fall 2019
UMASSD-BARTHE-F19S1G5
3 членов
Автор 5 руководств