Введение
The maximum dimensions of a new solid state drive are 100.5 x 69.85 x 7.0mm. Before performing any work, always remember to completely turn off and disconnect your computer from any power source.
Выберете то, что вам нужно
-
-
Push the unlock tabs on the back of the monitor in and towards each other while sliding the back cover up.
 Спросите у FixBot
-
-
-
Pull up on the hard drive bay handle and push it to the left while holding back the metal tab on the bottom.
-
-
-
-
Pull side latch out and slide the hard drive tray out of the bay.
-
-
-
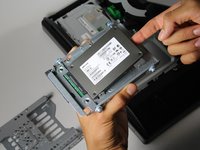
Remove the four 5/16" side screws, with the T15 Torx Screwdriver, and gently take out the drive.
-


To reassemble your device, follow these instructions in reverse order.
Отменить: Я не выполнил это руководство.
2 человек успешно провели ремонт по этому руководству.
Прикрепленные документы
Команда

Cal Poly, Team 1-20, Maness Fall 2015 Участник Cal Poly, Team 1-20, Maness Fall 2015
CPSU-MANESS-F15S1G20
4 членов
Автор 12 руководств