Перейти к основному содержанию

HP Spectre x360 13t-4000 Motherboard Replacement

Выберете то, что вам нужно

  1. HP Spectre x360 13t-4000 Motherboard Replacement, Bottom Cover: шаг 1, изображение 1 из 2 HP Spectre x360 13t-4000 Motherboard Replacement, Bottom Cover: шаг 1, изображение 2 из 2
    • Turn off and unplug the laptop.

    • Flip over the laptop so that the bottom backplate is exposed.

  2. HP Spectre x360 13t-4000 Motherboard Replacement: шаг 2, изображение 1 из 2 HP Spectre x360 13t-4000 Motherboard Replacement: шаг 2, изображение 2 из 2
    • Use a T5 screwdriver to remove the six 3 mm screws that secure the backplate.

    • Use the same screwdriver to remove the two 7 mm screws.

  3. HP Spectre x360 13t-4000 Motherboard Replacement: шаг 3, изображение 1 из 3 HP Spectre x360 13t-4000 Motherboard Replacement: шаг 3, изображение 2 из 3 HP Spectre x360 13t-4000 Motherboard Replacement: шаг 3, изображение 3 из 3
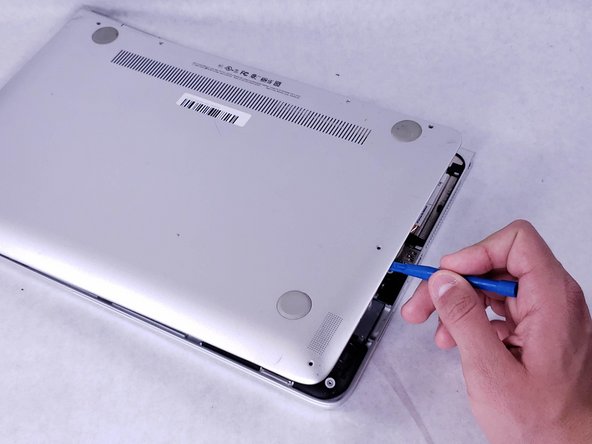
    • Insert an opening tool under the bottom cover at the screen hinges, and gently pry the cover free.

    • Carefully work your way around the cover's edges to pop it off completely.

  4. HP Spectre x360 13t-4000 Motherboard Replacement, Battery: шаг 4, изображение 1 из 3 HP Spectre x360 13t-4000 Motherboard Replacement, Battery: шаг 4, изображение 2 из 3 HP Spectre x360 13t-4000 Motherboard Replacement, Battery: шаг 4, изображение 3 из 3
    • With the backplate removed, remove the four 3 mm screws securing the battery with a Phillips #1 screwdriver.

    • With the screws removed, disconnect the 3 wires connected to the battery.

    • Tweezers may be needed to remove the wires.

  5. HP Spectre x360 13t-4000 Motherboard Replacement, Heatsink and Fan Assembly: шаг 5, изображение 1 из 3 HP Spectre x360 13t-4000 Motherboard Replacement, Heatsink and Fan Assembly: шаг 5, изображение 2 из 3 HP Spectre x360 13t-4000 Motherboard Replacement, Heatsink and Fan Assembly: шаг 5, изображение 3 из 3
    • Use a Phillips #0 Screwdriver to remove the four circled 3 mm screws.

    • Use the same screwdriver to remove the circled 4 mm screw.

  6. HP Spectre x360 13t-4000 Motherboard Replacement: шаг 6, изображение 1 из 2 HP Spectre x360 13t-4000 Motherboard Replacement: шаг 6, изображение 2 из 2
    • Remove black adhesive tape and metal shielding.

  7. HP Spectre x360 13t-4000 Motherboard Replacement: шаг 7, изображение 1 из 2 HP Spectre x360 13t-4000 Motherboard Replacement: шаг 7, изображение 2 из 2
    • Use a Phillips #0 screwdriver to remove the last 4 mm screw under the black tape.

    • Unplug the cable next to the fan.

  8. HP Spectre x360 13t-4000 Motherboard Replacement: шаг 8, изображение 1 из 2 HP Spectre x360 13t-4000 Motherboard Replacement: шаг 8, изображение 2 из 2
    • Remove heatsink and fan assembly.

    • Reapply fresh thermal paste to the CPU before placing a heatsink back in the device.

  9. HP Spectre x360 13t-4000 Motherboard Replacement, Motherboard: шаг 9, изображение 1 из 1
    • Use a Phillips #0 Screwdriver to remove the 2.6 mm and 2.7 mm screws.

    • Strip wire present in the motherboard must also be removed

  10. HP Spectre x360 13t-4000 Motherboard Replacement: шаг 10, изображение 1 из 3 HP Spectre x360 13t-4000 Motherboard Replacement: шаг 10, изображение 2 из 3 HP Spectre x360 13t-4000 Motherboard Replacement: шаг 10, изображение 3 из 3
    • For the strip wires, push the white tab seen in the photo up gently and slowly pull the strip wire.

    • The normal wires can be removed by holding the sides of the connector and gently pulling away.

    • Finally, the screws can be removed.

  11. HP Spectre x360 13t-4000 Motherboard Replacement: шаг 11, изображение 1 из 1
    • You may now pull the motherboard off the computer to access it.

Заключение

To reassemble your device, follow these instructions in reverse order.

Justin Dages

Участник с: 03/28/23

361 Репутация

Автор 3 руководств

Команда

IUPUI, Team 2-5, Harley Spring 2023 Участник IUPUI, Team 2-5, Harley Spring 2023

IUPUI-HARLEY-S23S2G5

3 членов

Автор 3 руководств

0 Комментариев

Добавить комментарий

Просмотр статистики:

За последние 24часов: 0

За последние 7 дней: 0

За последние 30 дней: 4

За всё время: 150