Перейти к основному содержанию
Присоединяйся к сообществу ремонтников - Создай аккаунт

Hamilton Beach 70740 Motor Replacement

Архивированное руководство
Это руководство сохранено для исторических целей. Используйте его обновлённую версию, чтобы выполнить ремонт.

Выберете то, что вам нужно

  1. Hamilton Beach 70740 Motor Replacement, Base Removal: шаг 1, изображение 1 из 3 Hamilton Beach 70740 Motor Replacement, Base Removal: шаг 1, изображение 2 из 3 Hamilton Beach 70740 Motor Replacement, Base Removal: шаг 1, изображение 3 из 3
    • Hold the food processor upside down and remove the two screws indicated with a screwdriver. Once unscrewed, remove the two rubber suction pads.

  2. Hamilton Beach 70740 Motor Replacement: шаг 2, изображение 1 из 2 Hamilton Beach 70740 Motor Replacement: шаг 2, изображение 2 из 2
    • Use a spudger to remove the 4 rubber base pads located at the corners of the device.

  3. Hamilton Beach 70740 Motor Replacement: шаг 3, изображение 1 из 1
    • Unscrew all 4 screws that are located beneath the pads with a screwdriver and remove the plastic grey base.

  4. Hamilton Beach 70740 Motor Replacement: шаг 4, изображение 1 из 1
    • Remove the screws indicated with a screw driver.

  5. Hamilton Beach 70740 Motor Replacement: шаг 5, изображение 1 из 1
    • Remove the two screws behind the knob with a screwdriver.

  6. Hamilton Beach 70740 Motor Replacement, Motor/Cord: шаг 6, изображение 1 из 1
    • Use a regular nylon spudger to remove the plastic caps at these locations with moderate pressure.

    • When working with electronics, it's important to choose a tool that's ESD-safe to avoid accidental damage to the device. The regular black nylon spudger or a plastic opening tool should be used whenever possible.

    • Apply pressure at the edge of the plastic cap circles. Apply stress elsewhere may damage the device.

    • Note that the plastic caps are glued

  7. Hamilton Beach 70740 Motor Replacement: шаг 7, изображение 1 из 1
    • Remove the 4 screws located under the plastic caps with a screw driver.

  8. Hamilton Beach 70740 Motor Replacement: шаг 8, изображение 1 из 2 Hamilton Beach 70740 Motor Replacement: шаг 8, изображение 2 из 2
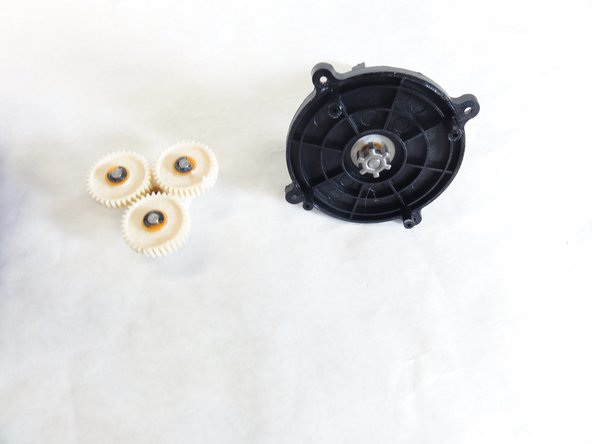
    • Lift and remove the plastic gears at the center of the device.

    • Remove any grease residue underneath the plastic gears.

  9. Hamilton Beach 70740 Motor Replacement: шаг 9, изображение 1 из 2 Hamilton Beach 70740 Motor Replacement: шаг 9, изображение 2 из 2
    • Remove the remaining screws to unhinge the motor located at the center of the device using a screw driver.

  10. Hamilton Beach 70740 Motor Replacement, Motor: шаг 10, изображение 1 из 1
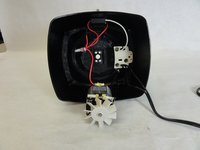
    • Remove to electrical cap to the positive terminal(black terminal), and undo the wiring.

  11. Hamilton Beach 70740 Motor Replacement: шаг 11, изображение 1 из 1
    • Remove the electrical cap to the negative end(red wire), and undo the wiring. Once this is complete reconstruct the wiring with the new motor.

Заключение

To reassemble your device, follow these instructions in reverse order.

2 человек успешно провели ремонт по этому руководству.

David Gedeon

Участник с: 09/17/15

806 Репутация

Автор 6 руководств

Команда

IUPUI, Team 1-1, Baechle Fall 2015 Участник IUPUI, Team 1-1, Baechle Fall 2015

IUPUI-BAECHLE-F15S1G1

4 членов

Автор 8 руководств

0 Комментарии к руководству

Добавить комментарий

Статистика просмотров:

За последние 24 часов: 0

За последние 7 дней: 1

За последние 30 дней: 1

За всё время: 730