Введение
One of the scariest parts of building your own computer can be handling your expensive new processor, especially the large plane of delicate pins on its underside. If you accidentally bent some pins, fear not! In most cases, these pins can be bent back, and nobody has to know of your mishap.
Use this guide to straighten bent pins on your computer’s processor (CPU).
Note: The level of severity of bent pins varies case to case, but the general process outlined in this guide is intended to be a catch-all. Some instances of bent pins are unfixable, so use your best judgement and proceed with caution. If your processor arrives already damaged, pursue an RMA before attempting to bend the pins back, which could void your warranty.
Caution: CPU pins are extremely fragile, and although malleable, can only be bent a finite number of times before they easily break.
If a pin breaks off, consult a pinout diagram of your CPU to see if the pin happens to be a dummy pin or one that’s otherwise not critical. If so, consider yourself lucky, and install your CPU as you normally would.
This guide uses an AMD Ryzen 7 2700X, but the process applies to all pin grid array (PGA) CPUs, including all AMD AM2, AM2+, AM3, AM3+, and AM4 socket CPUs. This guide doesn’t apply to land grid array (LGA) CPUs, such as modern Intel CPUs and AMD AM5 CPUs, as the pins reside inside the motherboard socket instead of on the CPU itself.
Выберете то, что вам нужно
-
-
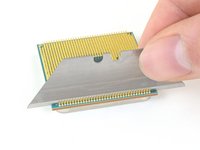
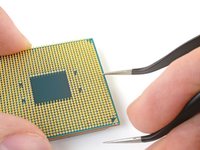
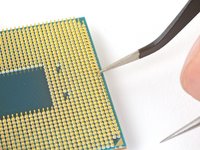
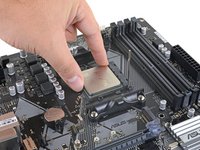
Assess the damage and the amount of bent pins by gripping the CPU by the edges and peering down the straight rows of pins to check for abnormalities.
-
Check each row—from both directions—so you have a good idea of which areas you need to work on. For example, look down the pins north to south as well as east to west.
-
-
-
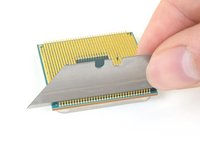
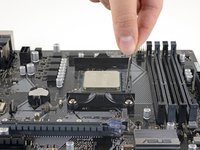
Gently slide the utility blade between two rows of pins.
-
If bent pins block the blade's path, gently bend them upright using the sharp corner of the blade, going one at a time.
I like to use a pocket knife blade. It’s stiffer and you get better control (the razor blade is more flexible at the pointy end. Also the knife handle allows better control over force as you are rotating, rather than levering.
-
-
-
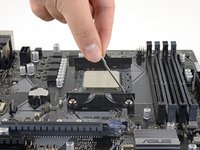
Once the blade can make it down a full row, tilt the blade side to side to straighten the pins on each flanking row.
-
-
-
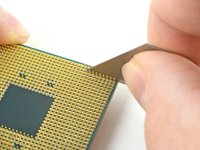
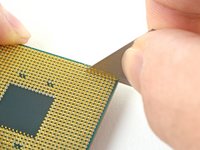
Rotate the CPU 90˚ and slide the blade down a row in the opposite direction.
-
As you push the blade along the row, rock it back and forth, straightening pins along the way.
-
-
-
Инструмент, используемый на этом этапе:Tweezers$3.99
-
If you're really in a pinch, you can modify a pair of tweezers to have a slightly curled tip.
-
Be careful using too much force—the long pencil body will give you more leverage than you realize.
I actually have a device designed for single pin that is very similar to the mechanical pencil, My problem is that it has such a long lever arm that it’s easy to apply too much force, If using that, grab the pencil as close to the chip as comfortable for better control of force and distance.
-
-
-
Repeat the last four steps until all rows are as straight as possible.
-
-
-
On your motherboard, lift the socket locking arm out around the locking clip and up to its vertical position.
-
-
-
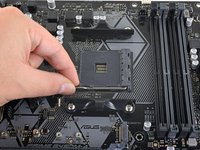
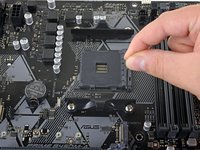
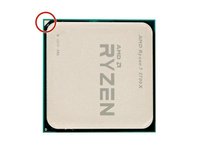
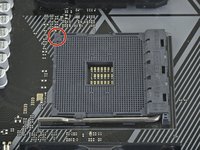
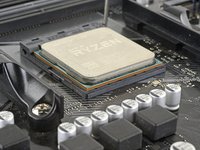
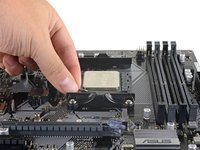
Match the corner of the CPU with a gold triangle to the corner of the motherboard socket that also has a triangle.
-
Grip the CPU by its edges and align it over the socket.
Ich weiß noch nicht ob die CPU funktioniert . Aber die Anleitung ist wirklich gut Habe das unter einer beleuchteten Lupe gemacht .Die Pins waren an den Ecken verbogen. ( Ebay Transport ? ) Fällt wie von selbst in den Sockel und kann verriegelt werden . Danke
-
-
-
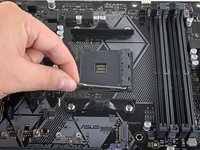
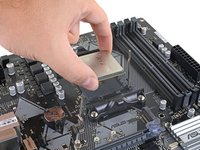
Lower the CPU into the socket, ensuring that all pins fall into their matching holes.
-
If the pins don't find their holes immediately, or if only one side goes in, remove the CPU and check its pins again.
-
-
-
Once the pins on your CPU are straight enough to allow it to be installed into the socket, close the locking arm by pulling it down, around the locking tab.
-
-
-
Without touching the CPU, repeat the locking/unlocking process on the socket four to five more times.
-
That's it! Close the socket's locking arm and proceed with your PC build.
-


Отменить: Я не выполнил это руководство.
34 человек успешно провели ремонт по этому руководству.


19 Комментариев
Thanks so much!
Ce tutoriel est aussi valable pour les sockets Intel à “matrice de pastilles” (Land Grid Array) sauf que dans le cas d’un socket LGA les pins à relever seront sur le socket plutôt que sur le processeur, mais le principe est le même, j’ai pu sauver une carte mère avec un socket LGA 1155 comme ça.
Exemple de socket LGA ou les pins sont bien visibles : https://upload.wikimedia.org/wikipedia/c...
Les pins sur les sockets sont très petits, mais avec une pincette de précision (visible dans ce tutoriel) comme celle d’iFixit c’est faisable.
English translation: "This tutorial is also valid for Intel Land Grid Array sockets, except that in the case of an LGA socket, the pins to be raised will be on the socket rather than on the processor, but the principle is the same, I was able to save a motherboard with an LGA 1155 socket like that.
Example of an LGA socket where the pins are clearly visible: https://upload.wikimedia.org/wikipedia/c...
The pins on the sockets are very small, but with precision tweezers (visible in this tutorial) like the one from iFixit it is doable."
It's a valuable guide for those who get into trouble with bent CPU pins.
I have encountered and dealt with such a problem several times. It's not an easy task.
This guide gives readers the knowledge and tool to fix the struggle problem. Especially, step-by-step instruction with clear photos will encourage readers to overcome the problem.
Thank U :) I’ll fix it.
using a razor blade is brilliant. worked perfectly
Worked 30 years ago on the first 386 I built and worked last week on a Ryzen 5600g that I dropped. All be best fixes for high-tech screw-ups involve low-tech ingenuity.
Thank you so much!
gerade zwei ryzen cpu vom neffen erfolgreich gerade gebogen, 1000 dank!
15 min to 2 hours 650 pins and 6 hours later
I'm too scared to do it myself.. are pins easily broken?
This helped so much thank god I was able to save my CPU
We fix these very often as a service. Especially when the pins are missing. They need to be replaced. Contact us at Micro Soldering Repairs
As an "older" elect tech, I worked quite a bit with "breadboard" circuit boards and wire wrap. Bent pins galore! My favorite pin straitening technique is using a very small diameter manual wire wrap tool. CPU pins are smaller, so the smallest wire wrap tool is needed. Cover the bent pin with the tool and GENTLY straighten. The tool supports the pin, slide it down further and further as the pin straightens up. Works well!
Thank you, this guide helped me recover my Ryzen 5800X. Great idea with the razor blade.