Введение
You don't need a lot of expensive equipment to shoot amazing guide photos—just proper technique and a little practice. The photos in this guide were taken with a Canon PowerShot SX120 IS (a basic point-and-shoot camera) and a pair of inexpensive 10" clamp lights from the local hardware store. Follow along to start taking guide photos like the pros.
-
-
Find a clutter-free table or flat workspace.
-
Use a clean white background. Inexpensive matte poster board or butcher paper works best. Avoid using bedsheets.
-
Use two lamps, one on each side.
-
Use LED “daylight” bulbs, or bulbs in the 5000-5500K color temperature range, for a clean white light. Avoid household incandescent bulbs, which cast an ugly orange glow over your photos.
-
Use a tripod. For crisp, clear shots, you need to keep the camera rock steady.
-
-
-
Don’t use flash! Flash is the enemy.
-
Use the highest resolution setting. We love large photos!
-
Shoot in 4:3. Most point-and-shoot cameras use a 4:3 aspect ratio automatically, while DSLRs shoot in 3:2.
-
It may be tempting, but don't rotate the camera to take portrait shots. For layout consistency, we require all photos to have a landscape 4:3 aspect ratio.
-
You can always crop your photos to 4:3 later, but it will save you a little time if you capture your images in 4:3 to begin with.
-
Shoot in aperture priority mode, and boost the exposure compensation. Auto mode does a decent enough job, but your light background will likely cause your photos to come out a bit dark. For best results, use aperture mode (usually denoted by an A or Av) and set the exposure compensation to around +1.
-
-
-
Use a delay timer or remote. Believe it or not, just having your shaky hands on the camera can introduce a little blurriness into the shot. Set your camera to a short (1 or 2 second) delay, using the self-timer setting, so that you can remove your hands completely after pressing the shutter button.
-
Connect to a laptop or live monitor. Checking your shots at full size will help you correct issues early, before they become a problem. Use a camera cable, or take a few shots and then pop the memory card into your computer.
-
-
-
You're ready to start shooting! Photos, that is.
-
Take a couple photos and pull them up on your computer screen to see how they look. Common issues include:
-
Harsh shadows—Too much light from a single source will create harsh shadows and make details harder to see. Reposition your lights or add more lights to minimize shadows.
-
Glare—Bright lights sometimes create a spotlight effect, especially on screens and shiny surfaces. Reposition your lights and/or angle the device to eliminate glare.
-
-
-
Another common issue is white balance, which tells your camera what true white is in your photo.
-
Sometimes the auto white balance doesn't work properly. If your "whites" don't look white, try a manual setting.
-
For daylight bulbs, use your camera’s “daylight” or “fluorescent” white balance setting. If you must use incandescent bulbs, set the white balance to “incandescent” or “tungsten” (sometimes called “indoor”). This will help remove the orange hue from your photos.
-
Some cameras have a custom white balance feature, allowing you to define “white” by taking a shot of your nice white background.
-
-
-
Before you proceed, clear a separate workspace for disassembling your device. Working in the photo area will create a lot of unwanted clutter, complicating your photos—and any dirty parts will mar your white background.
-
Only switch to your photo table when you're ready to set up a shot.
-
-
-
-
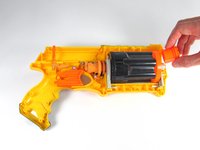
Use your hands/tools in each shot to demonstrate the action being performed.
-
Shoot in a first-person perspective. Try to set up each shot so that it matches what your readers will see.
-
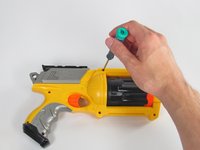
This first image isn't necessarily bad; the photo is well-lit, free of clutter, and the required action is clear—but the image is not from the reader's perspective.
-
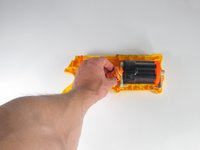
The second image does all of that equally well, and also matches what the reader is likely to see.
-
-
-
Fill up the frame with the subject. In this photo, the subject is too far away, using up only a small part of the frame.
-
Try not to let your arms or hands dominate the view. Work with your teammates to avoid taking shots like this one!
-
If you're working alone, you can use the camera's delay timer to free up your hands.
-
-
-
Getting great guide photos is a group effort! Important roles include:
-
Camera Operator—Not for the faint of heart, this job requires patience, a little technical skill, and an eye for detail. Opposable thumbs are a plus.
-
Lighting Operator—Requires attentiveness and near immunity to heat. Must be trusted to wield the power of blinding light responsibly; anyone who owns a laser pointer should be instantly disqualified.
-
Hand Model—Someone to hold parts and tools completely still from awkward, sometimes precariously balanced positions. If any of your friends are gymnasts or Twister champions, this job is for them. Barring that, look for someone with clean fingernails, who doesn’t write phone numbers on their hands.
-
Note Taker—A master scribe, whose eye sees all.
-
-
-
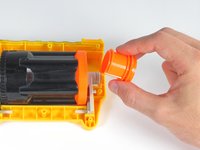
Keep the action in the center. Draw attention to the required procedure by centering it in the frame.
-
-
-
Keep the subject in focus. It's easy to accidentally focus on your hand instead of the device you're working on.
-
-
-
Take multiple shots for each step. Try different angles and positions, and use the one that best conveys what the reader needs to do.
-
It's easy to block the action with your hands. Switch hands or change positions in order to give your readers a better look at what's going on.
-
-
-
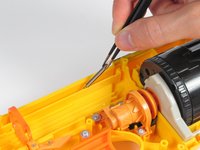
Zoom in to get detailed shots of actions, especially when performing smaller or more intricate tasks.
-
In this example, the black "bullet" chamber is a good reference point. Without it, the action is still clear, but the location is not.
-
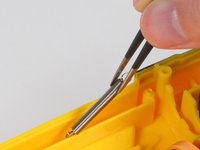
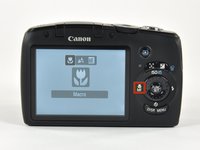
For very close shots, your camera may have trouble focusing. Switch to Macro mode (usually denoted by a flower icon) for extreme close-ups.
-
-
-
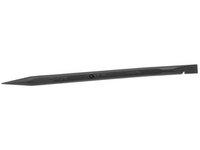
Don't use metal prying tools in your guides except as a last resort.
-
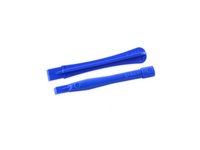
The nylon spudger and plastic opening tools included in your toolkit are ESD-safe and are less likely to cause cosmetic damage.
-
Only instruct your readers to use a metal spudger when safer tools aren't up to the task. Never use a screwdriver to pry open your device.
-
-
-
For complex actions, use multiple photos in sequence. You can create a "stop-motion" or "flip-book" effect, using up to three photos in one step.
-
-
-
Avoid "Ta-Da!" photos. When writing instructions, it's important to be concise. A photo of a disassembled device doesn't convey any action or procedure.
-


Отменить: Я не выполнил это руководство.
274 человек успешно провели ремонт по этому руководству.

5 Комментарии к руководству
Thanks, that highlighted the process well, and i'm actually excited about doing my own shoots!
Thanks for sharing these tips, I would like to make some of these in the future.
KUDOS!
I’m planning on getting a 3 lamps setup, using 2 smaller lamps from above coming at a 45 degrees angle, and a bigger lamp coming from behind myself. How much wattage should my bulbs be?
I will grab
2x E14 5500K
1x E27 5500K
Thanks!
Nice job. Thanks very much.