Перейти к основному содержанию

Infant Optics DXR-8 Monitor Motherboard Replacement

Выберете то, что вам нужно

  1. Infant Optics DXR-8 Monitor Motherboard Replacement, Internal Monitor Components: шаг 1, изображение 1 из 3 Infant Optics DXR-8 Monitor Motherboard Replacement, Internal Monitor Components: шаг 1, изображение 2 из 3 Infant Optics DXR-8 Monitor Motherboard Replacement, Internal Monitor Components: шаг 1, изображение 3 из 3
    • Using the plastic opening tool, remove screen protector from front of monitor.

  2. Infant Optics DXR-8 Monitor Motherboard Replacement: шаг 2, изображение 1 из 3 Infant Optics DXR-8 Monitor Motherboard Replacement: шаг 2, изображение 2 из 3 Infant Optics DXR-8 Monitor Motherboard Replacement: шаг 2, изображение 3 из 3
    • Remove the six 4mm screws using a Phillips #00 screwdriver.

    • Remove the screen, exposing the circuit board.

    • Turn device over to expose rear circuit board.

  3. Infant Optics DXR-8 Monitor Motherboard Replacement: шаг 3, изображение 1 из 3 Infant Optics DXR-8 Monitor Motherboard Replacement: шаг 3, изображение 2 из 3 Infant Optics DXR-8 Monitor Motherboard Replacement: шаг 3, изображение 3 из 3
    • Disconnect speaker from monitor for ease of access by unplugging wire.

  4. Infant Optics DXR-8 Monitor Motherboard Replacement, Monitor Screen: шаг 4, изображение 1 из 3 Infant Optics DXR-8 Monitor Motherboard Replacement, Monitor Screen: шаг 4, изображение 2 из 3 Infant Optics DXR-8 Monitor Motherboard Replacement, Monitor Screen: шаг 4, изображение 3 из 3
    • Using a plastic opening tool, disconnect the ribbon cable connector.

    • Gently separate the ribbon cable from the motherboard.

  5. Infant Optics DXR-8 Monitor Motherboard Replacement: шаг 5, изображение 1 из 2 Infant Optics DXR-8 Monitor Motherboard Replacement: шаг 5, изображение 2 из 2
    • Using a Phillips #000 screwdriver, remove the four 4mm screws around the edge of the motherboard.

    • Flip the motherboard away from the front case to reveal the screen on the other side.

  6. Infant Optics DXR-8 Monitor Motherboard Replacement: шаг 6, изображение 1 из 1
    • Using a plastic opening tool, carefully pry the top retaining frame off of the screen. Start in one corner and work around the bottom of the frame.

  7. Infant Optics DXR-8 Monitor Motherboard Replacement: шаг 7, изображение 1 из 3 Infant Optics DXR-8 Monitor Motherboard Replacement: шаг 7, изображение 2 из 3 Infant Optics DXR-8 Monitor Motherboard Replacement: шаг 7, изображение 3 из 3
    • Using a plastic opening pick, carefully pry a corner of the screen away from the motherboard.

    • Lift the screen off of the motherboard.

  8. Infant Optics DXR-8 Monitor Motherboard Replacement, Monitor Motherboard: шаг 8, изображение 1 из 2 Infant Optics DXR-8 Monitor Motherboard Replacement, Monitor Motherboard: шаг 8, изображение 2 из 2
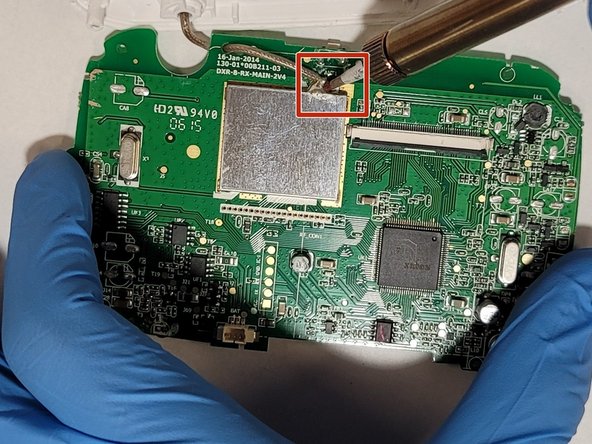
    • Flip the motherboard away from the case.

    • Using a soldering iron and desoldering braid, desolder the antenna from the motherboard.

    • For more information on soldering, please visit the How to Solder and Desolder Connections guide.

Заключение

To reassemble your device, follow these instructions in reverse order.

Еще один человек закончил это руководство.

James McNeil

Участник с: 09/17/20

400 Репутация

Автор 2 руководств

2 Комментариев

Can you do one for the DXR-8 Pro monitor? Mine randomly stoped turning on and I want to see if I can open it up and try to fix it.

Andfel - Ответить

Can you please tell me where to buy a replacement motherboard??

Ilya Nechay - Ответить

Добавить комментарий

Просмотр статистики:

За последние 24часов: 1

За последние 7 дней: 6

За последние 30 дней: 20

За всё время: 1,088