Перейти к основному содержанию

JBL Charge 4 Speaker Replacement

Выберете то, что вам нужно

  1. JBL Charge 4 Speaker Replacement, Speaker Grill: шаг 1, изображение 1 из 1
    • Flip your speaker over and insert the plastic opening tool into the slit on the grille.

    • Pry away from yourself towards the back of the speaker to release the clip.

    • Repeat this process for the clip on the other side.

  2. JBL Charge 4 Speaker Replacement: шаг 2, изображение 1 из 2 JBL Charge 4 Speaker Replacement: шаг 2, изображение 2 из 2
    • Remove the two 8mm Phillips #0 screws from the other edge of the grille.

  3. JBL Charge 4 Speaker Replacement: шаг 3, изображение 1 из 1
    • Pull apart both sides of the grille.

    • Lift the cover off of the speaker.

  4. JBL Charge 4 Speaker Replacement, Passive Bass Radiators: шаг 4, изображение 1 из 2 JBL Charge 4 Speaker Replacement, Passive Bass Radiators: шаг 4, изображение 2 из 2
    • Using the plastic opening tool, lift the tab on top of the speaker to release the radiator from the clips.

    • Repeat this process on the other clips around the radiator to release it from the frame.

  5. JBL Charge 4 Speaker Replacement: шаг 5, изображение 1 из 2 JBL Charge 4 Speaker Replacement: шаг 5, изображение 2 из 2
    • Push the radiator off of the frame of the device.

    • Repeat on the other side.

    • The passive bass radiators seal out water from inside the device. Removing them multiple times may compromise the waterproof nature of the speaker.

  6. JBL Charge 4 Speaker Replacement, Speaker: шаг 6, изображение 1 из 2 JBL Charge 4 Speaker Replacement, Speaker: шаг 6, изображение 2 из 2
    • Flip the device so that the speaker faces you.

    • Remove the four 8mm Phillips #1 screws.

  7. JBL Charge 4 Speaker Replacement: шаг 7, изображение 1 из 1
    • Gently pull out the speaker.

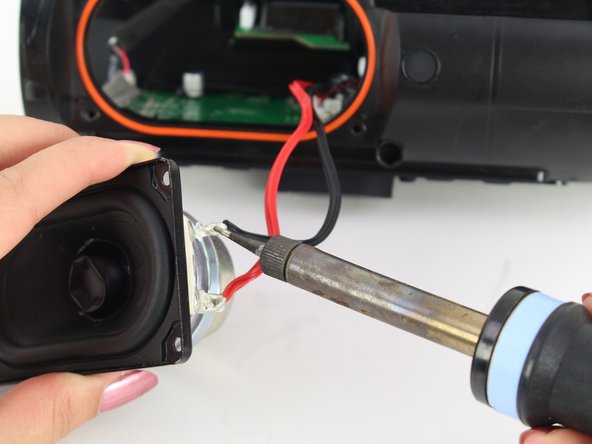
  8. JBL Charge 4 Speaker Replacement: шаг 8, изображение 1 из 2 JBL Charge 4 Speaker Replacement: шаг 8, изображение 2 из 2
    • Desolder the red and black wires.

    • A guide for soldering and desoldering can be found here.

Заключение

To reassemble your device, follow these instructions in reverse order.

10 участников успешно повторили данное руководство.

Rohith Dara

Участник с: 01/24/19

357 Репутация

1 руководство автора

Команда

Cal Poly, Team S1-G1, White Winter 2019 Участник Cal Poly, Team S1-G1, White Winter 2019

CPSU-WHITE-W19S1G1

4 членов

Автор 26 руководств

11 Комментариев

Perfect - But where to get the replacement speaker ??? I’ve searched whole web. Please give me the info about replacement speaker diaphragm. Regards, T

Tadej Tomašič - Ответить

Jbl charge 4 Led indicator board G ribbon cable authentic

carlos maltez - Ответить

Добавить комментарий

Просмотр статистики:

За последние 24часов: 8

За последние 7 дней: 50

За последние 30 дней: 212

За всё время: 22,467