Перейти к основному содержанию

Jawbone Big Jambox Button Circuit Board Replacement

Выберете то, что вам нужно

  1. Jawbone Big Jambox Button Circuit Board Replacement, Outer Case: шаг 1, изображение 1 из 1
    • Remove both end caps by putting a plastic opening tool in the center of the seam. Work around the edges to pry the end caps off completely.

    • Due to interior clips holding the end caps in place, use caution when applying force.

  2. Jawbone Big Jambox Button Circuit Board Replacement: шаг 2, изображение 1 из 3 Jawbone Big Jambox Button Circuit Board Replacement: шаг 2, изображение 2 из 3 Jawbone Big Jambox Button Circuit Board Replacement: шаг 2, изображение 3 из 3
    • Turn the Jambox upside down. Peel the indicated rubber tabs off, using a plastic opening tool if necessary.

    • You may want to only take the tabs half way off to avoid re-gluing when reassembling.

    • Remove the three T6, 7.0 mm screws under each rubber tab.

    • Because the screws are a different length, set the screws aside.

  3. Jawbone Big Jambox Button Circuit Board Replacement: шаг 3, изображение 1 из 3 Jawbone Big Jambox Button Circuit Board Replacement: шаг 3, изображение 2 из 3 Jawbone Big Jambox Button Circuit Board Replacement: шаг 3, изображение 3 из 3
    • With the Jawbone logo facing towards you and with correct orientation, place the Jambox with the left end cap facing upward.

    • Unscrew indicated T6 9.7 mm screws.

    • Gently loosen the tabs from their anchor points so the bottom may be removed.

    • Flip the Jambox so the other end cap is facing up. The USB cable is on this side (metal grounding clip, indicated in orange). Repeat the above two steps.

  4. Jawbone Big Jambox Button Circuit Board Replacement: шаг 4, изображение 1 из 1
    • Pry up the bottom panel by lifting from the device.

    • Pull the bottom up. This may take a bit of force as the bottom is glued to device.

    • Once removed, the battery will now be visible.

  5. Jawbone Big Jambox Button Circuit Board Replacement: шаг 5, изображение 1 из 2 Jawbone Big Jambox Button Circuit Board Replacement: шаг 5, изображение 2 из 2
    • Before unscrewing, take a picture of the top view. That way, when you're reassembling the device, you'll know the orientation of the metal grounding plates.

    • Unscrew the eight indicated T6 9.8 mm screws. Remove metal grounding plates.

  6. Jawbone Big Jambox Button Circuit Board Replacement: шаг 6, изображение 1 из 1
    • Once all eight screws are removed, pry the sides of the Jambox to lift the body from it's shell.

  7. Jawbone Big Jambox Button Circuit Board Replacement: шаг 7, изображение 1 из 1
    • With the battery facing forward, remove the three indicated T6 9.5 mm screws.

    • Once the screws are removed, lift up the small plastic plate, revealing the auxiliary board underneath.

  8. Jawbone Big Jambox Button Circuit Board Replacement, Button Panel: шаг 8, изображение 1 из 2 Jawbone Big Jambox Button Circuit Board Replacement, Button Panel: шаг 8, изображение 2 из 2
    • Turn the Jambox so that the button panel is visible.

    • Remove the indicated screws, T6 9.6 mm.

    • There is a small plastic flap obscuring the view of one of the screws, indicated in orange. In order to unscrew it, simply lift the flap out of the way.

  9. Jawbone Big Jambox Button Circuit Board Replacement: шаг 9, изображение 1 из 1
    • Pop off the button panel.

  10. Jawbone Big Jambox Button Circuit Board Replacement: шаг 10, изображение 1 из 2 Jawbone Big Jambox Button Circuit Board Replacement: шаг 10, изображение 2 из 2
    • Remove the colored ribbon that connects the green button circuit board to the blue auxiliary board by using your finger to lift the small black tabs that clamp down the ribbon.

  11. Jawbone Big Jambox Button Circuit Board Replacement, Speaker: шаг 11, изображение 1 из 3 Jawbone Big Jambox Button Circuit Board Replacement, Speaker: шаг 11, изображение 2 из 3 Jawbone Big Jambox Button Circuit Board Replacement, Speaker: шаг 11, изображение 3 из 3
    • Place the disassembled Jambox with the speakers facing up.

    • Locate the screws around the broken speaker.

    • Use a T15 screwdriver to remove the four 12.1 mm screws around the broken speaker.

  12. Jawbone Big Jambox Button Circuit Board Replacement: шаг 12, изображение 1 из 1
    • Using a plastic opening tool, pry the speaker out of the Jambox.

  13. Jawbone Big Jambox Button Circuit Board Replacement: шаг 13, изображение 1 из 2 Jawbone Big Jambox Button Circuit Board Replacement: шаг 13, изображение 2 из 2
    • Desolder the wires from the speaker terminal in the Jambox.

    • Detach the round speaker from its square frame, and save the square frame for the replacement speaker.

    • Use caution when operating a soldering iron due to extreme heat.

    • For instructions on how to solder and desolder, take a look at the soldering guide.

  14. Jawbone Big Jambox Button Circuit Board Replacement, Button Circuit Board: шаг 14, изображение 1 из 3 Jawbone Big Jambox Button Circuit Board Replacement, Button Circuit Board: шаг 14, изображение 2 из 3 Jawbone Big Jambox Button Circuit Board Replacement, Button Circuit Board: шаг 14, изображение 3 из 3
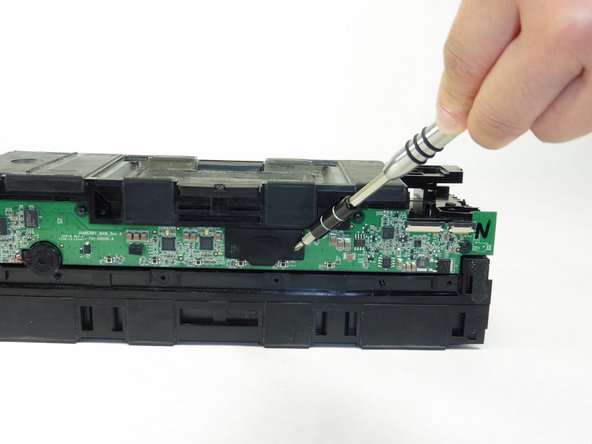
    • Remove the two PH0, 5.8 mm screws on the small plastic black panel using a screwdriver.

  15. Jawbone Big Jambox Button Circuit Board Replacement: шаг 15, изображение 1 из 1
    • Pull out rubber stopper using your fingers.

  16. Jawbone Big Jambox Button Circuit Board Replacement: шаг 16, изображение 1 из 2 Jawbone Big Jambox Button Circuit Board Replacement: шаг 16, изображение 2 из 2
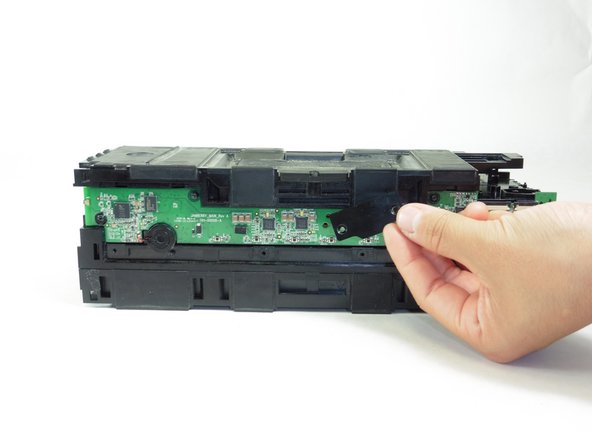
    • Remove the four T6, 9.9mm screws that secure the button circuit board to the body

  17. Jawbone Big Jambox Button Circuit Board Replacement: шаг 17, изображение 1 из 1
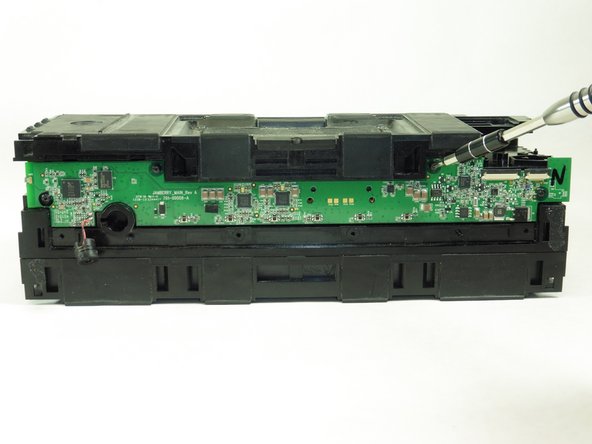
    • Minding the small L-shaped piece of metal on the end opposite of the ports, lift the circuit board from the body of the Big Jambox.

Заключение

To reassemble your device, follow these instructions in reverse order.

3 участников успешно повторили данное руководство.

Zoe Houghton

Участник с: 04/01/15

227 Репутация

1 руководство автора

Команда

Cal Poly, Team 24-5, Lancaster Spring 2015 Участник Cal Poly, Team 24-5, Lancaster Spring 2015

CPSU-LANCASTER-S15S24G5

4 членов

Автор 9 руководств

0 Комментариев

Добавить комментарий

Просмотр статистики:

За последние 24часов: 1

За последние 7 дней: 2

За последние 30 дней: 16

За всё время: 6,422