Перейти к основному содержанию

Karcher Vacuum Universal 14286230 2014 Vacuum Motor Replacement

Выберете то, что вам нужно

  1. Karcher Vacuum Universal 14286230 2014 Vacuum Motor Replacement, Unlatch the top assembly: шаг 1, изображение 1 из 3 Karcher Vacuum Universal 14286230 2014 Vacuum Motor Replacement, Unlatch the top assembly: шаг 1, изображение 2 из 3 Karcher Vacuum Universal 14286230 2014 Vacuum Motor Replacement, Unlatch the top assembly: шаг 1, изображение 3 из 3
    • Before you begin, unplug the vacuum and disconnect all hose accessories.

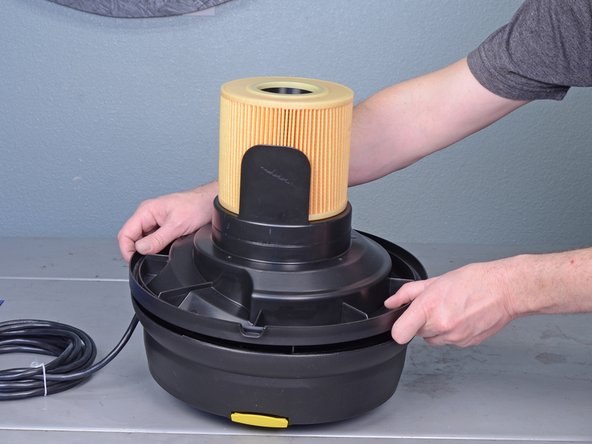
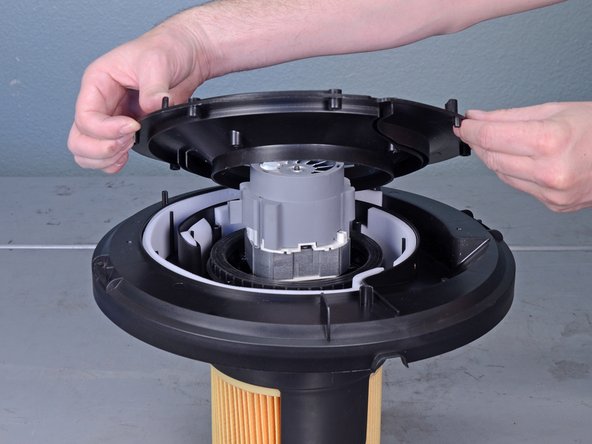
    • Release the two latches locking the top assembly in place.

  2. Karcher Vacuum Universal 14286230 2014 Vacuum Motor Replacement, Remove the top assembly: шаг 2, изображение 1 из 2 Karcher Vacuum Universal 14286230 2014 Vacuum Motor Replacement, Remove the top assembly: шаг 2, изображение 2 из 2
    • Lift and remove the top assembly from the tank.

  3. Karcher Vacuum Universal 14286230 2014 Vacuum Motor Replacement, Unscrew the top assembly: шаг 3, изображение 1 из 1
    • Remove the four T15 screws securing the top assembly.

  4. Karcher Vacuum Universal 14286230 2014 Vacuum Motor Replacement, Disconnect the motor: шаг 4, изображение 1 из 2 Karcher Vacuum Universal 14286230 2014 Vacuum Motor Replacement, Disconnect the motor: шаг 4, изображение 2 из 2
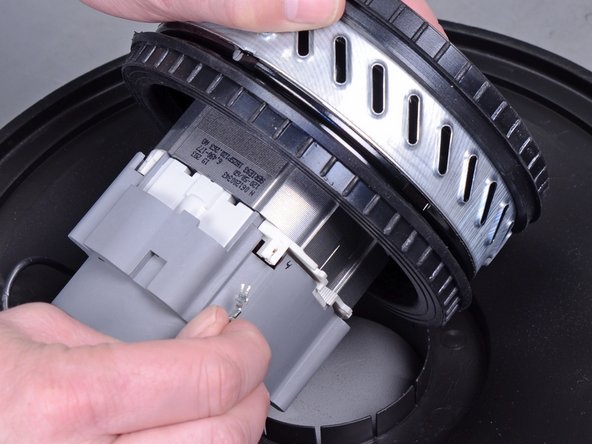
    • Carefully lift the motor/filter away from the housing until you can access the motor wires.

    • Do not separate the motor/filter from the assembly completely, or you risk damaging the motor wires.

  5. Karcher Vacuum Universal 14286230 2014 Vacuum Motor Replacement: шаг 5, изображение 1 из 3 Karcher Vacuum Universal 14286230 2014 Vacuum Motor Replacement: шаг 5, изображение 2 из 3 Karcher Vacuum Universal 14286230 2014 Vacuum Motor Replacement: шаг 5, изображение 3 из 3
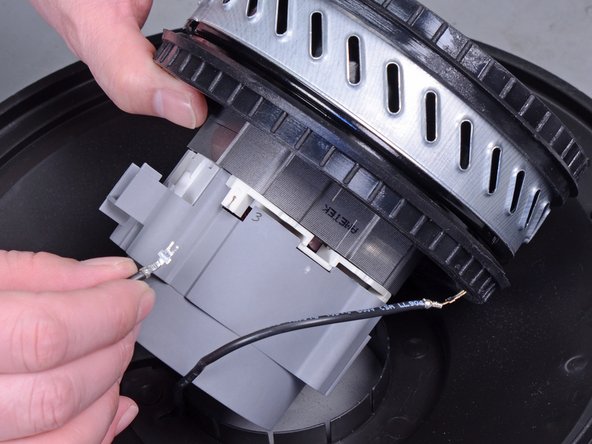
    • Disconnect the two motor wires from the motor by pulling them straight out of their sockets.

    • Reassembly tip: The wires are not polarized and can be plugged into either socket.

  6. Karcher Vacuum Universal 14286230 2014 Vacuum Motor Replacement, Remove the motor/filter: шаг 6, изображение 1 из 2 Karcher Vacuum Universal 14286230 2014 Vacuum Motor Replacement, Remove the motor/filter: шаг 6, изображение 2 из 2
    • You can now fully remove the motor/filter assembly from the housing.

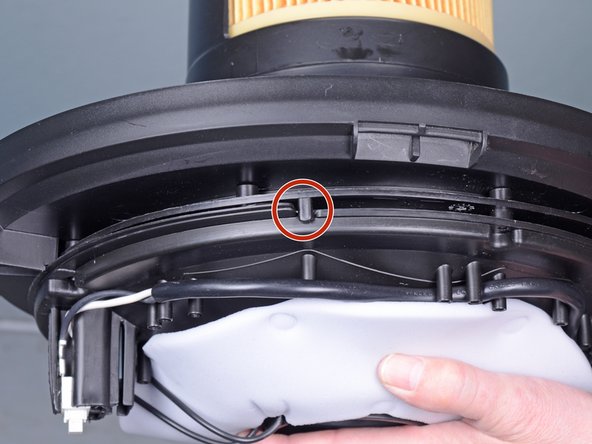
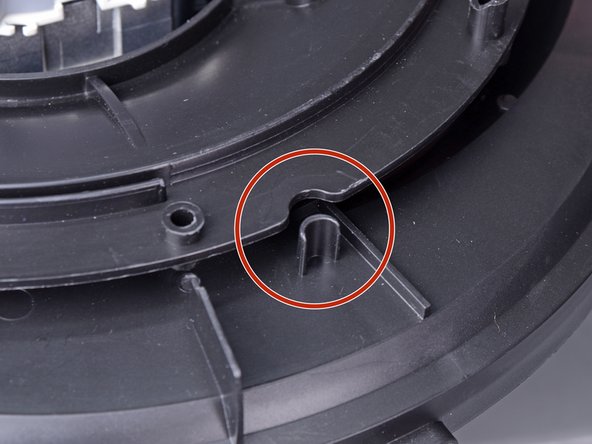
    • Reassembly tip: Use the alignment tab to help you align the motor/filter with the housing assembly.

  7. Karcher Vacuum Universal 14286230 2014 Vacuum Motor Replacement, Unscrew the motor flange: шаг 7, изображение 1 из 1
    • Remove the four T15 screws securing the motor flange.

  8. Karcher Vacuum Universal 14286230 2014 Vacuum Motor Replacement, Remove the motor flange: шаг 8, изображение 1 из 3 Karcher Vacuum Universal 14286230 2014 Vacuum Motor Replacement, Remove the motor flange: шаг 8, изображение 2 из 3 Karcher Vacuum Universal 14286230 2014 Vacuum Motor Replacement, Remove the motor flange: шаг 8, изображение 3 из 3
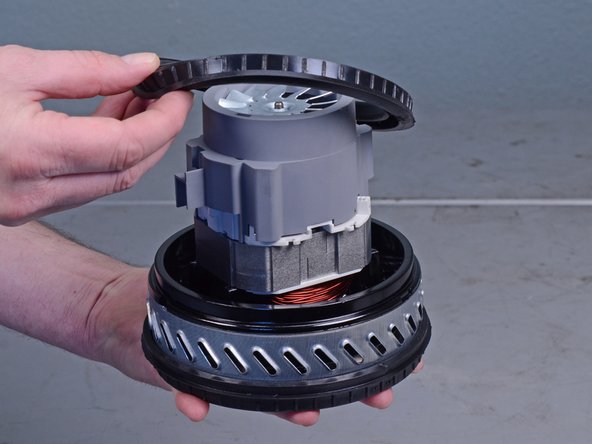
    • Lift the motor flange and remove it from the motor assembly.

    • Re-assembly tip: Use the marked notch to help you align the motor flange to the assembly.

  9. Karcher Vacuum Universal 14286230 2014 Vacuum Motor Replacement, Remove the motor: шаг 9, изображение 1 из 2 Karcher Vacuum Universal 14286230 2014 Vacuum Motor Replacement, Remove the motor: шаг 9, изображение 2 из 2
    • Lift the motor straight out of the assembly and remove it.

    • Re-assembly tip: The motor is not keyed into the assembly. As long as the motor wires can reach their sockets, the motor can sit in any rotation.

  10. Karcher Vacuum Universal 14286230 2014 Vacuum Motor Replacement, Transfer the rubber seals: шаг 10, изображение 1 из 3 Karcher Vacuum Universal 14286230 2014 Vacuum Motor Replacement, Transfer the rubber seals: шаг 10, изображение 2 из 3 Karcher Vacuum Universal 14286230 2014 Vacuum Motor Replacement, Transfer the rubber seals: шаг 10, изображение 3 из 3
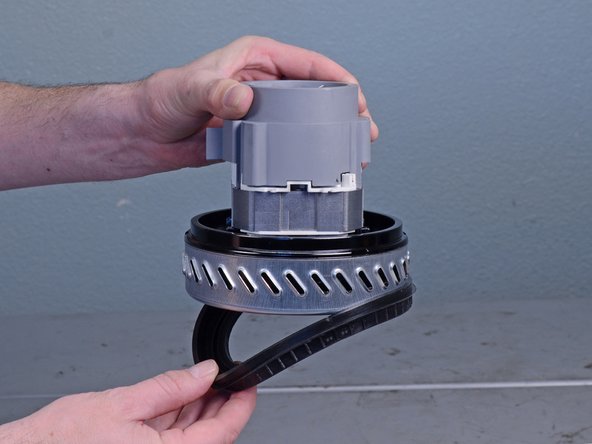
    • Peel and remove the two black rubber seals from the motor.

    • Transfer the rubber seals to the replacement motor.

    • If the seals look torn or worn, discard the used seals and install replacements.

  11. Karcher Vacuum Universal 14286230 2014 Vacuum Motor Replacement: шаг 11, изображение 1 из 1
    • Only the motor remains.

Заключение

To reassemble your device, follow these instructions in reverse order.

4 участников успешно повторили данное руководство.

Arthur Shi

Участник с: 01/03/18

252 818 Репутация

Автор 526 руководств

Команда

iFixit Участник iFixit

Staff

135 членов

Автор 16 817 руководств

0 Комментариев

Добавить комментарий

Просмотр статистики:

За последние 24часов: 0

За последние 7 дней: 4

За последние 30 дней: 21

За всё время: 1,553