Перейти к основному содержанию

LexiBook Tablet One Battery Replacement

Выберете то, что вам нужно

  1. LexiBook Tablet One Battery Replacement, Battery: шаг 1, изображение 1 из 3 LexiBook Tablet One Battery Replacement, Battery: шаг 1, изображение 2 из 3 LexiBook Tablet One Battery Replacement, Battery: шаг 1, изображение 3 из 3
    • First the case must be opened. Insert the blue plastic opening tool where the two casings meet. Pry up until you hear a clip pop and then carefully move around the device. Do this until the front and back casing are completely separate from one another.

    • You will again need to be careful opening the device in order to avoid damaging the speaker, or worse, the motherboard.

    • The clips holding the case together are roughly 1.5 in. apart.

  2. LexiBook Tablet One Battery Replacement: шаг 2, изображение 1 из 2 LexiBook Tablet One Battery Replacement: шаг 2, изображение 2 из 2
    • Carefully remove the speaker by inserting the spudger between the case and the speaker. Pry upwards until the speaker comes out. Set the speaker to the side.

    • Be careful with the speaker wires. The wires can easily detach from both the speaker and the board.

  3. LexiBook Tablet One Battery Replacement: шаг 3, изображение 1 из 1
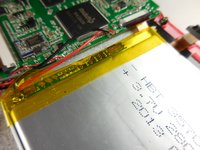
    • Use the spudger to repeatedly gouge between the battery and LCD. Work around the battery until it breaks free.

    • It may feel as though you are pushing extremely hard. This is normal as the adhesive is quite strong. As long as you don't tip the tool you use and puncture the battery / LCD it will be fine.

  4. LexiBook Tablet One Battery Replacement: шаг 4, изображение 1 из 2 LexiBook Tablet One Battery Replacement: шаг 4, изображение 2 из 2
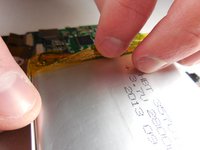
    • The tape around the battery's circuit board is extremely thorough. There are 2 pieces of tape, on folded over the side and another wrapped around the circuit board. Simply peel both off.

  5. LexiBook Tablet One Battery Replacement: шаг 5, изображение 1 из 2 LexiBook Tablet One Battery Replacement: шаг 5, изображение 2 из 2
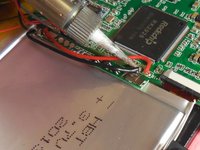
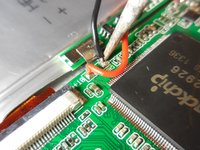
    • Now that the battery is pry'd free and the tape is removed, the wires should be able to move freely. Give yourself as much room as you need, and solder off the connections on the motherboard.

    • How to Solder is iFixit's official guide to use a soldering gun.

Заключение

To reassemble your device, follow these instructions in reverse order.

Jordan

Участник с: 03/11/15

645 Репутация

Автор 4 руководств

Команда

Colorado Springs, Team 2-5, Panko Spring 2015 Участник Colorado Springs, Team 2-5, Panko Spring 2015

UCCS-PANKO-S15S2G5

3 членов

Автор 10 руководств

0 Комментариев

Добавить комментарий

Просмотр статистики:

За последние 24часов: 1

За последние 7 дней: 4

За последние 30 дней: 8

За всё время: 1,519