Перейти к основному содержанию

Mac mini (2024) Bottom Cover Replacement

Выберете то, что вам нужно

  1. Mac mini (2024) Bottom Cover Replacement, Before you begin: шаг 1, изображение 1 из 2 Mac mini (2024) Bottom Cover Replacement, Before you begin: шаг 1, изображение 2 из 2
    • Fully shut down your Mac mini and unplug all cables from it.

    • Flip over your Mac mini and place it on a clean, flat surface to avoid scratching the chassis.

  2. Mac mini (2024) Bottom Cover Replacement, Create a gap: шаг 2, изображение 1 из 3 Mac mini (2024) Bottom Cover Replacement, Create a gap: шаг 2, изображение 2 из 3 Mac mini (2024) Bottom Cover Replacement, Create a gap: шаг 2, изображение 3 из 3
    • Insert a Jimmy into the gap between the bottom cover and the chassis.

    • Pry up the bottom cover to create a gap.

    • Keep the Jimmy inserted under the bottom cover.

  3. Mac mini (2024) Bottom Cover Replacement, Insert an opening pick: шаг 3, изображение 1 из 3 Mac mini (2024) Bottom Cover Replacement, Insert an opening pick: шаг 3, изображение 2 из 3 Mac mini (2024) Bottom Cover Replacement, Insert an opening pick: шаг 3, изображение 3 из 3
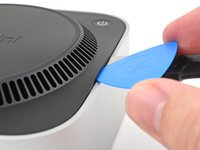
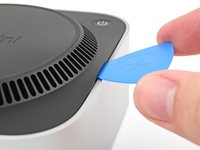
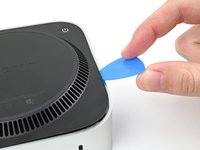
    • Insert an opening pick into the gap created by the Jimmy.

    • Remove the Jimmy.

  4. Mac mini (2024) Bottom Cover Replacement, Release the clips: шаг 4, изображение 1 из 3 Mac mini (2024) Bottom Cover Replacement, Release the clips: шаг 4, изображение 2 из 3 Mac mini (2024) Bottom Cover Replacement, Release the clips: шаг 4, изображение 3 из 3
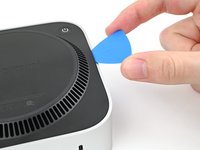
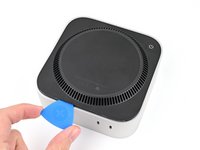
    • Slide the opening pick along the bottom cover until you feel it snag on a clip.

    • There are four clips total—one at each corner of the bottom cover.

    • Twist the pick to lift the clip out of its slot.

  5. Mac mini (2024) Bottom Cover Replacement: шаг 5, изображение 1 из 3 Mac mini (2024) Bottom Cover Replacement: шаг 5, изображение 2 из 3 Mac mini (2024) Bottom Cover Replacement: шаг 5, изображение 3 из 3
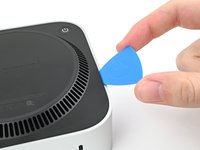
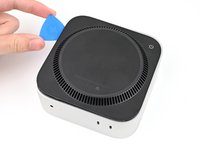
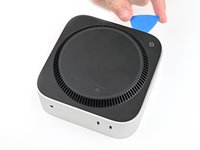
    • Continue sliding and prying with the pick along the perimeter of the bottom cover to release the remaining clips.

    • Don't insert the pick more than an inch when sliding near the power button, as you risk damaging the cable.

    • During reassembly, press along the perimeter of the bottom until you hear and feel all four clips click back into place.

  6. Mac mini (2024) Bottom Cover Replacement: шаг 6, изображение 1 из 2 Mac mini (2024) Bottom Cover Replacement: шаг 6, изображение 2 из 2
    • Don't remove the bottom cover yet, as it's still connected to the Mac mini with a cable.

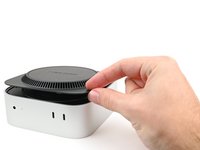
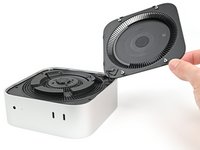
    • Lift the edge of the bottom cover opposite the power button and flip it over to expose the power button cable.

  7. Mac mini (2024) Bottom Cover Replacement, Disconnect the power button: шаг 7, изображение 1 из 3 Mac mini (2024) Bottom Cover Replacement, Disconnect the power button: шаг 7, изображение 2 из 3 Mac mini (2024) Bottom Cover Replacement, Disconnect the power button: шаг 7, изображение 3 из 3
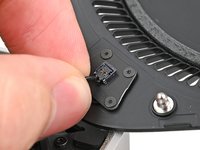
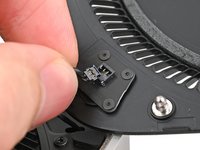
    • Grip the power button cable close to the head and pull it away from its socket to disconnect it.

  8. Mac mini (2024) Bottom Cover Replacement, Remove the bottom cover: шаг 8, изображение 1 из 1
    • Remove the bottom cover.

Заключение

To reassemble your device, follow these instructions in reverse order.

Repair didn’t go as planned? Try some basic troubleshooting, or ask our Mac mini (2024) Answers Community for help.

Alex Diaz-Kokaisl

Участник с: 01/16/22

161 942 Репутация

Автор 769 руководств

Команду

iFixit Участник iFixit

Staff

118 членов

Автор 19 410 руководств

0 Комментариев

Добавить комментарий

Статистика просмотров:

За последние 24 час(ов): 13

За последние 7 дней: 80

За последние 30 дней: 333

За всё время: 1,130