Эта версия возможно содержит некорректные исправления. Переключить на последнюю проверенную версию.
Выберете то, что вам нужно
-
Этот шаг не переведен. Помогите перевести
-
If your MacBook is running Big Sur v11.1 or later, disabling Auto Boot may not work. You can proceed normally, but make sure to disconnect the battery as soon as you're inside.
-
Use a P5 driver to remove the following screws:
-
Two 7.9 mm screws
-
Two 7.1 mm screws
-
Six 2.6 mm screws
-
-
Этот шаг не переведен. Помогите перевести
-
Wedge your fingers between the display and the lower case and pull upward to pop the lower case off the Air.
-
Remove the lower case.
-
-
Этот шаг не переведен. Помогите перевести
-
Peel back the tape covering the battery connector enough to reveal the connector underneath.
-
-
Этот шаг не переведен. Помогите перевести
-
Use a spudger to slide the battery connector parallel to the logic board and out of its socket on the logic board.
-
-
Этот шаг не переведен. Помогите перевести
-
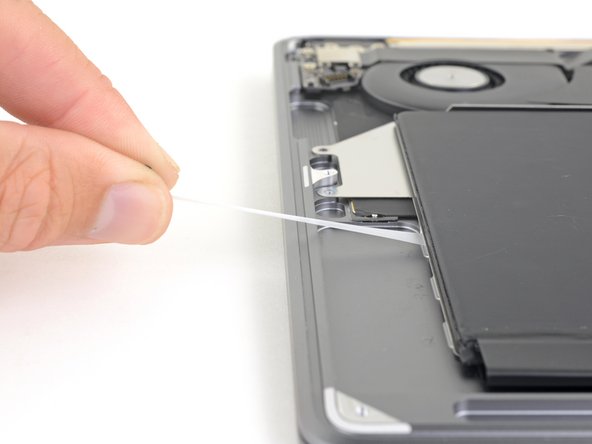
Use a pair of tweezers to lift up the black adhesive pull tab at the bottom of the right speaker, enough so you can grab it with your fingers.
-
Grab the adhesive strip pull tab and slowly and carefully pull the adhesive strip out from under the speaker.
-
If the adhesive strip breaks, leave it in and proceed to the next step.
-
-
Этот шаг не переведен. Помогите перевести
-
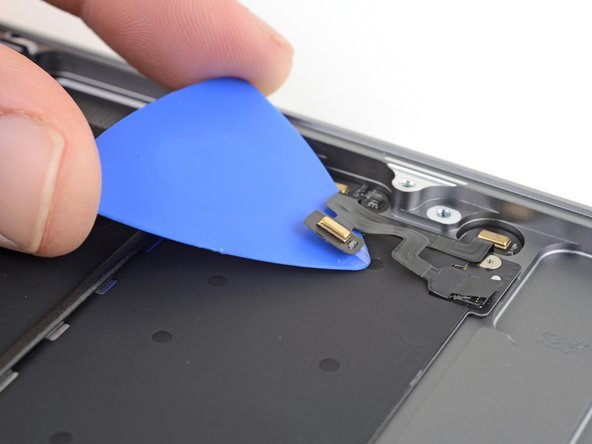
Slide the tip of a spudger underneath the right speaker cable and pry straight up to disconnect the speaker.
-
-
Этот шаг не переведен. Помогите перевести
-
Use tweezers to lift the adhesive pull tab at the top of the right speaker enough that you can grab it with your fingers.
-
Grab the adhesive strip pull tab and slowly and carefully pull the adhesive strip out from under the speaker.
-
Apply heat to the speaker to soften the adhesive underneath.
-
Carefully slide a spudger or opening pick underneath the speaker to separate the adhesive.
-
-
Этот шаг не переведен. Помогите перевести
-
Lift the right speaker straight up from the bottom and remove it.
-
-
Этот шаг не переведен. Помогите перевести
-
Use a pair of tweezers to lift up the black adhesive pull tab at the bottom of the left speaker, enough so you can grab it with your fingers.
-
Grab the adhesive strip pull tab and slowly and carefully pull the adhesive strip out from under the speaker.
-
If the adhesive strip breaks, leave it in and proceed to the next step.
-
-
Этот шаг не переведен. Помогите перевести
-
Slide the tip of a spudger underneath the left speaker cable and pry straight up to disconnect the speaker.
-
With the connector disconnected, slide the flat end of a spudger under the cable to separate the adhesive securing the cable to the logic board.
-
-
Этот шаг не переведен. Помогите перевести
-
Use tweezers to lift the adhesive pull tab at the top of the left speaker enough that you can grab it with your fingers.
-
Grab the adhesive strip pull tab and slowly and carefully pull the adhesive strip out from under the speaker.
-
Apply heat to the speaker to soften the adhesive underneath.
-
Carefully slide a spudger or opening pick underneath the speaker to separate the adhesive.
-
-
Этот шаг не переведен. Помогите перевести
-
Lift the left speaker straight up from the bottom and remove it.
-
-
Этот шаг не переведен. Помогите перевести
-
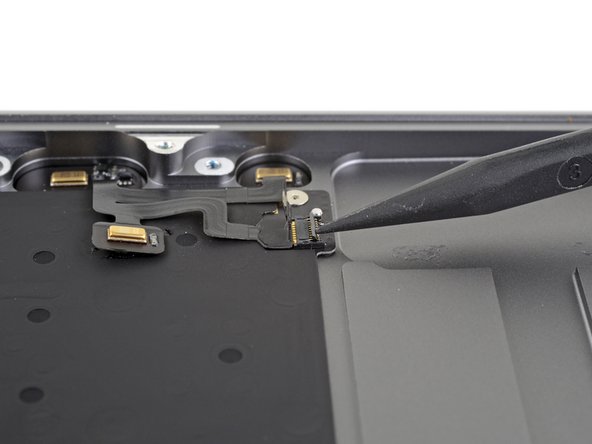
Slide the tip of a spudger underneath the speaker cable and pry straight up to disconnect the speaker.
-
-
Этот шаг не переведен. Помогите перевести
-
Use a T3 Torx driver to remove the three 1.4 mm screws securing the audio board cable bracket.
-
Remove the cable bracket.
-
-
Этот шаг не переведен. Помогите перевести
-
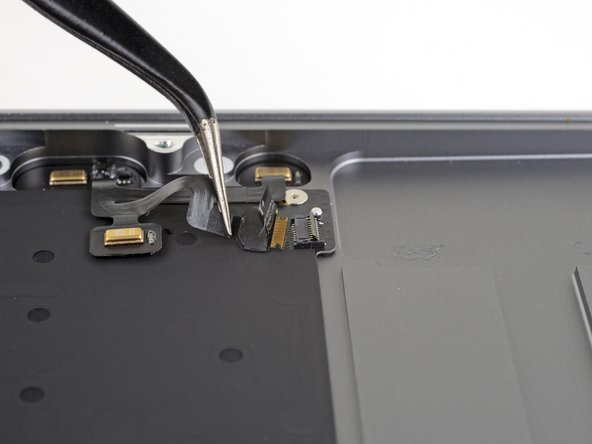
Use the flat end of a spudger to pry the audio board connector straight up and disconnect it.
-
-
Этот шаг не переведен. Помогите перевести
-
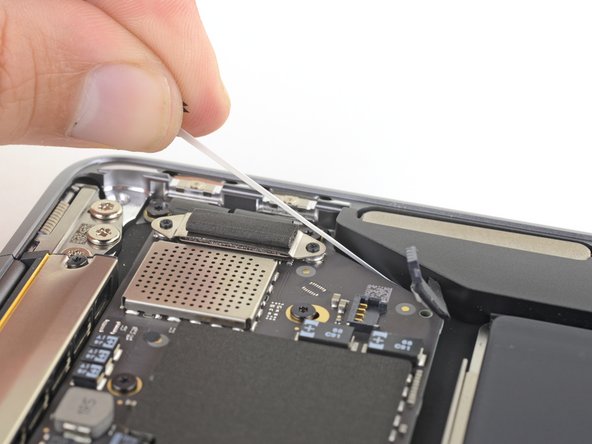
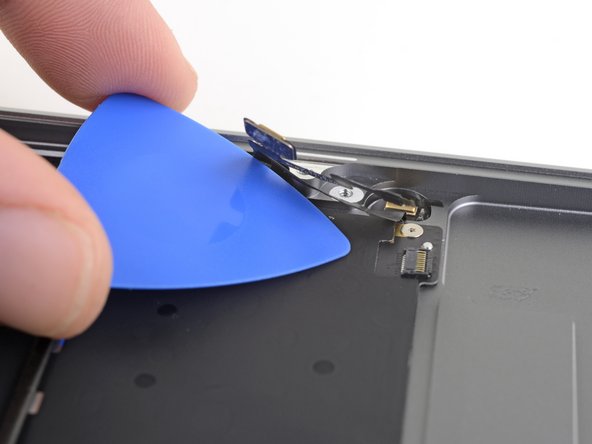
Use the flat end of a spudger to pry the Touch ID sensor connector straight up and disconnect it.
-
-
Этот шаг не переведен. Помогите перевести
-
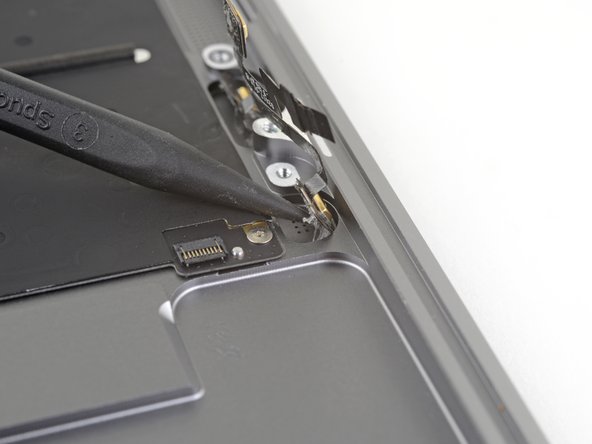
Remove the following screws:
-
Two 4.3 mm, T5 Torx screws
-
One 2.4 mm, T3 Torx screw
-
-
Этот шаг не переведен. Помогите перевести
-
Slide the flat end of a spudger underneath the Touch ID sensor cable to slice through the adhesive securing it to the audio board.
-
-
Этот шаг не переведен. Помогите перевести
-
Peel back the black tape covering the fan cable connector.
-
-
Этот шаг не переведен. Помогите перевести
-
Use the tip of a spudger to lift up the locking flap on the fan cable's ZIF connector.
-
Slide the fan cable out of the ZIF connector.
-
-
-
Этот шаг не переведен. Помогите перевести
-
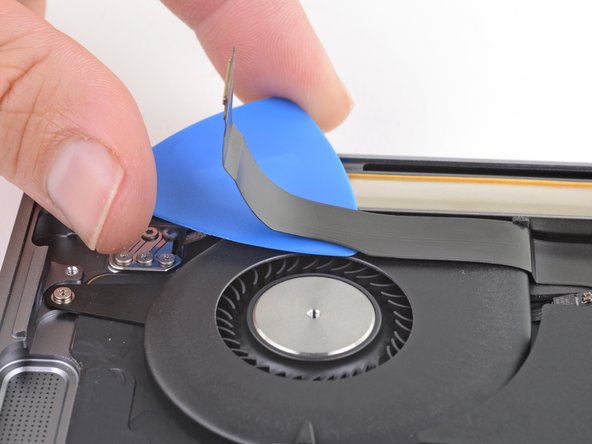
Slide an opening pick under the audio board cable to slice through the adhesive securing it to the fan.
-
-
Этот шаг не переведен. Помогите перевести
-
Use a T5 Torx driver to remove the three 2.7 mm screws securing the fan.
-
-
Этот шаг не переведен. Помогите перевести
-
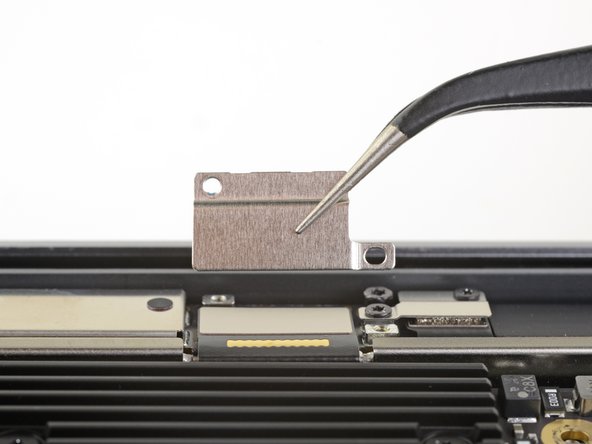
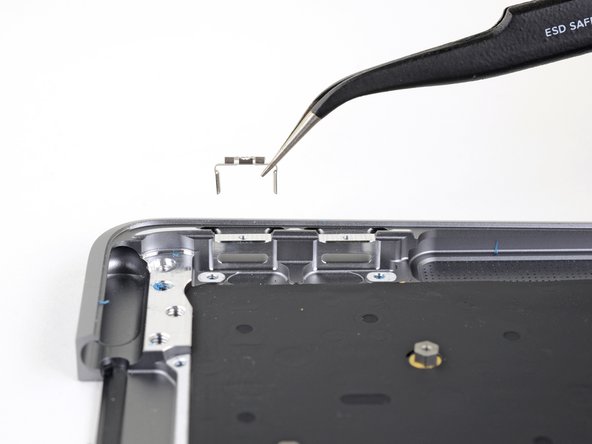
Use a T3 Torx driver to remove the two 1.4 mm screws securing the antenna cable bracket.
-
Remove the antenna cable bracket.
-
-
Этот шаг не переведен. Помогите перевести
-
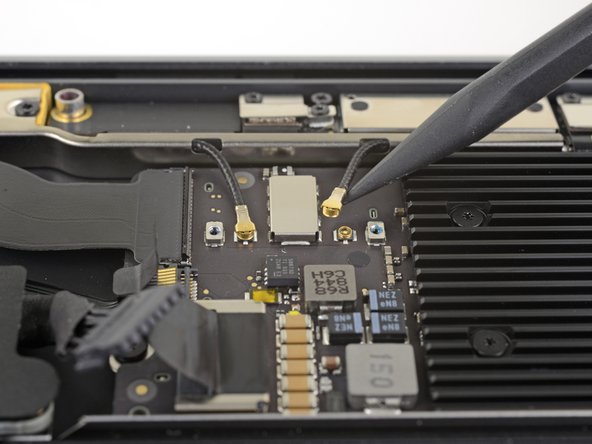
Insert the point of a spudger under one of the antenna cables close to the connector.
-
Pry straight up to disconnect the cable.
-
Repeat for the other antenna cable.
-
-
Этот шаг не переведен. Помогите перевести
-
Use a T3 Torx driver to remove the two 1.5 mm screws securing the display cable connector bracket.
-
Remove the display cable connector bracket.
-
-
Этот шаг не переведен. Помогите перевести
-
Use the flat end of a spudger to pry up the display cable connector.
-
-
Этот шаг не переведен. Помогите перевести
-
Use a T5 Torx driver to remove the following screws:
-
Four 7.4 mm screws
-
Two 4.5 mm screws
-
-
Этот шаг не переведен. Помогите перевести
-
Lift the antenna bar straight up and out of the case. Take care not to snag the antenna bar on any cables or connectors.
-
Remove the antenna bar.
-
-
Этот шаг не переведен. Помогите перевести
-
Use a T9 Torx driver to remove the six 4.9 mm screws securing the display hinges to the upper case.
-
-
Этот шаг не переведен. Помогите перевести
-
With the MacBook still screen-side down, carefully lift the upper case to open the MacBook as far as possible.
-
-
Этот шаг не переведен. Помогите перевести
-
Lift the MacBook and carefully rotate the display to a 90 degree angle with the upper case.
-
Keeping the display at a 90 degree angle with the case, move the display straight down while holding the case still, so that the hinges slide out the bottom of the case.
-
-
Этот шаг не переведен. Помогите перевести
-
Use a T3 Torx driver to remove the six 1.6 mm screws securing the Touch ID sensor and its bracket.
-
Remove the Touch ID bracket.
-
-
Этот шаг не переведен. Помогите перевести
-
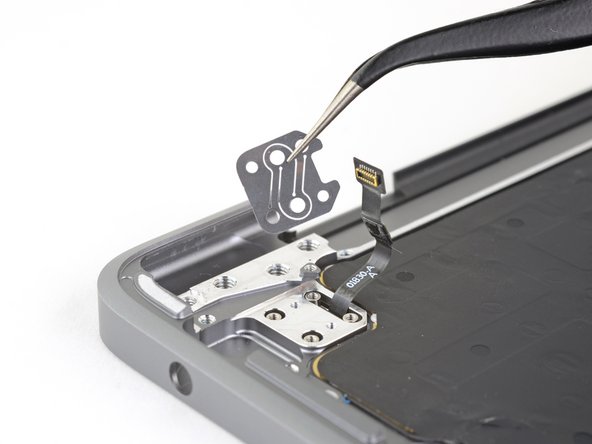
Turn the MacBook right-side up and open the display.
-
Lift the Touch ID sensor sensor out of its recess and remove it.
-
-
Этот шаг не переведен. Помогите перевести
-
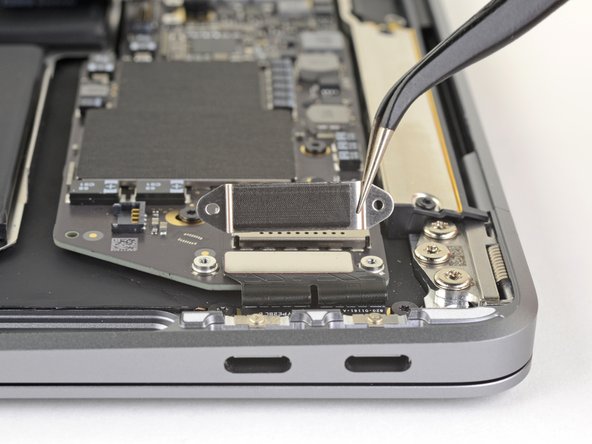
Use a T3 Torx driver to remove the two 1.4 mm screws securing the USB-C connector bracket.
-
Remove the USB-C connector bracket.
-
-
Этот шаг не переведен. Помогите перевести
-
Use the flat end of a spudger to pry the USB-C cable connector up and out of its socket on the logic board.
-
-
Этот шаг не переведен. Помогите перевести
-
Use a T4 Torx driver to remove the two 2.9 mm screws securing the USB-C board.
-
-
Этот шаг не переведен. Помогите перевести
-
Use a T3 Torx driver to remove the two 1.4 mm screws securing the trackpad connector bracket.
-
Remove the trackpad connector bracket.
-
-
Этот шаг не переведен. Помогите перевести
-
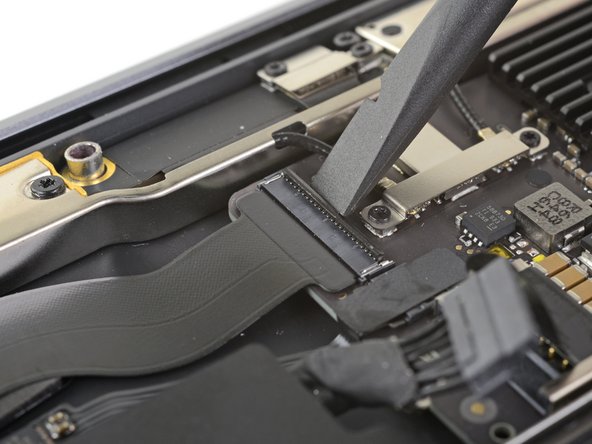
Use the flat end of a spudger to pry the trackpad cable connector up and out of its socket.
-
-
Этот шаг не переведен. Помогите перевести
-
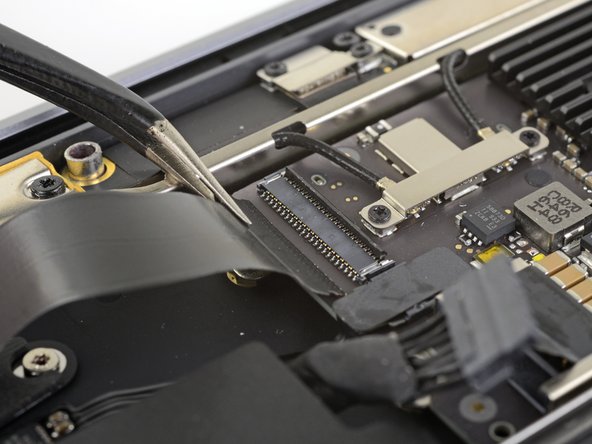
Use a spudger to lift up the small locking flap on the sound board cable's ZIF connector.
-
Slide the sound board cable out of the ZIF connector.
-
-
Этот шаг не переведен. Помогите перевести
-
Use a T5 Torx driver to remove the following screws:
-
One 5.5 mm screw
-
Three 2.6 mm screws
-
Two 1.9 mm screws
-
-
Этот шаг не переведен. Помогите перевести
-
Carefully slide an opening pick under the trackpad cable to separate the adhesive securing it to the upper case.
-
-
Этот шаг не переведен. Помогите перевести
-
Use the flat end of a spudger to lift the small locking flap on the trackpad ZIF connector.
-
Slide the trackpad cable straight out of its connector.
-
-
Этот шаг не переведен. Помогите перевести
-
Carefully slide an opening pick under the trackpad cable to separate the adhesive securing it to the battery.
-
-
Этот шаг не переведен. Помогите перевести
-
Use a T5 Torx driver to remove the following screws securing the trackpad:
-
One 3.2 mm screw
-
Eight 3.1 mm screws
-
-
Этот шаг не переведен. Помогите перевести
-
With the laptop still lying screen-side down, carefully open the laptop. The trackpad will stay sitting on the display.
-
Remove the trackpad from the MacBook. Take care not to scratch the display.
-
-
Этот шаг не переведен. Помогите перевести
-
Use the flat end of a spudger to lift the small locking flap on the trackpad's ZIF connector.
-
Slide the trackpad cable straight out of the ZIF connector.
-
-
Этот шаг не переведен. Помогите перевести
-
Use a T3 Torx driver to remove four 2.5 mm screws securing the battery.
-
-
Этот шаг не переведен. Помогите перевести
-
Use a pair of tweezers to lift up the black adhesive pull tab on the side of the battery, enough so you can grab it with your fingers.
-
Grab the adhesive strip pull tab and slowly and carefully pull the adhesive strip out from under the battery.
-
If the adhesive strip breaks, leave it in and proceed to the next step.
-
-
Этот шаг не переведен. Помогите перевести
-
Repeat the previous step to remove the next two adhesive strips on the same side of the battery.
-
If any adhesive strips break, leave them in and proceed to the next step.
-
-
Этот шаг не переведен. Помогите перевести
-
Repeat the previous two steps to remove the three adhesive strips on the other side of the battery.
-
Carefully drip isopropyl alcohol along either edge of the battery, in the recessed part of the upper case, where the adhesive pull tabs were.
-
Let the alcohol soak into the adhesive for a minute or two.
-
Use opening picks to gently pry the battery away from the upper case.
-
-
Этот шаг не переведен. Помогите перевести
-
Remove the battery.
-
Calibrate your newly installed battery: charge it to 100%, and keep charging it for at least 2 more hours. Unplug and use it normally to drain the battery. When you see the low battery warning, save your work, and keep your laptop on until it goes to sleep due to low battery. Wait at least 5 hours, then charge your laptop uninterrupted to 100%.
-
-
Этот шаг не переведен. Помогите перевести
-
Slide an opening pick under the microphone farthest away from the edge of the case to slice through the adhesive securing it to the upper case.
-
-
Этот шаг не переведен. Помогите перевести
-
Use the point of a spudger to lift the small locking flap on the microphone's ZIF connector.
-
Slide the microphone cable straight out of the ZIF connector.
-
-
Этот шаг не переведен. Помогите перевести
-
Slide an opening pick under the rest of the microphone assembly cable to separate it from the adhesive securing it to the upper case.
-
-
Этот шаг не переведен. Помогите перевести
-
Use the point of a spudger to carefully pry one of the microphones out of its recess in the upper case.
-
-
Этот шаг не переведен. Помогите перевести
-
Use the point of a spudger to carefully pry the other microphone out of its recess in the upper case.
-
-
Этот шаг не переведен. Помогите перевести
-
Use a P2 pentalobe driver to remove the two 1.1 mm screws securing the USB-C port brackets.
-
-
Этот шаг не переведен. Помогите перевести
-
Lift the USB-C port brackets out of their recesses in the upper case and remove them.
-
Compare your new upper case to your old one and transfer over any remaining parts.
-


Отменить: Я не выполнил это руководство.
4 участников успешно повторили данное руководство.

2 Комментариев
Saw one for cheap with a bad keyboard and battery. I think I'm gonna pass lmao
When reassembling the device, what does one do about all of the removed adhesive? Is it reusable, or is there some kind of recommended replacement material?