Введение
This guide contains instructions for using the old-style iFixit adhesive remover with separate bottle and syringe, which is no longer sold. For the updated version, click here.
Use this guide to remove the glued-in battery from your MacBook Pro. This is best done with the help of an iFixit battery replacement kit; the liquid adhesive remover in your kit will dissolve the adhesive securing the battery, allowing you to remove it with ease. Alternatively, you can use an iOpener to apply a modest amount of heat in order to soften the adhesive before prying out the battery.
iFixit adhesive remover is highly flammable. Perform this procedure in a well-ventilated area. Do not smoke or work near an open flame during this procedure.
For your safety, drain your MacBook Pro's battery before you begin this procedure. A charged lithium-ion battery can create a dangerous and uncontrollable fire if accidentally punctured.
Note: The solvent used to dissolve the battery adhesive can damage certain plastics, such as the MacBook Pro's plastic speaker enclosures. Take care when applying the solvent.
Выберете то, что вам нужно
-
Инструмент, используемый на этом этапе:Magnetic Project Mat$19.95
-
Remove the following ten screws securing the lower case to the upper case:
-
Two 2.3 mm P5 Pentalobe screws
-
Eight 3.0 mm P5 Pentalobe screws
-
-
-
Wedge your fingers between the upper case and the lower case.
-
Gently pull the lower case away from the upper case to remove it.
-
-
-
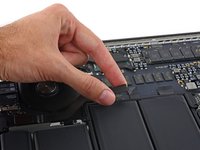
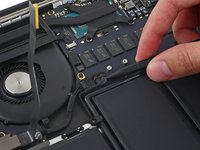
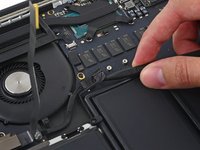
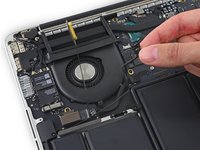
Use the flat end of a spudger to lift the battery connector straight up out of its socket on the logic board.
-
-
-
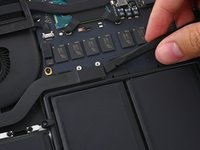
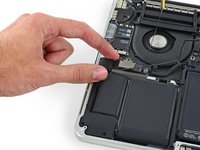
Remove the two 2.1 mm T5 Torx screws securing the logic board end of the I/O board cable bracket.
-
-
Инструмент, используемый на этом этапе:Tweezers$4.99
-
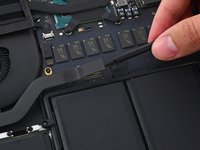
Grasp the I/O board cable bracket with a pair of tweezers and remove it from the MacBook.
-
-
-
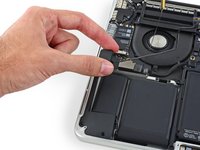
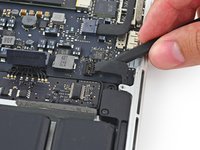
Use the flat end of a spudger to pop the I/O board connector straight up off its socket on the logic board.
-
-
-
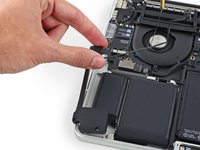
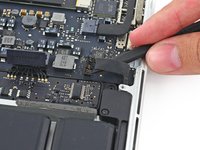
Lift the logic board end of the I/O board cable straight up to bend it out of the way.
-
-
-
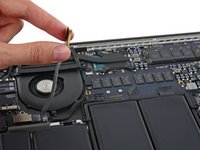
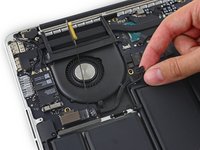
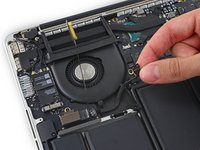
Carefully tuck the tip of a spudger under the right speaker cable near the connector and lift it up out of its socket on the logic board.
-
-
-
-
Remove the following screws securing the right speaker to the upper case:
-
One 5.7 mm T5 Torx screw
-
One 6.5 mm T5 Torx screw
-
One 3.8 mm T5 Torx screw
-
-
-
Insert the tip of a spudger under the left speaker cable near the connector and lift it up out of its socket on the logic board.
-
-
-
Remove the following screws securing the left speaker to the upper case:
-
One 5.7 mm T5 Torx screw
-
One 6.5 mm T5 Torx screw
-
One 3.8 mm T5 Torx screw
-
-
-
Lift the corner of the left speaker up and slide it out around the battery to remove it from the upper case.
-
-
-
Remove the five 3.7 mm T5 Torx screws securing the battery to the upper case.
-
-
-
To protect your display, place a sheet of aluminum foil between the display and keyboard and leave it there while you work.
-
-
-
Alternatively, if you are using the hot iOpener method, skip the following three steps.
-
Wear eye protection when handling and applying the adhesive remover. (Eye protection is included in your kit.)
-
Do not wear contact lenses without eye protection.
-
Protective gloves are also included in your kit. If you are concerned about skin irritation, put your gloves on now.
-
-
-
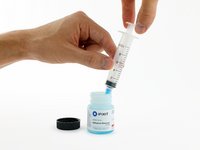
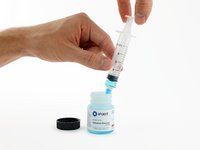
Open your container of adhesive remover.
-
Fill the syringe included in your kit with a small amount (approximately 1-2 milliliters) of adhesive remover.
-
Refill your syringe as needed throughout the rest of this procedure.
-
-
-
Apply a small amount of adhesive remover (approximately 1 ml) evenly under the edge of the rightmost battery cell.
-
Wait 2-3 minutes for the liquid adhesive remover to penetrate underneath the battery cell before you proceed to the next step.
-
-
-
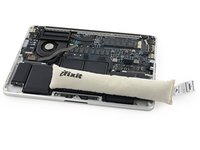
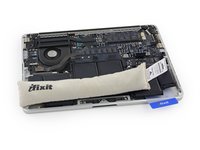
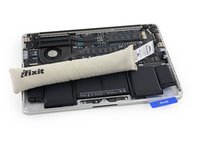
Use the hot iOpener to cover half of the two right-most battery cells.
-
After about a minute, reheat the iOpener and move it to cover the other half of the right-most battery cells.
-
-
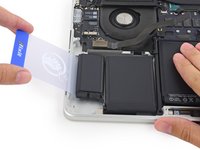
Инструмент, используемый на этом этапе:Plastic Cards$2.99
-
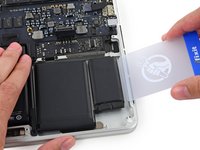
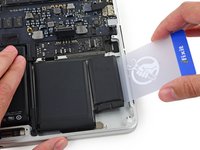
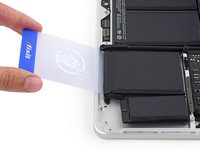
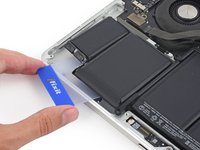
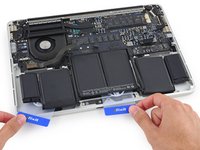
Push a plastic card between the right-most battery cell and the upper case, cutting the adhesive between the two.
-
When using the hot iOpener method, if you encounter significant resistance to prying, stop and use the iOpener to reheat the section you're working on.
-
-
-
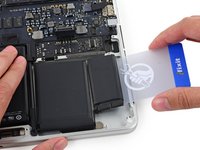
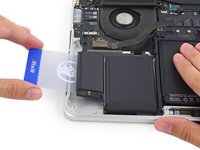
Repeat this procedure with the adjacent battery cell:
-
Apply a small amount (about 1 ml) of liquid adhesive remover under the battery cell, and wait 2-3 minutes for it to penetrate and soften the adhesive.
-
Alternatively, re-heat this section with your iOpener if needed.
-
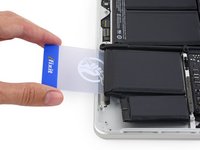
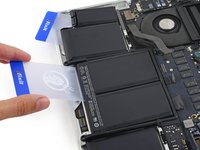
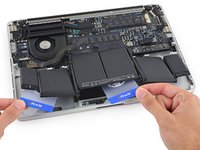
Push a plastic card about an inch between the battery cell and the upper case, and slowly pry the cell up to separate all of the adhesive.
-
-
-
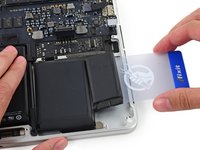
Temporarily leave your plastic card underneath the two rightmost battery cells to prevent them from re-adhering to the upper case.
-
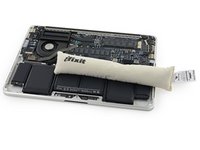
If using an iOpener, reheat it and reapply it, this time to the left-most battery cells.
-
-
-
Repeat the above procedure to separate the two leftmost battery cells from the upper case.
-
Remember to apply a small amount (about 1 ml) of adhesive remover to each battery cell, and wait 2-3 minutes for it to penetrate and soften the adhesive.
-
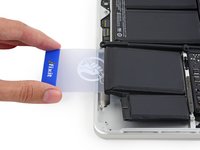
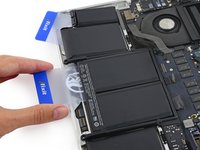
Use a second plastic card to separate the two leftmost battery cells from the upper case.
-
-
-
To separate the adhesive securing the final two, middle battery cells, apply another 1 milliliter or so of liquid adhesive remover (or your iOpener) to each cell.
-
It may help to elevate one side of your MacBook Pro a few inches so that the adhesive remover flows in the correct direction, underneath the battery cells. You can use a sturdy book or foam block to prop up one side of your MacBook Pro while you work.
-
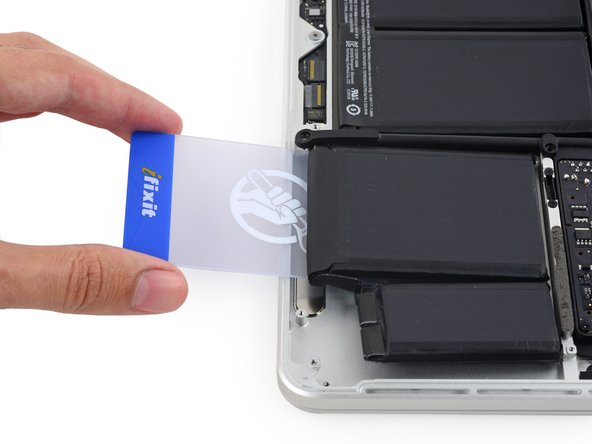
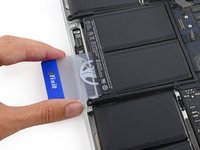
Insert the card about an inch between the left-center battery cell and the upper case, separating the adhesive between the cell and the case.
-
-
-
Pull the card back out and insert it about an inch between the right-center battery cell and the upper case, separating the adhesive between the cell and case.
-
-
-
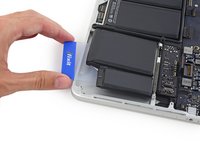
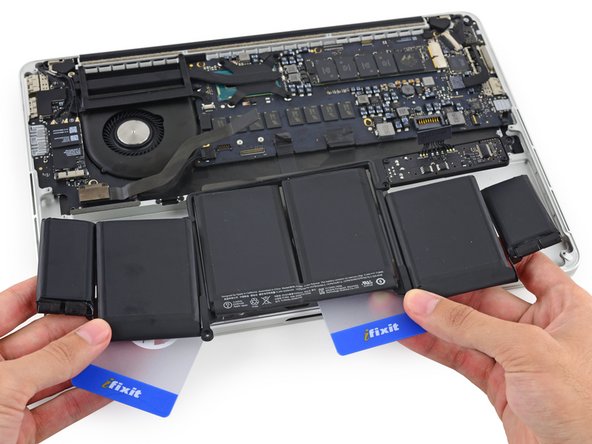
Pry up on the two center cells to separate the last of the adhesive and lift the battery from the device.
-
-
-
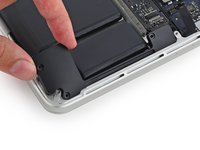
Remove the battery.
-
With a little luck, you can slowly pull out each strip of adhesive with your fingers.
-
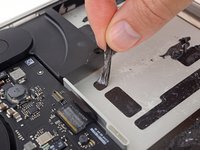
Otherwise, soak each section of adhesive with a bit of adhesive remover for 2-3 minutes, and then scrape it out with an opening pick or one of the other tools in your kit. This can take quite a bit of work, so be patient.
-
Mop up any remaining adhesive remover and give your MacBook Pro a few minutes to air dry.
-
Calibrate your battery before using it: allow it to drain overnight, then charge it to 100% and drain it again until your MacBook Pro shuts down automatically. Charge it again and use it normally.
-


To reassemble your device, follow these instructions in reverse order.
To reassemble your device, follow these instructions in reverse order.
Отменить: Я не выполнил это руководство.
2 человек успешно провели ремонт по этому руководству.

